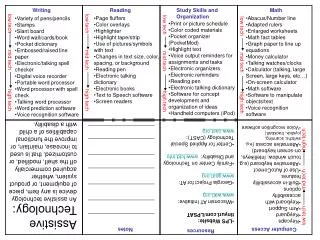
Teaching Tech
This guide, created by Kim Klein and J. Muffy Pacey in Spring 2001, provides essential shortcuts for Mac applications, including commands like exiting, saving, copying, and printing. It also covers how to insert graphics, manage emails, and utilize networked printers. Users will learn to check emails, add contacts to address books, and effectively save documents to servers. The content is aimed at enhancing productivity and streamlining computer usage in educational settings.

Teaching Tech
E N D
Presentation Transcript
Teaching Tech By: Kim Klein & J. Muffy Pacey EdPsy OL399 Spring 2001 Tom Anderson, Instructor
Apple Shortcuts � is the Open Apple or Command Key To Exit an application �Q To Save an Application�S To Close a Window�W To Copy text or graphics�C To Paste text or graphics �V To Print a document�P
Find New Apple Shortcuts • Click on a Menu • Menu Bar • To the right of the choices, you will see the shortcut symbols. • Use the or the � key with the letter shown for the shortcut.
Insert A Graphic • Open a word processing application such as AppleWorks or Microsoft Word.
Insert A Graphic • Open an internet browser application such as Netscape Communicator or Internet Explorer.
Insert A Graphic • Search for a graphic in the internet browser application. • Place the arrow over the graphic. • Hold the mouse down until a gray dialog box appears. • Click on Copy Image.
Insert A Graphic • Return to the word processing application by clicking on the application menu in the upper right corner of the screen and dragging the mouse to the desired application. • Once your document appears you are ready to paste your image. • Go to Edit • Click on paste. • Your picture or clipart should appear in your document.
Choose a Networked Printer from the Chooser • Click the Apple Menu • Click the Chooser • Click LaserWriter 8
Choose a Networked Printer • Double Click on the printer you want to use. • Click Setup If you get the box below click OK
Email • To check your mail click • Get Messages • To write a new message click new message
Email • The Trash and Sent Messages Folder should be emptied every few weeks. • To empty Sent Messages • Double click on the Sent Messages folder • Highlight the messages you want to delete. • Click the delete button • To empty the Trash • Click the menu • Empty Trash Folder
Add an address to the Address Book • Click the Communicator Menu • Click Address Book • Click New Card
Add an address to the Address Book • Fill in the information • First Name, Email, and Display • Name are required • Other information is optional • Click OK
Use an address from the Address Book • Click the Address Button in a new message • Click through the list of addresses • Click the Name of the person you want to email • Click OK You can click more than one person on the list to email a group of people
Open a Server Folder • Click • Click the Chooser • Double Click AppleShare • Double Click Romona Server • OR • Click Romona Server and click OK
Server • Type in your User Name • Type in your Password • Click Connect If you do not remember your User Name or Password, see Muffy • To open your personal folder • Click your User Name • Click OK • To open the Romona folder • Click Romona • Click OK
Server • Your Server will appear on the desktop. • Double Click to open • Double Click your folder to open files or documents.
Email • Locate the “Groupwise” icon on your desktop or launcher. • Double click to open
Email • Type in User ID (Last name and first initial). • Type in Password • Click “Log In”
Email • Messages should appear at Log In. Be sure “Mailbox” icon on left side of screen is selected. • To read a message, double click on the envelope icon.
Add an address to the Address Book • Click Tools Menu • Click Address Book • Click Add New
Add an address to the Address Book • Fill in information • First Name, Email address, and Display Name are required • Other information is optional • Click “OK”
Use an address to the Address Book • Click the address Button in a new message • Click through the list of addresses • Double Click the name of the person you want to email • Click OK
Saving To The Server • Go to File, then drag the mouse to “Save As…” • Desktop should appear in the gray box at the top of the screen. (Use arrows on right side to change what appears in the box.) • Click on MLMC.VOL1 alias. • Type the name of your document in the box at the very bottom of the screen. • Click Open.
Saving To The Server VERY IMPORTANT… The following boxes must be filled in as listed below: • Context: Mstaff.Madison (Use arrows on right side to change what appears in the box.) • Name: Your Name consists of your last name and first initial. • Enter Password. • Click Login
Saving To The Server • MLMC.VOL1 should appear in the gray box at the top of the screen. • Double-click Users Folder to open.
Saving To The Server • The Users Folder should appear in the gray box at the top of the screen. • Double-click folder with your name.
Saving To The Server • Click save to place your document in your personal folder.
Saving To The Server • The name of your document should appear in the gray bar at the top of the page.
Opening Files Saved On Server • Open the word processing application. • Go to File, then drag your mouse to “Open…” • Desktop should appear in the gray box at the top of the screen. (Use arrows on right side to change what appears in the box.) • Double click on MLMC.VOL1 alias, or click Open.
Opening Files Saved On Server • Log In to the Network.
Opening Files Saved On Server • Double click User’s Folder to open.
Opening Files Saved On Server • Double click folder with your name to open.
Opening Files Saved On Server • Use the arrows on the right side of the screen to scroll and find your document. • Double click to open.
Opening Files Saved On Server • Your document will open.