Download
1 / 32
320 likes | 422 Vues
Learn to work with namespaces in XML documents, avoid name collisions, and apply namespaces to elements and attributes for structured data.

E N D
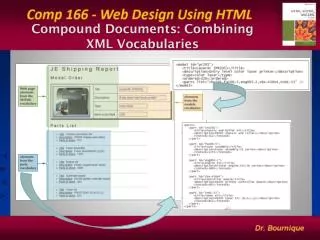
Working with Namespaces Combining XML Vocabularies in a Compound Document
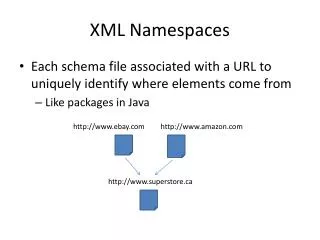
Combining XML Vocabularies • A document that combines several vocabularies is known as a compound document
Working with Namespaces • Name collision occurs when elements from two or more documents share the same name. • Name collision is not a problem if you are not concerned with validation. The document content only needs to be well-formed. • However, name collision will keep a document from being validated.
Name Collision This figure shows name collision
Declaring a Namespace • A namespace is a defined collection of element and attribute names. • Names that belong to the same namespace must be unique. Elements can share the same name if they reside in different namespaces. • Namespaces must be declared before they can be used.
Declaring a Namespace • A namespace can be declared in the prolog or as an element attribute. The syntax for an attribute used to declare a namespace in the prolog is: xmlns:prefix=“URI” • Where URI is a Uniform Resource Identifier that assigns a unique name to the namespace, and prefix is a string of letters that associates each element or attribute in the document with the declared namespace.
Declaring a Namespace • For example, <mode1 xmlns:mod=http://jacksonelect.com/models> • Declares a namespace with the prefix “mod” and the URI http://jacksonelect.com/models • The URI is not a Web address. A URI identifies a physical or an abstract resource.
URIs, URLs, and URNs • A physical resource is a resource one can access and work with such as a file, a Web page, or an e-mail address. A URL is one type of URI. • An abstract resource is one that doesn’t have any physical existence, the URI is used as an identifier or an ID.
URIs, URLs, and URNs • A proposed type of URI is the URN or Universal Resource Name. A URN is a persistent resource identifier, meaning the user need only know the name of a resource. An agency would then retrieve a copy of the resource independent of its location. • URNs take the form: urn:NID:NSS
Applying a Namespace to an Element • Once it has been declared and its URI specified, the namespace is applied to elements and attributes by inserting the namespace prefix before each element name that belongs to the namespace. <prefix:element> content </prefix:element> • Here, prefix is the namespace prefix and element is the local part of the element name.
Applying a Namespace to an Element • Prefixed names are called qualified names and an element name without a namespace prefix is called an unqualified name. • Qualified names can be added to a document using code entered directly into the document. • However, the more common way is to add the xmlns attribute to an element.
Declaring a Namespace as an Element Attribute • The syntax is: xmlns:prefix=“URI” • Where prefix and URI are the prefix and URI for the namespace.
Declaring a Namespace as an Element Attribute • For example, the code: <mod:model xmlns:mod="http://jacksonelect.com/models"> <mod:title>Laser4C (PR205)</mod:title> <mod:description>Entry level color laser printer</mod:description> <mod:type>color laser</mod:type> <mod:ordered>320</mod:ordered> <mod:parts list="chx201,fa100-5,eng005-2,cbx-450V4,tn01-53" /> </mod:model>
Declaring a Namespace as an Element Attribute • …applies the namespace http://jacksonelect.com/models namespace to the model element and all of its child elements. • While the “mod” prefix was only added to the model element name, the XML parser considers the other elements parts of the model namespace and they inherit the namespace.
Declaring a Namespace as an Element Attribute • They are unqualified elements, though, because they lack a namespace prefix. • Declaring a namespace by adding it as an attribute of the document’s root element places all elements in the namespace. • All elements thus are children of the root element.
Declaring a Default Namespace • You can specify a default namespace by omitting the prefix in the namespace declaration. • The element containing the namespace attribute and all of its child elements are assumed to be part of the default namespace.
Using Namespaces with Attributes • Attributes, like elements, can become qualified by adding the namespace prefix to the attribute name. For example, <element xmlns=“uri”> content</element>
Using Namespaces with Attributes • No element may contain two attributes with the same name. • No element may contain two qualified attribute names with the same local part, pointing to identical namespaces, even if the prefixes are different.
Adding a Namespace to a Style Sheet: Declaring a Namespace • To declare a namespace in a style sheet, you add the following rule to the style sheet file @namespace prefix url(uri); Where prefix is the namespace previx and uri is the URI of the namespace • Example: @namespace mod url(http://jacksonelect.com/models)
Applying a Namespace to a Selector • Once you’ve declared a namespace in a style sheet, you can associate selectors with that namespace using the syntax: prefix|selector {attribute1:value1; attribute2:value2;…} • For example: mod|title {width: 150px} • You also can use the wildcard symbol (*) to apply a style to any element within a namespace or to elements across different namespaces
Defining Namespaces with the Escape Character • Not all browsers support the use of the @namespace rule • A proposal implement in the Internet Explorer browser was to insert the backslash escape character before the namespace prefix in CSS style sheets: prefix\:selector {attribute1:value1; attribute2:value2;…} • Browsers like Firefox, Opera, and Netscape do not support this method with XML documents
Declaring and Applying a Namespace in a Style Sheet • To declare a namespace in a CSS style sheet, add the following rule before any style declarations: @namespace prefix url(uri); where prefix is the namespace prefix and uri is the namespace URI. If no prefix is specified, the namespace URI is the default namespace for selectors in the style sheet. • To apply a namespace to a selector, use the form prefix|selector {attribute1:value1; attribute2:value2; ...} where prefix is the namespace prefix and selector is a selector for an element or group of elements in the document. • For Internet Explorer browsers, use the following form to apply a namespace to a selector: prefix\:selector {attribute1:value1; attribute2:value2; ...}
Combining Standard Vocabularies • Standard vocabularies may be combined within single documents
Adding the Elements of the Parts Vocabulary • Return to the order.xml file in your text editor. • Copy the parts element from the parts namespace, including all of the elements and contents it contains. • Return to the report.htm file in your text editor and paste the copied elements directly below the h2 heading “Parts List.” • Add the following attribute to the opening <html> tag: xmlns:pa="http://jacksonelect.com/parts" • Below the link element that links the report.htm file to the report.css style sheet, insert the following link element: <link rel="stylesheet" href="parts.css" type="text/css" /> • Save the changes and open the report.htm file in your Web browser
Describing the Items in the Parts List • Return to the report.htm file in your text editor. • Scroll down to the first title element in the parts namespace. Directly after the opening <pa:title> tag, insert the text <span>Title</span> • Directly after the opening <pa:description> tag in the next line, insert the text <span>Description</span> • Directly after the opening <pa:instock> tag in the following line, insert the text <span>Parts in Stock</span> • Repeat the previous 3 steps, as necessary
Adding Elements from the Models Vocabulary • Return to the report.htm file in your text editor and add the following namespace declaration to the opening <html> tag: xmlns:mod="http://jacksonelect.com/models" • Add the following link to the document’s head: <link rel="stylesheet" href="model.css" type="text/css" /> • In the table cell directly after the Title table heading, insert the element <mod:title>Laser4C (PR205)</mod:title>
Adding Elements from the Models Vocabulary • In the table cell directly after the Description table heading, insert the element <mod:description>Entry level color laser printer</mod:description> • In the table cell directly after the Type table heading, insert the element <mod:type>color laser</mod:type> • In the table cell directly after the “Items to be Built” table heading, insert the element <mod:ordered>320</mod:ordered>