Streamlining Sales Order Processes in eRecycleSoft for Efficient Customer Management
180 likes | 289 Vues
This guide outlines the step-by-step process of creating and managing sales orders within eRecycleSoft. Learn how to add a new customer's sales order, select inventory from a designated warehouse, and ensure effective inventory reservation based on customer orders. Discover the importance of freight payment status, employee selection for sales, and the handling of partial skids when exact inventory amounts are unavailable. Gain insights into recording payments, creating credit memos, and customizing invoice forms for branding. Simplify your sales process and improve customer satisfaction.

Streamlining Sales Order Processes in eRecycleSoft for Efficient Customer Management
E N D
Presentation Transcript
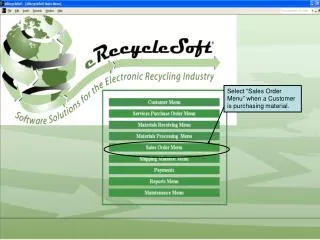
Select “Sales Order Menu” when a Customer is purchasing material.
Select “Add eRecycleSoft Sales Order” when creating a new Customer sales order.
We have entered the information for the Customer - Good To Go (GTG). We are shipping from the “AUS1” warehouse (we sell from only one warehouse per Sales Order). They have a Customer Type of “Products Buyer” and a shipping date of “6/9/2009”. This automatically brings up the “Bill To” and “Ship To” address information from the Customer. We then select the employee responsible for selling the material (Note this may be different than the Customer’s Sales Rep, this allows for commission sharing). We also entered the Freight Payment Status as “Pre-Paid”.
We have entered the first item the customer has requested “A/C Adapters”. They wish to purchase approximately 1150 lbs. After the “Product Description” is selected the “Qty In Inventory” is populated with the available inventory not reserved for sale. Inventory is reserved when selected from the “Review/Select Available Inventory” screen. Here we see 5870 lbs. available. We push the “Review/Select Available Inventory” button and navigate to the screen.
When the “Review/Select Available Inventory” screen displays we see the amount that we are trying to order and the amount we have remaining to be selected from inventory. This assists the User in determining how much remains to be selected from inventory to fulfill the order. It also allows for the selection to be stopped once the order quantity has been reached. If the exact amount is not available the customer may be contacted to approve of the new purchase amount or a partial skid may be used to get the exact amount. A partial skid requires manual intervention to select the requested amount and weighing of the material. We have approval for the new amount and will select the 2 skids by pushing the “Select Inventory for Shipping” button for each skid.
Here you see we have selected the 1st skid of 954 lbs. and the “Amount Remaining To Select From Inventory” has been reduced by 954 and the “Net Weight Remaining” field is zero.
Here you see we have selected the 2nd skid of 200 lbs. and the “Amount Remaining To Select From Inventory” has been reduced by 200 (to zero) and the “Net Weight Remaining” field is zero. We have selected the necessary inventory for this product and will move on to the next product. Note that the “Select Inventory For Shipping” button is no longer enabled. This prevents you from selecting more than what has been ordered based on the Sales Order Quantity.
Notice that when we return to the Sales Order screen, the Qty In Inventory has been reduced by the amount selected. In our case by 1154 lbs. (5870 – 1154 = 4716). This reserves the inventory for sale and no other salesman has this inventory at there disposal (unless the material is returned and the product is returned to inventory).
We have completed this Sales order by adding Monitors 15 Inch and Power Supply’s on Sales Order Line Numbers 2 and 3, selecting the “Remit To Address” (where we want the payment made), and selecting the “Order Payment Status” and the “Expected Payment Method”. Once all of the information is complete the Sales Order maybe exited and the Shipping Manifest information is completed and is ready for the warehouse to pick and load the material.
Here is the Sales Order associated with the form we just completed. This may be used as an invoice for your Customers. Remember that forms that may be seen outside of your company may be customized with your logo.
When the “Record Payment” button is pushed we arrive at the same Payment Entry screen we saw in the “Record Payment” section of the “Services Purchase Order” details. The only difference is the “Recycle Sales Order” information is highlighted and the “Recycling Services Order” information is grayed out. All of the same logic applies to the payment entry.
Here is the message displayed when there are no Credit Information for a Sales Order (no material has been returned after payment has already been made.
We are going to use a different Sales Order to demonstration the Credit Memo feature. We will enter the Sales Order, enter a payment from the Customer for the Sales Order, ship the material to the Customer and then receive the material back as a return which will allow a Credit Memo to be created. This same example will also display the returned serial number reporting function in the examples provided at the end of the Shipping Manifest details.
The payment information has been updated on the Sales Order (Total Amount Paid and Order Payment Status).
As a result of the material being returned (as shown in the Shipping Manifest section) and the Sales Order having been paid for, a credit now exists and is shown in the “Total Credit Amount Created”. This amount may be used against other Services Purchase Orders or other Sales Orders as part of the Payments menu option. We are going to display the Credit Memo by clicking the “Print Credit Memo Form” button.
The Credit Memo uses the Remit to Address of the Recycling firm in the header and the Customers Address and Shipping Address in the detail of the Credit Memo. The detail of the material returned is listed to provide an accurate reference of the source of the credit.