How To: Model Salary
90 likes | 213 Vues
This guide provides Pool Managers with the necessary steps to model salary changes for eligible employees prior to submitting for approval. It covers how to filter pools, enter salary adjustments, utilize draft saves, and add justifications when salary increases exceed university guidelines. Managers can explore options to apply percentage changes to individual roles or across the pool, ensuring compliance with budget constraints. Follow the detailed process to streamline salary modeling and enhance budget accuracy for effective personnel management.

How To: Model Salary
E N D
Presentation Transcript
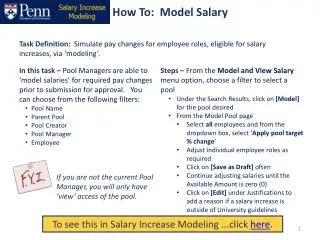
Task Definition: Simulate pay changes for employee roles, eligible for salary increases, via ‘modeling’. • In this task – Pool Managers are able to ‘model salaries’ for required pay changes prior to submission for approval. You can choose from the following filters: • Pool Name • Parent Pool • Pool Creator • Pool Manager • Employee • Steps – From the Model and View Salary menu option, choose a filter to select a pool • Under the Search Results, click on [Model] for the pool desired • From the Model Pool page • Select all employees and from the dropdown box, select ‘Apply pool target % change’ • Adjust individual employee roles as required • Click on [Save as Draft] often • Continue adjusting salaries until the Available Amount is zero (0) • Click on [Edit] under Justifications to add a reason if a salary increase is outside of University guidelines How To: Model Salary If you are not the current Pool Manager, you will only have ‘view’ access of the pool. To see this in Salary Increase Modeling ...click here.
Task: Model Salary (cont’d) From the Find Pools to Model or View page, select a filter; click on [Find]. Click on ‘Ready to model only’ to see only the pools available for ‘modeling’, otherwise you will see all employee roles delegated to you. Click on [Find] to begin modeling.
Task: Model Salary (cont’d) The search results above appear after clicking on [Find]. • When modeling salary, • a number of choices are available: • Enter a salary change to one employee role • Select several employee roles and select ‘Apply pool target % change or • Select all employee roles and select ‘Apply pool target % change’. • In this case, all are selected. When you click on [Model] next to the Pool Name, the following page appears. Click on [Apply to Selected] to advance to the next slide. Note the Pool Statistics section, particularly the # Entered and the Available Amount. Note the pool summary including the # Employee Roles and the # To Be Entered. Note: To ‘Select All’ click on the select box at the top.
Task: Model Salary (cont’d) Note the Pool Statistics now, particularly the # Entered and the Available Amount. Note the message that appears on the page to remind you the modeling data is unsaved. Click on [Save as Draft] to advance to the next slide. Note the Percent Change and the New Salary fields are now populated with the modeled salary increase. 50,000 50,000 50,000 50,000 51,375 51,375 51,375 51,375
Task: Model Salary (cont’d) You have the option of adjusting the salary % or amount for individual employee roles, but the Actual % Change Amount and Available Amount fields should not exceed the pool targets. This is a sample of the Pool Statistics when the pool targets have been exceeded. Now let’s discuss ‘Justifications’. Tip: Click on [Save as Draft] often. This will save your work as you continue updating until you are ready to ‘Submit for Approval’. If a salary increase is outside the University guidelines, a Justification must be entered. 50,000 50,000 50,000 51,000 52,000 53,000 Click on [Save as Draft] to learn more about Justifications.
Task: Model Salary (cont’d) We had adjusted a few salary ‘% Change’ fields and entered one ‘% Change’ outside of the University’s established range. • Note: If a salary increase is ‘outside of the University’s established range’, and you have not entered a ‘Justification’, this pop-up box appears when you hover over the ‘!’. • Tip: The ‘Justification' error message appears only after you click on • [Submit for Approval] NOT when you click on • [Save as Draft]. 50,000 50,000 50,000 50,000 51,000 52,000 53,000 51,000 Click on [Edit] to advance to the next slide and see how to enter a Justification.
Task: Model Salary (cont’d) • After clicking on Edit, select from the list a ‘Justifications’ why the salary increase is outside the University guidelines. • If ‘Other’ is selected (not shown here) you must enter additional text in the ‘Other Description’ field. Click on [Submit] to save Justification and advance to the next slide. • Tip: You can select multiple ‘Justifications’; if one is ‘Other’ you must also complete ‘Other Description’. • Justification notation after clicking on [Submit Page].
Task: Model Salary (cont’d) Optional: Click on [Edit] under the Notes column to enter notes for yourself or the approver(s), if desired. Tip: The note should not contain confidential/sensitive information. Optional: If appraisal data is not available/visible, you may use the ‘Sort Order’ field to enter an internal rating/ranking for this employee. Click on [Submit] to save the Notes and advance to the next slide.
Task: Model Salary (cont’d) Once all the salaries, justifications, notes, etc. are entered, review the Pool Statistics to be sure the target pool %/amount is correct. If pool is ready for approval, click on [Submit for Approval] to see the following Validation Warning. 50,000 50,000 50,000 51,000 52,000 53,000 Click on [Submit Anyway] to send the pool to the next level Manager.