Download
1 / 46
460 likes | 480 Vues
This presentation explores techniques for drawing plants on a landscape plan, labeling the plan, and enhancing the plan's appearance through rendering. It covers the use of symbols, title blocks, plant lists, and notes to create a well-designed and informative landscape plan.

E N D
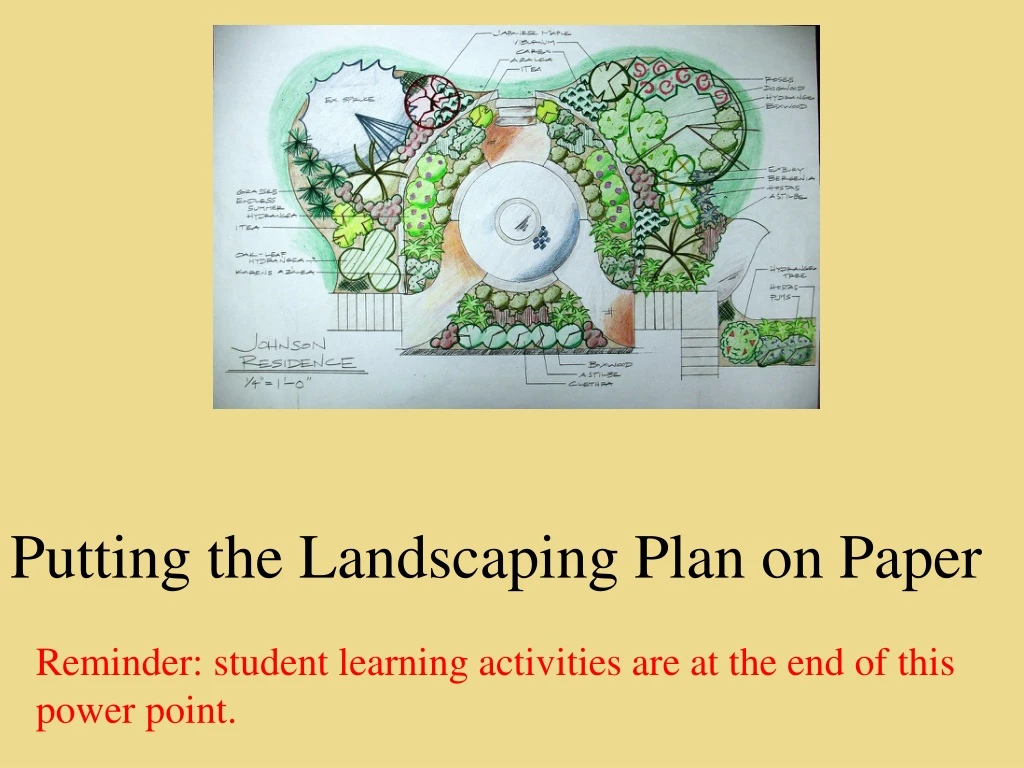
Putting the Landscaping Plan on Paper Reminder: student learning activities are at the end of this power point.
Next Generation Science / Common Core Standards Addressed! • CCSS. Math. Content.HSN‐Q.A.1 Use units as a way to understand problems and to guide the solution of multi‐step problems; choose and interpret units consistently in formulas; choose and interpret the scale and the origin in graphs and data displays. • CCSS. Math. Content. HS N‐Q.A.2 Define appropriate quantities for the purpose of descriptive modeling. • CCSS. Math.Content.HSG‐CO.A.1 Know precise definitions of angle, circle, perpendicular line, parallel line, and line segment, based on the undefined notions of point, line, distance along a line, and distance around a circular arc. • CCSS .Math. Content. HS G‐CO.D.12Make formal geometric constructions with a variety of tools and methods (compass and straightedge, string, reflective devices, paper folding, dynamic geometric software, etc.). Copying a segment; copying an angle; bisecting a segment; bisecting an angle; constructing perpendicular lines, including the perpendicular bisector of a line segment; and constructing a line parallel to a given line through a point not on the line.
Agriculture, Food, and Natural Resource Standards Addressed • PS.04.02.01.a. Research and summarize the principles and elements of design for use in plant systems. • PS.04.02.01.b. Apply principles and elements of design that form the basis of artistic impression.
Bell Work / Student Learning Objectives • 1. Demonstrate how to draw plants on the landscape plan. • 2. Describe how to label a landscape plan. • 3. Explain how to render the landscape plan.
Terms • Render • Title block
Interest Approach • With the landscape plan given to you answer the following questions. • How many shrubs are on the plan? How many trees are needed for this design? Are there any evergreen plants needed for this plan? How large are the shrubs by the front door? • Explain how you arrived at the answers.
Objective 1: Demonstrate how to draw plants on the landscape plan. How are plants drawn on the landscape plan?
I. Drawing symbols • Used to indicate trees, shrubs, ground covers, flowers, and hardscape (fences, patios, pools, etc.). • The symbols are distinct for each type of plant or physical feature drawn on the landscape plan.
A. Plants are drawn on the landscape plan at their mature size. They are indicated by circles with a center point or plus sign in the middle to show the center of the plant. • B. Each type of plant, deciduous, evergreen, broadleaf evergreen,groundcover, tree, and shrub, is given its own distinct symbol.
C. By varying the type of pencil used (2H, HB, 4H) and making lines thicker or thinner, trees and shrubs can be made to stand out on the landscape plan. • D. It is important to be neat and accurate in drawing the symbols on your landscape plan.
Objective 2: Describe how to label a landscape plan. How is a landscape plan labeled?
II. Labeling the plan • Plans are labeled in such a way that the average person can read what is being presented. • The labeling on the plan would include a plant list, a list of notes, a directional arrow, and a title block.
A. Title Block • A list of information that would include the client’s name, the scale used in the drawing, the date, and the designer’s name.
B. Plant List • A list of plants that are called for in the landscape plan. • Include both the Latin name of the plant and the common name. • The plants can be labeled by using numbers, letters or a code. • Each different plant species is given a specific number, letter, or code that corresponds with that in the plant list.
C. List of notes • Consists of any information needed to describe details of the plan. • The type of edging, type of mulch, location of lights in the yard, and any physical features like the fence. • Letters can be used to label notes on the plan.
D. The writing • Writing needs to be simple, neat, and easily read. • The writing is done in uppercase letters and is usually a basic block style with a few variations.
III. Improving the appearance • It is important for the landscape designer to present his or her plan to the client in an attractive way. • One way to enhance the landscape design is to add color to the plan. In the FFA design contest color is not allowed. • Realize that landscape architects learned to design by hand but generally use computer generated designs in their business.
B. Color with shades • To create the appearance of depth and shadows within the plan • Begin by coloring the entire plant with a light color. • With a medium shade, color about half of the same plant and then with a darker color, color half of that. • Try to blend the colors together.
C. Trees with under plantings • The designer can choose to color the tree or the shrubs under the tree. If the designer colors the shrubs, the tree is usually just outlined in color.
Informal entries lack balance / planting appears to be more random.
Remember to think safety when incorporating a swimming pool in the plan.
Review • The landscape drawings should be done to appeal to the customer, while being easy to understand by the landscaper and the person who will be installing the landscape. Using the specific symbols will allow the design to be understood by all who help with the process.
Student Learning Activities • Sample tests are available in the Lesson Plan tab.
Create a design for this home. Your design should include: a verity of plants including trees, shrubs, ground cover, and flowers. Your design should also include a plant list, a list of notes, a directional arrow, and a title block. On another sheet of paper write a one to two page paper explaining your design.
Create a design for this home. Your design should include: a verity of plants including trees, shrubs, ground cover, and flowers. Your design should also include a plant list, a list of notes, a directional arrow, and a title block. On another sheet of paper write a one to two page paper explaining your design.