Creating a Colorful Design Using Paint and Word Tools
In this tutorial, learn how to create vibrant designs using the Paint program and Word. Start by using the rectangle tool to outline your design. With the curve tool, draw intricate lines within the rectangle, then use the paint bucket tool to fill in each zone with different colors. Enhance your artwork by copying and pasting it into a Word document, where you can utilize the format bar to make backgrounds transparent and adjust images. Learn to flip images for a unique layout that showcases your creativity beautifully.

Creating a Colorful Design Using Paint and Word Tools
E N D
Presentation Transcript
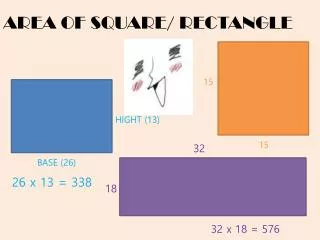
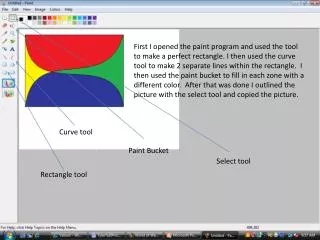
First I opened the paint program and used the tool to make a perfect rectangle. I then used the curve tool to make 2 separate lines within the rectangle. I then used the paint bucket to fill in each zone with a different color. After that was done I outlined the picture with the select tool and copied the picture. Curve tool Paint Bucket Select tool Rectangle tool
For this portion I right clicked and pasted the picture onto a word document.
This part of the project you have to go to the format bar in word, go to the recolor tab and select “Set Transparent Color” then click in the white space surrounding the picture. White Space
Copy the image and paste in right next to the original picture.
Flip the picture horizontally using the rotate tool located in the page layout tab.
Copy and paste another image and place it below the left upper picture. Then flip this picture Vertically.
Copy and paste the image one more time and flip it to make it look like the above image.