Download
1 / 16
160 likes | 273 Vues
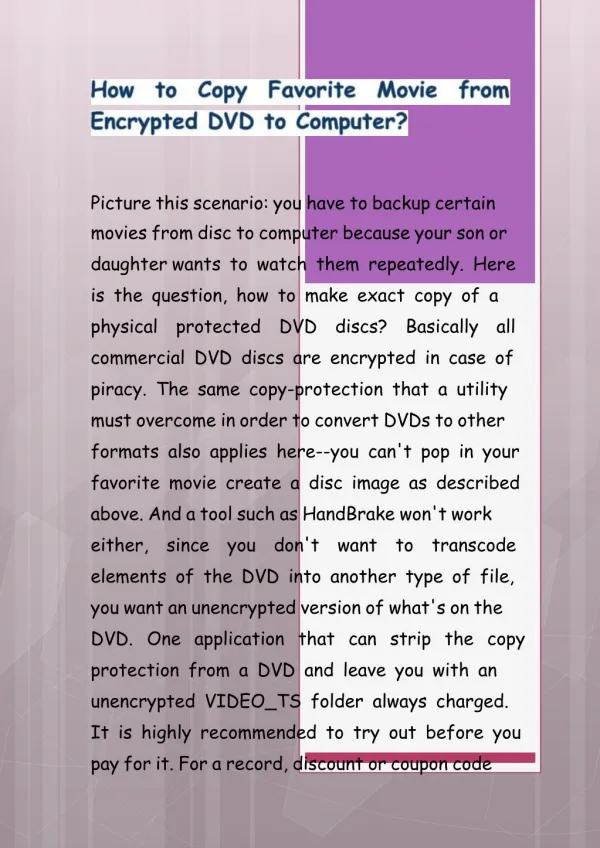
This guide walks you through the process of creating and burning a DVD of a veteran's interview using iMovie and iDVD on your Mac. Start by creating a new project in iMovie, importing your video from your camera, and assembling the clips. Once your timeline is set, export the project to iDVD, where you can add themes and buttons before burning your finished DVD. Follow the instructions to ensure your video is captured, edited, and saved properly, allowing you to preserve valuable memories for future generations.

E N D
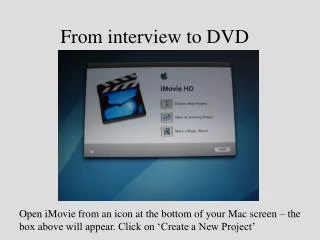
From interview to DVD Open iMovie from an icon at the bottom of your Mac screen – the box above will appear. Click on ‘Create a New Project’
The ‘Create Project’ box above will appear. You can enter a name for the project (use your veteran’s name) and choose a place to save it. Saving to the desktop makes it easy to find.
iMovie icon The screen above will open, indicating iMovie is ready to download your video.
Put the tape in your camera (don’t forget to rewind) and plug the camera into the computer. Set camera on ‘play/vcr’ or similar setting.
Just underneath the blue window, there are clickable controls for the camera. To the left of them, a clickable button slides left to camera icon to connect it. The blue screen will tell you the camera is connected.
You will see the video playing as it imports. The video is deposited in the upper right, ‘clip’ set. Every time the camera was stopped (at every pause) a new clip is created by iMovie.
When the video is finished, you can rewind it using the on-screen controls. Then unplug the camera and switch the sliding button (to the left of camera controls) from the camera icon to the right (to a scissor icon). This allows you to assemble your video clips.
Drag the clips from the upper right down to the horizontal space at the bottom of the window. This will put the clips in the order that you want them shown.
As you line each on up along the bottom, the screen will show the first image from each clip.
Since no editing is needed, you should finish this stage with all clips aligned. Next step is to move the video so aligned into iDVD.
With iMovie open, go to File, down to export and select iDVD to export into at window (to right here).
In iDVD you can add themes, buttons, etc. Or just burn the DVD by hitting the circle to the left of the blue ‘Themes’ button.
The ETC desk has a copy of a Veterans History Project theme DVD opener which you can add to your project if you wish.
When you hit the ‘burn’ button, a box will open asking you to insert a blank DVD.
Another box will then keep you apprised of the progress. When it’s finished, the Mac ejects your DVD and asks whether you want to burn another one.