Download

1 / 67
670 likes | 866 Vues
Viruses. Viruses, Disaster Recovery and a Maintenance Plan that Works. Preventive Maintenance. A good maintenance plan will Help to prevent failures Reduce repair costs Reduce downtime Help equipment last longer, reducing replacement costs Help to prevent data loss.

E N D
Viruses Viruses, Disaster Recovery and a Maintenance Plan that Works
Preventive Maintenance • A good maintenance plan will • Help to prevent failures • Reduce repair costs • Reduce downtime • Help equipment last longer, reducing replacement costs • Help to prevent data loss
Preventive Maintenance Component Maintenance How Often Inside the case Make sure air vents are clear; Yearly Use compressed air to blow dust out of case; Ensure chips and cards are firmly seated CMOS setup Keep a backup record of setup If changes are made Floppy drive Only clean the drive head if drive When the drive fails does not work Hard drive Perform regular backups At least weekly Run virus scan program At least daily Defragment drive Monthly Protect PC from harm Table 17-1 Guidelines For Developing a PC Preventive Maintenance plan
Preventive Maintenance Component Maintenance How Often Keyboard Keep it clean Monthly Keep liquids away Always Mouse, monitor Clean regularly At least monthly Printers Clean out dust and bits of paper At least monthly Clean paper, ribbon paths Use only top-quality cartridges Software Check that it is authorised only At least monthly Empty Recycle Bin; \temp folder Written record Record all software, hardware, When changes are repairs, maintenance made Table 17-1 Guidelines For Developing a PC Preventive Maintenance plan
Preventive Maintenance • When moving equipment • Back up the hard drive, or at least back up data and copy important configuration files to a floppy disk • Remove tape cartridges or CDs from the drives • Turn off the PC and all other devices • Disconnect the power cords from the electrical outlet and the devices
Preventive Maintenance • Disconnect all external devices from the computer • Consider labelling the cable connections to identify where each is connected • Coil up all cords and secure them with plastic ties or rubber bands • Pack the computer, monitor, and all other devices in their original shipping cartons; use packing material to pad them
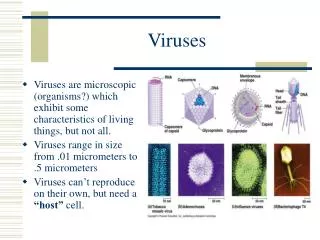
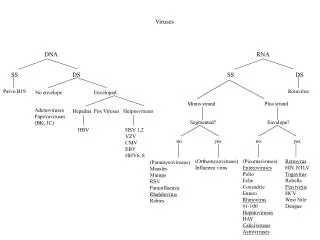
Viruses and Other ComputerInfestations • A computer infestation is • A virus, a Trojan Horse, or a Worm • Any unwanted program that is unknowingly transmitted to a computer • Designed to damage data and software • Not designed to damage the computer hardware, although it may destroy boot sector information • A virus hoax - warning about a nonexistent virus that ties up network traffic
Viruses and Other ComputerInfestations • Virus • A program that can replicate itself by attaching itself to other programs • Needs the infected, or host, program to execute in order for it to be able to execute • May simply replicate itself, filling up the hard drive, or may actually do damage • May be triggered to do damage at a future point in time: on a specific date, or when the host program activates some logic
Viruses and Other ComputerInfestations • Worm • A program that spreads copies of itself throughout a network, overloading memory • Does not need a host program • Trojan Horse • A program disguised as a helpful utility or a legitimate program • Requires human intervention to move • Does not need a host program
Where Viruses Hide • Boot sector • In the program code that is part of the Master Boot Record on a hard drive • In the part of the boot record program that loads the OS on the active partition of the hard drive • In the boot program on a floppy disk (one of the most common ways a virus is spread)
Where Viruses Hide • Files • In executable (.exe or .com) programs or word processing documents with macros • If a virus copies itself into a data file containing no macros, it can do no more damage than corrupting the data it has overwritten with itself • Multipartite virus • A combination of a boot sector virus and a file virus
Viruses • Cloaking techniques • Viruses try to hide from antivirus software • Polymorphic - changes its distinguishing characteristics so it is harder to recognise • Encrypting - can transform itself from a replicating program to a nonreplicating program and back again to avoid detection • Stealth - actively conceals itself • Alters OS information to mask the size of the file it is hiding in • Monitors file operations: when it sees its host file is about to be opened, it removes itself from the file
Damage from Infestations • Damage done by an infestation is called the payload • The payload may be dropped in response to a triggering event, such as a date, opening of a certain file, or pressing of a certain key • Damage may be minor, such as displaying bugs crawling over the screen, or major, such as erasing everything on a hard drive
Damage from Infestations Figure 17-1 The harmless or benign Walker virus displays a man walking across the screen
Damage from Infestations Figure 17-2 The crash virus appears to be destructive, making the screen show only garbage, but does no damage to the hard drive data
How Infestations Spread • Dangerous practices include • Trading floppy disks containing program files • Connecting the computer to an unprotected network • Buying software from unreliable sources • Downloading programs from the Internet • Using floppy disks from unknown sources • Using shared network programs • Using e-mail that automatically executes a word processor to read attached files • Not write-protecting original program disks
How Infestations Spread • How a virus replicates • Once a program containing a virus is copied to your PC, the virus can spread only when the infected program is executed • Viruses are loaded into memory with the program and then executed from memory • Memory-resident viruses stay in memory after the host program is terminated • Non-memory resident viruses terminate when the host program is closed
How Infestations Spread 1 Host program is copied into memory 2 The virus may or may not move itself to a new location in memory 3 A second program is opened and copied into memory 4 The virus copies itself to the second program in memory 5 The newly infected second program is written back to the hard drive Figure 17-3 How a virus replicates
Protecting Against Infestations • Make backups • Buy antivirus (AV) software and set your computer to run it automatically at startup • Keep the AV software current by periodically downloading upgrades from the Internet • Set a virus scan program to automatically scan word-processor documents as they are opened • Establish and faithfully execute a plan to make backups of the hard drive
Protecting Against Infestations • Only buy software from reputable vendors • Do not trade program files on floppy disks • Do not use floppy disks from unknown sources • Download software from the Internet sparingly, then scan program files for viruses before executing them • Never use pirated software • Format floppy disks before first use
Protecting Against Infestations • Write-protect original program disks • Avoid shared network programs, such as Java or ActiveX programs on the Internet • Adopt strict company policies against using unauthorised software • If someone has been on a computer before you, reboot it • Set the PC to boot from drive C, then A • Turn on AV protection for the CMOS MBR
Virus Symptoms • A programs takes longer than usual to load • The number and length of disk accesses seem excessive for simple tasks • Unusual error messages occur regularly • Less memory than usual is available • Files mysteriously disappear or appear • Strange graphics display on the monitor • The computer makes strange noises • The DOS MEM command reveals strange TSRs loaded into memory
Virus Symptoms • The system does not recognise the hard drive when you’ve booted from a floppy disk • The system does not recognise the CD-ROM drive, although it had worked earlier • Executable files have changed size • The access lights on the hard drive and floppy drive turn on when they shouldn’t • The hard drive boots but hangs up before getting a DOS prompt or Windows 95 safe boot
Virus Symptoms • There is a noticeable reduction in disk space • Files constantly get corrupted • Strange or bizarre error messages display • DOS error messages display about the FAT or partition table • File extensions or file attributes change without reason • A message displays from the AV software • The number of bad sectors on the hard drive continues to increase
Protecting Against Viruses • If you suspect you have a virus • Run the latest version of a virus scan program to detect and delete the virus • When selecting AV software, look for • The ability to download current upgrades from the Internet • The ability to automatically execute at startup • The ability to detect macro viruses in word-processing documents • The ability to automatically monitor files being downloaded from the Internet
Protecting Against Viruses Table 17-2 Antivirus software
Using AV Software • To scan for viruses on a floppy disk using AV software from Windows 95 • Click Start, Programs, Nuts & Bolts, Cheyenne AntiVirus Scanner • In the scanning box, enter what you want the software to scan: to scan a floppy disk, insert the disk in drive A and enter A: • Click Advanced to see the options • Click the FileTypes tab; verify that AllFiles is selected; click OK to return to the opening screen • Click Start to execute the scan
Using AV Software Figure 17-4 Set the Cheyenne AntiVirus software to scan both boot sectors and files
Using AV Software Figure 17-5 Set the Cheyenne AntiVirus software to scan all files, including compressed files
Backup Hardware • Tape drives • Hold from several hundred megabytes to several gigabytes • May be an internal or external device • May not require special backup software, although using it will make backups as efficient and effortless as possible • More convenient than floppy or removable disks and relatively inexpensive • Store data sequentially, so access is slow and inconvenient for general storage of data
Backups - Tape Drives • How a tape interfaces with a computer • An external tape drive can use the parallel port with an optional pass-through to the printer so they can share the port • An external or internal tape drive can use the SCSI bus • An external or internal tape drive can use its own proprietary controller card • An external or internal tape drive can use the floppy drive controller
Backups - Tape Drives Figure 17-7 An external tape drive can use the parallel port for input/output, with an optional pass-through to the printer
Backups - Tape Drives • Tape drives accommodate one of two kinds of tapes • Full-size data cartridges: 4 x 6 x 5/8 inches • Minicartridges: 3 1/4 x 2 1/2 x 3/5 inches • Minicartridges are more popular because their drives fit into a standard 5 1/4 inch drive bay • Tapes have a FAT at the beginning that tracks the location of data and bad sectors • Tapes must be formatted before they are used
Backups - Tape Drives Figure 17-8 Minicartridge for a tape drive has a write-protect switch
Backups - Tape Drives a) Tape compatibility for the Ditto 2GB tape drive Figure 17-9 Tables from two tape drive manufacturers indicate the multitude of formats used when reading and writing to tapes
Backups - Tape Drives * Using software compression with an assumed 2:1 compression ratio b) Minicartridge capacities obtained by the Eagle TR-3 tape drive using five different tape types Figure 17-9 Tables from two tape drive manufacturers indicate the multitude of formats used when reading and writing to tapes (continued)
Troubleshooting Tape Drives • A minicartridge does not work • If you are trying to write data, verify that the minicartridge is write-enabled • Are you inserting the minicartridge correctly? • Are you using the correct type of minicartridge? • Is the minicartridge formatted? • Re-tension the tape using backup software to eliminate loose spots on the tape
Troubleshooting Tape Drives • Take the minicartridge out and reboot • Try using a new minicartridge • If the tape was removed from the drive while data was being written to it, the data may be unreadable • The drive doesn’t work after installation • Check that pin 1 is correctly oriented • Check for a resource or IRQ conflict • For DOS, check for appropriate entries in Config.sys and Autoexec.bat
Troubleshooting Tape Drives • Data transfer is slow • Does the tape software have an option for optimising speed or data compression? • Some tape drives can use an accelerator card to speed up data transfer • Try a new minicartridge • If possible, completely erase the tape and reformat it • If you have an accelerator card, verify that it is connected • Check that there is enough memory
Troubleshooting Tape Drives • The drive intermittently fails or gives errors • Try a new tape • Clean the read/write heads of the drive • For an external drive, move it as far as possible from the computer and monitor • Reformat the tape • Re-tension the tape • Verify that you are using the correct tape type and format
Tape Backup Methods • Full, incremental, and differential • Full - all data on the hard drive is backed up • Incremental - backs up only files that have been changed or created since the last backup (full or incremental) • Differential - backs up only files that have been changed or created since the last full backup • Child, Parent, and Grandparent • Track, store, and rotate copies of backups
Tape Backup Methods Table 17-3 The Child, Parent, Grandparent backup method
Backup Software • Most tape drives come with some backup software • Windows 95 and Windows NT can back up your hard drive • To install Windows 95 backup component • Click Start, Settings, ControlPanel • Double-click Add/Remove Programs • Click the WindowsSetup tab • Under DiskTools, select Backup; click OK, then Apply to install from the disks or CDs
Backup Software Table 17-4 Tape Drives Supported and Not Supported by Windows 95 Backup
Windows 95 Backup Utility • To use Windows 95 Backup utility to backup your hard drive • Click Start, Programs, Accessories, SystemTools, and Backup • The WelcometoMicrosoftBackup screen displays with a dialog box telling you that it has created a file set for a full system backup of the entire hard drive; click OK to continue • With the Backup tab selected, click File, OpenFileSet; the list of file sets displays • If this is your first time, only the Full System Backup set is listed
Windows 95 Backup Utility Figure 17-10 The Windows 95 Backup utility automatically builds a file set to back up the entire hard drive
Windows 95 Backup Utility • Select FullSystemBackup and click Open • The backup utility builds a complete list of the files on the hard drive; click NextStep to create the full system backup • To back up only certain folders, files, or logical drives, don’t open Full System Backup; select files, folders, and drives you want to back up • Click NextStep to continue • Select the drive to hold the backup • Click StartBackup to begin the process; you will be asked to enter a Backup Set Label • A progress report displays on the screen
Windows 95 Backup Utility Figure 17-11 Windows 95 Backup lets you select folders and files to back up
Windows 95 Backup Utility • To recover files, folders, or the entire drive from backup using the Windows 95 Backup utility • From the backup utility, click the Restore tab • Click the medium to restore from under the Restorefrom list • Select the backup you want; click NextStep • A backup set displays • Check the entire backup set, or select individual files or folders you want to restore • Click StartRestore
Windows 95 Backup Utility • Windows 95 Backup features • May back up files with certain extensions • Can back up only files and folders that have been altered during a selected time interval • Use full backup or use incremental backup of files that have changed since the last full backup • Can use data compression • Can verify backup by automatically comparing files when the backup is finished • Can format tapes when needed