Enhance Your Lesson with Custom Arrows: Resize, Rotate, and Recolor Tips
Discover how to effectively use arrows in your presentations with these two essential tips. Tip 1: Save arrows as pictures for easier insertion in Storyline by right-clicking and choosing "save as picture." Tip 2: Recolor arrows directly in PowerPoint by selecting your arrow, going to the "Format" tab, and navigating to "Color/Recolor." You can adjust colors and brightness for a personalized touch. Create unique designs or simply use arrow heads for a sleek, professional look.

Enhance Your Lesson with Custom Arrows: Resize, Rotate, and Recolor Tips
E N D
Presentation Transcript
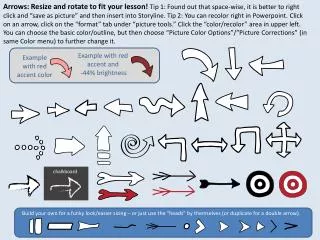
Arrows: Resize and rotate to fit your lesson! Tip 1: Found out that space-wise, it is better to right click and “save as picture” and then insert into Storyline. Tip 2: You can recolor right in Powerpoint. Click on an arrow, click on the “format” tab under “picture tools.” Click the “color/recolor” area in upper left. You can choose the basic color/outline, but then choose “Picture Color Options”/”Picture Corrections” (in same Color menu) to further change it. Example with red accent and -44% brightness Example with red accent color chalkboard Build your own for a funky look/easier sizing – or just use the “heads” by themselves (or duplicate for a double arrow).