Carding Cotton Lint
Carding Cotton Lint. Materials Needed:. Good quality ginned cotton, set of carders (preferably cotton carders with finer teeth than wool carders), and lastly a puni stick (a 1/4 in. dowel cut and sanded)
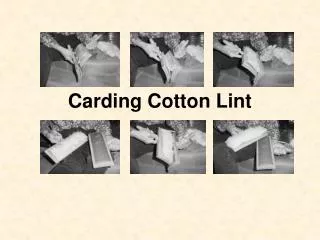

Carding Cotton Lint
E N D
Presentation Transcript
Materials Needed: • Good quality ginned cotton, set of carders (preferably cotton carders with finer teeth than wool carders), and lastly a puni stick (a 1/4 in. dowel cut and sanded) • For clarity, I'll call the front end of the carders the "toe" and the edge closest to the handle the "heel." Note the teeth curve toward the heel. These instructions are written for a right handed person. If you're left handed, do the reverse.
Charging • "Charge" the carder (putting fibers on the carder) with a small amount of cotton by drawing the fiber across the carder from the heel to the toe. Charge it lightly all the way across evenly.
Step I • Place left hand on your leg with palm up and place handle of carder, with the cotton, in your left hand with the teeth up. The right hand holds the other carder face down with index finger up on the back of the carder for control. Gently stroke the left carder with the right carder. Stroke only one-half the width of the carders, then three-quarters and then a full stroke.
Don’t press the fibers in the card • Cotton is a very short staple and you must not press the fibers into the teeth of the carder. The cotton fiber merely lays on the top of the teeth. Make sure your strokes are full strokes and continues beyond any fibers extending over the edge of the carder. If you do not, then the fiber will fold back on the carder as you stroke again, leaving thick areas and tangled fibers.
Transfering the fiber • Continue stroking gently 4 to 6 times then drop the right card between your legs sideways with handle tip facing you. Now keeping the same grip on the left carder, place it above the right, teeth side facing each other. Catch the heel of the right carder under the whiskers (cotton fibers) that hang over the toe of the left carder.
Pull up on the right carder and presto, the cotton lint should all be on the right carder. • Lay the left carder on your leg again, turn over the right with the cotton on it and begin carding gently. One-half the way, three-quarters, and then a full stroke. Reverse the process. Continue back and forth until your fibers are smooth, evenly distributed and laying parallel to each other.
This process is very similar to wool except stroking gently is the key word. When you're ready to remove the cotton, drop your right carder and place left above, pull up with the right, then put the left carder on the bottom, pull up with the left and repeat once again with the right carder. The carded cotton lint should now lay loosely on the right carder.
Making Your Cotton Puni • Place right carder in your lap with handle pointing towards you and toe of the carder the furthest away. Now lay the puni stick at the toe of the carder on the lint, gently roll the puni forward towards the heel. With your finger, work the lint so it all rolls on the puni stick evenly. As you get to the heel, let the puni stick drop under the last row of teeth. Keep turning the puni stick clockwise and using the underneath part of the teeth, tighten the cotton on the stick. If you prefer after rolling the cotton on the puni stick, you can roll the puni stick up the side of your leg in an upward movement. (Left handers go downward). Either method tightens the fiber around the stick.
Lastly, hold the stick straight up and push the fiber from the bottom, up and off the stick. Practice makes perfect. How tight you tighten the fiber around the stick is a matter of preference. Try it several degrees of tightness, thickness and then try spinning each until you determine how you like your punis!