MAKE YOUR FLASH MASKS DRAGGABLE
110 likes | 237 Vues
Learn how to create draggable masks in Adobe Flash with this straightforward guide. Follow the simple steps to set up a new Flash document with dimensions of 400x300 pixels, insert layers for background, mask, and actions, and use ActionScript to enable drag functionality. You'll import an image, convert it to a symbol, and create a circular mask that users can drag around the screen. Perfect for beginners or anyone looking to enhance their Flash projects with interactive elements.

MAKE YOUR FLASH MASKS DRAGGABLE
E N D
Presentation Transcript
1. Create a new Flash document 400x300 dimensions. Select a gray for the background color.
2. Insert two new layers. Name them background, mask and actions. Actions layer should be in top and background in bottom.
3. In the first frame of the background layer insert the picture you want (or take the one below): go to File>>Import>>Import to Stage (Ctrl+R). Make sure the picture has 400x300 dimensions.
4. Select the picture and go to Modify>>Convert to Symbol (F8). Choose MovieClip and registration point to center and put bgMC as name. Then go to Properties panel and give it and instance name of bg_mc.
5. Now go to the first frame of the mask layer and draw an 100x100 circle (hold pressed the Shift key to draw a perfect circle) without stroke. Convert it to a MovieClip ( Modify>>Convert to Symbol or F8).
At name field put maskMC, choose MovieClip as behavior and choose center for registration point. In the Properties Inspector give it an instance name of mask_mc.
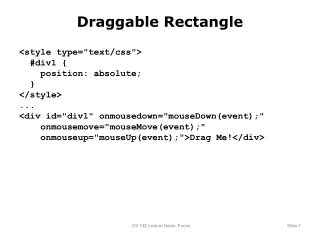
6. In the first frame of the actions layer put the following ActionScript code:
bg_mc.setMask(mask_mc);mask_mc.onPress = function(){startDrag(this, false, 50,50, 350, 250)}mask_mc.onRelease = mask_mc.onReleaseOutside = function(){this.stopDrag()}