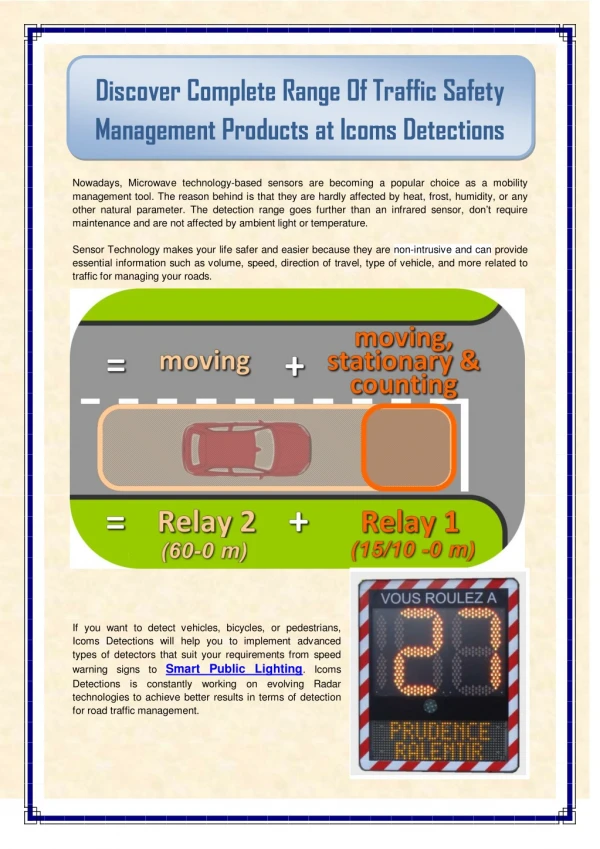
Smart lighting control
Smart lighting control. Done by : Haya S alah Esraa N abulsi Eman D wikat Under the supervision of: Dr. K amil Subhi. Background. Why A Smart lighting control?.

Smart lighting control
E N D
Presentation Transcript
Smart lighting control Done by : HayaSalah EsraaNabulsi EmanDwikat Under the supervision of: Dr. KamilSubhi
Why A Smart lighting control? Energy consumption is in a great increase all over the world so that required us to use engineering techniques to reach the optimum consumption of electricity by having the building automatically controlled (by using sensors, dimmable lighting units and controllers.….. etc).
Why A Smart lighting control? Lighting of a room for its intended use at the exact lighting level can help sufficiently saving energy.
What about our project? We will control the dimming of the light load according to dimmer theory by using: • zero crossing circuit. • dimmer circuit . • light sensor circuit. • Microcontroller (arduino) .
Theories and analyses Project is built according to the dimmer theory based on power electronics as illustrated bellow.
What does dimmer theory mean? • A dimmer is a device that is originally created to control the brightness of lamps. • This is done by altering the total power delivered to the lamp and thus the brightness.
basic type of dimmer The following schematic demonstrates a basic type of dimmer:
Operation principles The operation of the dimmer is based on the fact that, during a full cycle of an AC waveform, a triacwill only allow a part of the waveform to be delivered to the load (lamp). Take a look at the following waveforms:
designing the Electrical circuits This consists of the components and the operation of each circuit we built and these circuits are: • Zero cross detection circuits • Dimmer circuit • Light sensor circuit
Zero cross detection circuitcomponents • Transformer • Full-wave rectification • Optocoupler: its a combination of two distinct Devices:
Zero cross detection circuitcomponents • light-emitting diode • Phototransistor The two are Separated by a transparent barrier which blocks any electrical current between them
Zero cross detection circuit operation • First, the sine wave goes through double phased rectification. • Then this wave will pass via an optocoupler which givespulse at every zero crossing. • This pulse then can be used to trigger an interrupt in the Arduino.
Dimmer circuit components components we used in this circuit are : • MOC3021: The MOC3021 is optically isolated triac driver devices.These devices contain an intrafid emitting diod and a light activated silicon bilateral switch,whichfuctions like a triac.
Dimmer circuit components • Triac:The TRIAC is an ideal device to use for AC switching applications because it can control the current flow over both halves of an alternatingcycle.So It is possible to view the operation of a TRIAC in terms of two thyristors placed back to back.
Dimmer circuit operation • The output pulse of arduino goes through a MOC321 that opens and triggers the tiac. • Then the triac will open for a number of microseconds delay starting from the zero crossing therefore gives a predictable level of dimming.
Light sensor circuit components • LDR( Light Dependent Resistor) • Transistor
Light sensor circuit operation A light detector senses light. As the light level increases and LDR meets the lowest threshold resistance, the circuit automatically turns on the LED D1. We can adjust the sensitivity using the resistor R2.
Light sensor circuit operation We connect this circuit to arduino by connecting the collector of transistor to the analogue Pin of arduino (A0). LDR writes an analog value (PWM wave) to a pin, and so it can be used to light a LED at varying brightnesses.
Arduino Uno • When the AC voltage crosses the zero, the Microcontroller will be interrupted and therefore detects the zero crossing . • We can reach to the required voltage by triggering the triacafter a specific Delay.
Interrupt service routine code contain delay to Control the output pulse from arduino to control firing angle If keypad value<sensor value Enter the required illumination from keypad and compare it with sensor value If keypad value>sensor value If keypad value=sensor value No change in lamp lightening Decrease the lamp lightening Increase the lamp lightening
The input of the optocoupler(the output of full wave rectifier) We get this result because we used full wave rectifier that converts alternating current (AC), which periodically reverses direction, to direct current (DC), which flows in only one direction.
the output of optocoupler/ input of the arduino. When the rectified signal reaches zero the optocoupler give pulse. This signal then can be used to trigger an interrupt in the Arduino(pin2).
Synchronizing Synchronizing between the output of the arduino (pin 13) and the output of optocoupler. We control the output of the arduino by change the delay (in ms) after the zero crossing to give pulse. Blue signal:output of optocoupler.Red signal: output of the arduino
At Dely =50 ms. The output of the moc
We notice by changing the delay we control the firing angle (alpha). • When the α becomes smaller, then the dimmer becomes conductive sooner and the lamp is brighter. • When the α becomes larger, then the triac delays more to become conductive and thus the lamb is dimmer.
The output of Triac At delay 50ms
We notice by changing the delay we control the firing angle (alpha). • When we increased the delay, alpha also increased so, the lightening decreased. • If we increase alpha beyond this value we see that the lamp turns off delay.