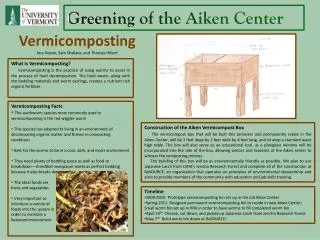
Vermicomposting
Vermicomposting. Building a Worm Bin. Providing Ventilation. You will need to drill holes around the top of your worm bin to provide air flow for your worms. Providing Ventilation.

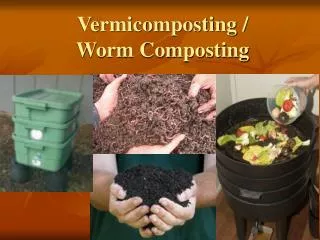
Vermicomposting
E N D
Presentation Transcript
Vermicomposting Building a Worm Bin
Providing Ventilation You will need to drill holes around the top of your worm bin to provide air flow for your worms.
Providing Ventilation You can use any size drill bit from 1/8 inch to ½ inch. You can drill fewer holes if you use a large diameter drill. (The worms do not typically try to escape from the container if they are happy.)
Providing Ventilation Some people will drill one or two small holes at the bottom of bin for drainage in case the bin gets too wet. If you do drill drainage holes, you will need to have your bin sitting on a tray or put plastic under it to protect the surface on which it rests.
Preparing Bedding Various materials can be used as bedding in your worm bin. Shredded paper is one of the easiest to use.
Preparing Bedding You will notice when you shred your paper that it will tear more evenly up and down that it will across the page. When a section is folded in half, you can start at the fold and tear off ½ inch to one inch strips.
Preparing Bedding Fluff the paper to separate the strips from one another. Fill the container because the bedding will compact.
Preparing Bedding Once you have shredded the bedding, you will need to moisten the paper.
Preparing Bedding Bedding should be moistened like a wet sponge so that you can squeeze a few drops of water from it. You do not want water standing in the bottom of the bin.
Adding Some Grit After you have moistened the paper, add up to a cup of dirt.
Adding Some Grit Worms don’t have teeth. They do have a crop that helps to mechanically breakdown their food. The grit aids this process just as providing grit for a bird. You may also want to add some crushed egg shells for a calcium source.
Adding the Worms Once your bin is ready, it is time to add some worms. The worms used are not nightcrawlers. They are composting worms commonly called red wigglers, brown-nosed worms, tiger worms, or manure worms in the continental US. The scientific name is Eiseniafetida.
Adding the Worms A bin this size can easily support 1 to 2 pounds of worms, but you can start a bin with just a hand full. This bin was started with two quarter pound bags of worms or about 500 worms total.
Adding the Worms These worms are mostly mature worms. Some dealers sell worms that include cocoons, immature worms, and adults. With proper care, your worms should double their population each month.
Moisture Protection While not necessary, putting wet cardboard, brown paper, or burlap on top of the bedding will help maintain moisture in the pile. It also serves as a light barrier and the worms will congregate beneath it.
This presentation was prepared by Bonnie Rinard. Photography is by Tom Rinard.