The Operating System Project
The Operating System Project. Start Here. Version 1: September 2009. Table of Contents. What to do in Week 1 – Test0 Brushing up your C programming skills. Compiling the program. Understanding how the program flows. What does Test0 do? What do you need to change? Step by step example.

The Operating System Project
E N D
Presentation Transcript
The Operating System Project Start Here Version 1: September 2009
Table of Contents What to do in Week 1 – Test0 • Brushing up your C programming skills. • Compiling the program. • Understanding how the program flows. • What does Test0 do? • What do you need to change? • Step by step example. What you need to do - Test1a • What’s the goal of Test1a? • Summary information. • Where do you find resources to help you?
Table of Contents(2) These materials not written yet. What you need to do - Test1b • What’s the goal of Test1b? • Summary information • Where do you find resources to help you? What you need to do – Test2a • What’s the goal of Test2a? • Summary information • Where do you find resources to help you?
Brushing up your C programming skills. There are many places you can review C programming. The document listed below looks at some of the differences between C and Java. The concept of pointers is where most java programmers have difficulty. If you need more information, the web is your friend. C_By_Example.ppt can be found on the Project Home Page – the same place you found this Start_Here.ppt.
Compiling the program. The first thing you need to figure out is the environment where you will be doing this project. If you’re a LINUX fan, then life is easy since gcc is installed on every computer. I would recommend that as a good way to get started. If you’ve been programming on Windows, then I’d recommend the free Visual Studio version designed for students – it’s great though may be a bit formidable to start with. I've built this code with Visual Studio on Windows, with gcc installed on Windows, and with a standard gcc on Linux. It worked for these three environments. The first thing you need to do is define whether you will be building on Windows or Linux. In the file global.h you will find the following two lines:// #define NT#define LINUX One of these lines should be commented out so that the other type of system is used; This is necessary because the threads implementations on the two operating systems are very different. After you’ve moved the files from the webpage into a new directory, compile the program: >gcc –g *.c -lm -o os Windows >gcc –g *.c -lm –lpthread -o os Linux This will create an executable called os. Because of the –g, you can debug this program.
Compiling the program. Executing the program will give the following output: >os This is Simulation Version 3.50 and Hardware Version 3.50. os_switch_context_complete called before user code. Program called with 1 arguments: os Calling with argument 'sample' executes the sample program. This is Release 3.50: Test 0 SVC handler: get_time 4272768 0 0 0 0 Time of day is 0 SVC handler: term_proc -1 4272816 0 0 0 ERROR: Test should be terminated but isn't. User program did a simple return; use proper system calls only. PANIC: Because OS502 used hardware wrong. Exiting the program If you get this result, you know your compilation was successful. Your task now for Test 0 will be to make this code work right, so it doesn’t produce the errors you see here.
Compiling the program. You just compiled the program in the solid box. It includes a hardware simulator, the beginnings of an operating system that you will expand, and test cases that drive your development of the OS. All elements inside the heavy box are in a single process, running several threads of execution. All I/O devices in the program are simulated entities. This includes the timer device and the disk devices. Try to treat the Hardware Simulator as a “black box” and use the architecture specification instead. The executable you just compiled test0 test1a test1b test1x test2a test2b ... Operating System(base.c, state_printer.c) Hardware Simulator (z215.c or z502.c) Native Operating System (Windows XP , Linux, etc.) Native Hardware Platform (Pentium 4, etc.)
Understanding how the program flows. The next slides describe the starting code that’s given to you (what you’ve already compiled). It shows how the program flows. The important actions are: Test0 in test.c contains system calls – requests for service from the Operating System. Those system calls come to the routine svc( ) in base.c. This is in the OS – you’re writing the OS so you own this code. In svc, you call (make a subroutine call) to the hardware in order to implement the action requested by Test0.
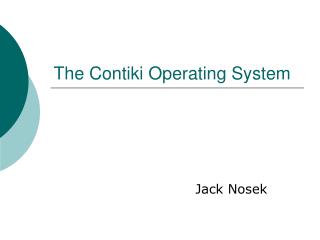
The Execution of test0 test0 test.c 5 8 9 SVC base.c 4 OS_ Switch_ Context_ Complete OS_ Init 10 3 2 6 7 Hardware Z502_ CLOCK Z502_ HALT switch_context main 1
The Execution of test0 1 All C programs start in main(). A temporary context is created and the simulation starts by requesting to run on that context. os_init is a routine in the operating system. For right now, all it does is create a context that will allow test0 to run. 2 We come to os_switch_context_complete before we go out to the new code in test. Who knows what you might want to do with this! Don’t worry about it now. 3 4 We go out to test0. It is time to run the user code. 5 Test0 does a system call get_time_of_day. A system call produces a software interrupt that causes execution to go to svc, the software service routine. 6 svc must get the time in order to service the system call. It calls the hardware to do that. It passes by reference a variable in which the time can be placed. 7 Z502_CLOCK is a hardware routine that keeps track of the time. It passes back this time to svc. 8 svc passes back the time to test0. test0 prints out that time as part of its code. test0 does a terminate_process system call – it’s all done with its job. It makes this call and again the execution ends up back in svc. 9 svc must handle this terminate_process request. Eventually this code will be more complicated, but for right now, since there’s nothing else for the OS to do, it simply ends the simulation by halting the processor. 10
What does Test0 do? void test0( void ) { SELECT_STEP { STEP( 0 ) printf( "This is Release %s: Test 0\n", CURRENT_REL ); GET_TIME_OF_DAY( &Z502_REG_1 ); STEP( 1 ) printf( "Time of day is %d\n", Z502_REG_1 ); TERMINATE_PROCESS( -1, &Z502_REG_9 ); STEP( 2 ) printf( "ERROR: Test should be terminated but isn't.\n"); break; } // End of SELECT } // End of test0 Let’s look at this code. The SELECT_STEP and STEP are C macros. They are defined in syscalls.h – but you don’t need to understand them now. These macros are here to make the code flow smoothly. For our purposes, each STEP is executed sequentially. There are two system calls: GET_TIME_OF_DAY( &Z502_REG_1 ); Get the time the hardware thinks it is. This is NOT in any normal units like seconds or whatever. Note that following the C convention, we’re passing the ADDRESS of the variable Z502_REG_1 (that’s what the “&” does.) Then in the next line printf( "Time of day is %d\n", Z502_REG_1 ); the value that’s in the variable is used in the printf statement. TERMINATE_PROCESS( -1, &Z502_REG_9 ); has two arguments. The “-1” says terminate the current process. The &Z502_REG_9 gives the address of a variable that the OS can use to return an error. Appendix C is where you will find a description of the system calls. Syscalls.h contains the macros that implement these system calls.
Test0 - What do you need to change? To make Test0 work, “all” you need do is change code in svc(). Let’s start by looking at the original code: void svc( void ) { INT16 call_type; static INT16 do_print = 10; call_type = (INT16)SYS_CALL_CALL_TYPE; if ( do_print > 0 ) { printf( "SVC handler: %s %8ld %8ld %8ld %8ld %8ld %8ld\n", call_names[call_type], Z502_ARG1.VAL, Z502_ARG2.VAL, Z502_ARG3.VAL, Z502_ARG4.VAL, Z502_ARG5.VAL, Z502_ARG6.VAL ); do_print--; } } /* End of svc */ • Call_type and SYS_CALL_CALL_TYPE – a system variable contains the type of system call that’s being passed to svc. In svc, this variable, as well as the arguments requested by the system call in test0, are printed out so you can see them. • Z502_ARG1 is a union. If you don’t understand unions, go read about them in any C book. The data type Z502_ARG is defined in global.h. • The do_print variable is here simply to do some initial printout, but then not clutter up printouts when there are many system calls. You can see how it works from the code.
Test0 - Step by step example. Remember that the call_type is which type of system call is being executed. The switch statement means a different case handles each call. void svc( void ) { INT16 call_type; static INT16 do_print = 10; INT32 Time; call_type = (INT16)SYS_CALL_CALL_TYPE; if ( do_print > 0 ) { // same code as before } switch (call_type) { // Get time service call case SYSNUM_GET_TIME_OF_DAY: // This value is found in syscalls.h ZCALL( MEM_READ( Z502ClockStatus, &Time ) ); *(INT32 *)Z502_ARG1.PTR = Time; break; // terminate system call case SYSNUM_TERMINATE_PROCESS: Z502_HALT(); break; default: printf( "ERROR! call_type not recognized!\n" ); printf( "Call_type is - %i\n", call_type); } // End of switch } // End of svc This is easy – all I did was find the code in sample.c that does this same call to the hardware. Then I copied it here! At this point, it’s magic. We’re returning the time to the caller (in test0). The ARG1_PTR could be pointing to 32 bits or 64 bits. We cast it to 32 since the data value is 32 bit. Then the “*” on the front says this is a pointer. (This is not obvious stuff if you’re new to C). In this test, when Test0 says it wants to terminate, there’s nothing more to do, so we simply call the hardware to say we’re done. Note how this is in a different case statement from the time. If a bogus system call number comes in here, we want to know about it and report an error.
Test0 - Step by step example. Here’s what the execution looks like after the code has been changed. Note that the time of day is reported as “65” in this case (you’re number may be different. Note also that the simulator says that the test ended happily. >gcc -g *.c -lm -o os >os This is Simulation Version 3.50 and Hardware Version 3.50. os_switch_context_complete called before user code. Program called with 1 arguments: os Calling with argument 'sample' executes the sample program. This is Release 3.50: Test 0 SVC handler: get_time 4272768 0 0 0 0 0 Time of day is 65 SVC handler: term_proc -1 4272816 0 0 0 0 Hardware Statistics during the Simulation Context Switches = 3: CALLS = 9: Masks = 0 The Z502 halts execution and Ends at Time 71 Exiting the program
Test1a - What you need to do • What does Test1a do? • Summary information. • Starting Architecture of the Simulator Environment; the interrupt_handler • Implementation of Test1a: • Step 1 • Step 2 • Step 3
What does Test1a do? void test1a( void ) { static INT32 sleep_time = 100; static INT32 time1, time2; SELECT_STEP { STEP( 0 ) printf( "This is Release %s: Test 1a\n", CURRENT_REL ); GET_TIME_OF_DAY( &time1 ); STEP( 1 ) SLEEP ( sleep_time ); STEP( 2 ) GET_TIME_OF_DAY( &time2 ); STEP( 3 ) printf( "sleep time= %ld, elapsed time= %ld\n“, sleep_time, time2 - time1 ); TERMINATE_PROCESS( -1, &Z502_REG_9 ); STEP( 4 ) printf( "ERROR: Test should be terminated but isn't.\n"); } /* End of SELECT */ } /* End of test1a */ Let’s look at this code. A lot is the same as test0. The SELECT_STEP and STEP are the same. There are two calls to GET_TIME_OF_DAY, and one call to TERMINATE_PROCESS. The only new piece is the SLEEP. There is one new system call: SLEEP( TimeToSleep ); With this call, we’re not getting a value returned to us – we’re simply passing to the OS, the amount of time we want to “sleep”. We don’t want control to come back to this code for a least TimeToSleep time units. Appendix C is where you will find a description of the system calls. Syscalls.h contains the macros that implement these system calls.
Test1a – Summary Information Hardware Registers Only the ARG and the REG are of interest to you right now.
Test1a – Summary Information Interrupt Handling An OS is just a program waiting for someone to give it something to do. It’s the hardware that transfers control into the OS. There are three ways to do this. • Interrupts (starts executing at interrupt_handler in base.c) • TIMER_INTERRUPT from the delay timer • DISK_INTERRUPT from disk 1, 2, ... • Faults (starts executing at fault_handler in base.c) • INVALID_MEMORY fault • CPU_ERROR fault • PRIVILEGED_INSTRUCTION fault • Traps (starts executing at svc in base.c) • SOFTWARE_TRAP for each system call
Test1a – Summary Information System Modes Modes have to do with privileges. The code executing in User mode has access to the code in Test.c and access to data associated with the test. In Kernel Mode, the code can see, touch, smell, and modify ANYTHING! • User Mode • Address space for user programs is divided into • C code “program” memory for instructions and for local variables. • User “data” memory, referenced through a virtual address space, and called MEMORY. You don’t need to know this until Test2a. • Kernel Mode • Instruction set includes C language instructions, plus • access to all the Z502 registers • access to the privileged instructions of the Z502 instruction set • I/O primitives • memory primitives • context switching primitives • These are all available through provided macros
Test1a – Summary Information Hardware Actions on Interruption • User registers are saved in Z502 Hardware Context – this is done by the hardware so you don’t have to worry about it. • The interrupt_handler queries the hardware to find out about the interrupt. There are three requests to the hardware. These are explained in excruciating detail in Appendix A, the Architecture Specification – see Section 5.3. • The calls: a) ask for the device that caused the interrupt b) say that future hardware queries will reference that device, and then c) get the status of that device. • Execution mode is set to kernel – after all, we’re now running in the OS! • Hardware begins execution at Interrupt_handler when the hardware has something to communicate (i.e., it took an error, it’s successfully completed its work, etc.)
Test1a – The interrupt_handler void interrupt_handler( void ) { INT32 device_id; INT32 status; INT32 Index = 0; static BOOL remove_this_in_your_code = TRUE; /** TEMP **/ static INT32 how_many_interrupt_entries = 0; /** TEMP **/ // Get cause of interrupt – which device caused the interrupt MEM_READ(Z502InterruptDevice, &device_id ); // Set this device as target of our query MEM_WRITE(Z502InterruptDevice, &device_id ); // Now read the status of this device – you need to interpret this to // make sure no error occurred. MEM_READ(Z502InterruptStatus, &status ); /** REMOVE THE NEXT SIX LINES **/ how_many_interrupt_entries++; /** TEMP **/ if ( remove_this_in_your_code && ( how_many_interrupt_entries < 20 ) ) { printf( "Interrupt_handler: Found device ID %d with status %d\n", device_id, status ); } // Clear out this device - we're done with it MEM_WRITE(Z502InterruptClear, &Index ); } /* End of interrupt_handler */
Test1a – The interrupt_handler void interrupt_handler( void ) { INT32 device_id; INT32 status; INT32 Index = 0; static BOOL remove_this_in_your_code = TRUE; /** TEMP **/ static INT32 how_many_interrupt_entries = 0; /** TEMP **/ // Get cause of interrupt – which device caused the interrupt MEM_READ(Z502InterruptDevice, &device_id ); // Set this device as target of our query MEM_WRITE(Z502InterruptDevice, &device_id ); // Now read the status of this device – you need to interpret this to // make sure no error occurred. MEM_READ(Z502InterruptStatus, &status ); // Your code will go here. It should include a switch statement for // each device – you have only the timer right now. // Check that the timer reported a success code. // Call a routine you write that does the work described later. MEM_WRITE(Z502InterruptClear, &Index ); } /* End of interrupt_handler */
Test1a – Summary Information Hardware Context • The context is the state of the executing CPU; essentially its registers. • The Hardware context is really just the set of registers , plus an entry address. • The OS only deals with the handle to a context. Typically this is stored in the process control block. You don’t EVER need to know what’s in that context. • Z502 Operations for manipulating contexts • Z502_MAKE_CONTEXT(handle, start address, kernel flag) • Z502_DESTROY_CONTEXT(handle) • Z502_SWITCH_CONTEXT(save/destroy flag, handle)
Writing Test1a Write this test in multiple stages – get each stage working before you start the next one; take small steps. • Stage 1: In svc for the SLEEP system call, you should: • Start the clock (see sample.c for an example of this – see also Appendix A for the API for the timer. • Call Z502_IDLE() • Control will not pass back from IDLE to it’s caller until the timer has completed its delay. • Stage 2: In OS_Init() • Write a routine called OS_Create_Process (actually it’s called by OS_Init) • In this routine, create OS structures , for instance a Process Control Block that allows you to know everything about the process. One of the elements in this PCB is a pointer to the context for the process. • Stage 3: Timer Queue is an object that contains an ordered list of the processes waiting for or currently being handled by the timer. • Svc calls AddToTimerQueue() • Interrupt_handler TimerInterrupt RemoveFromTimerQueue();
Components In The Starter Code o o o o o o o o o test0 test1a test1b test2g Test.c OS_ Switch_ Context_ Complete O.S. SVC interrupt_handler fault_handler OS_ Init z502.c Z502_ IDLE Z502_ DELAY_ TIMER Z502_ SWITCH_ CONTEXT Z502_ DESTROY_ CONTEXT Z502_ MAKE_ CONTEXT main Z502_ CLOCK August, 2006
OS Components – What you need to Build Test.c O.S. Give_Up_CPU Ready Queue Make_Ready_ To_Run OS_ Switch_ Context_ Complete SVC Dispatcher Timer Queue Interrupt_Handler Start Timer OS_ Init z502.c Z502_ SWITCH_ CONTEXT Z502_ IDLE Z502_ DELAY_ TIMER Z502_ DESTROY_ CONTEXT Z502_ MAKE_ CONTEXT Z502_ CLOCK August, 2006
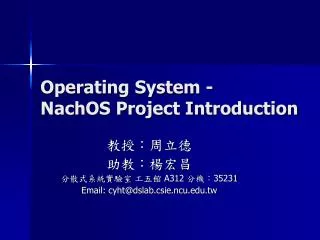
The Execution of test1a test1a test.c 5 SLEEP OS_ Create_Process 14 4 SVC base.c OS_ Init 3 6 Timer Queue 7 13 11 2 Start_ Timer Interrupt_Handler 10 8 9 12 z502.c Z502_ DELAY_TIMER Z502_ CLOCK Z502_ IDLE switch_context main 1 August, 2006
The Execution of test1a 1 The program starts in main(). A temporary context is created and the simulation starts by requesting to run on that context. os_init figures out what test you want to run. It passes the identifier for that test to os_create_process. 2 We come to os_create_process, a routine YOU write. Here we ask the hardware for a context, create the PCB, and then call Z502_SWITCH_CONTEXT. 3 4 OsCreateProcess calls Z502_Switch_Context which transfers control to test1a. Note: Test1a does various system calls, but we’re looking only at SLEEP in this picture. Test1a does a system call SLEEP transferring control to svc. 5 6 svc hands control of the SLEEP request to start_timer, a routine YOU write. 7 start_timer, enqueues the PCB of the running process onto the timer_queue. 8 Start_timer calls the Z502_DELAY_TIMER to give the request for a future interrupt. The timer starts thinking about the time, but interrupts in the future!! Start_timer realizes there’s nothing else to do and so calls Z502_IDLE. This routine says to idle the processor until an interrupt occurs. 9 Svc must handle this terminate_process request. Eventually this code will be more complicated, but for right now, since there’s nothing else for the OS to do, it simply ends the simulation by halting the processor. 10
The Execution of test1a When the delay timer expires, an interrupt is generated. This causes the processor to go to the interrupt handler. 10 In the interrupt handler, take the PCB off the timer queue. This is the process that has been sleeping! 11 When you return from the interrupt_handler, execution returns back to start_timer, to the line AFTER your call to Z502_IDLE. 12 13 Start_timer returns to svc. svc returns to test1a. 14
Test1b - What you need to do What’s the goal of Test1b? Summary information. Where do you find resources to help you? Architecture of the Simulator Environment Z502 Hardware Organization and Architecture Generic Operating System Structure
Test2a - What you need to do What’s the goal of Test2a? Summary information. Where do you find resources to help you? Architecture of the Simulator Environment Z502 Hardware Organization and Architecture Generic Operating System Structure
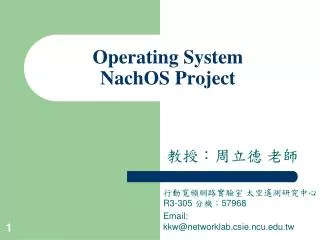
The Execution of test2a and test2b test2a test.c 4 5 GET_PROCESS_ID OS_ Create_Process Process_Management SVC base.c 6 Dispatch OS_ Init 3 12 9 2 Interrupt_Handler Fault_Handler 11 8 z502.c Z502_MEM_READ Z502_MEM_WRITE switch_context main 1 10 7 August, 2006
The Execution of test2a and test2b 1 The program starts in main(). A temporary context is created and the simulation starts by requesting to run on that context. os_init figures out what test you want to run. It passes the identifier for that test to os_create_process. 2 We come to os_create_process, a routine YOU write. Here we create the context, create the PCB, and then call Z502_SWITCH_CONTEXT. 3 4 os_create_process calls Z502_Switch_Context which transfers control to test1a. The test may do system calls as we saw in test1*. The example we see here is GET_PROCESS_ID. 5 6 svc hands control of the system call to the appropriate handler. 7 The test does a Memory Request (either read or write). That request ends up in the hardware. If the hardware can handle it, you’re done. 8 If hardware can NOT handle the call, then a page fault is generated. You do the work in your fault handler to make the memory access successful. After completing the page_fault work, always call your dispatcher to schedule the same or a new process. NEVER return from the fault handler. 9 Reads and writes are handled the same way. 10