ETID Electronic Turn-in Document
490 likes | 816 Vues
ETID Electronic Turn-in Document. CUSTOMER OVERVIEW FEB 2012. ETID is now accessed through the BSM portal link:. External Portal: https://business.dla.mil Internal Portal: https://pep1.bsm.dla.mil/irj. SELECT “I Accept”. SELECT “Disposition Services”. SELECT “ETID”.

ETID Electronic Turn-in Document
E N D
Presentation Transcript
ETIDElectronic Turn-in Document CUSTOMER OVERVIEW FEB 2012
ETID is now accessed through the BSM portal link: External Portal: https://business.dla.mil Internal Portal: https://pep1.bsm.dla.mil/irj
Customer Home Page This is the ETID Customer Home Page. Customers have options to update their profile or log in as a customer.
Customers must enter both their DoDAAC and a Site DoDAAC. To turn in hazardous property, they must answer “Yes” to the Certified for Hazardous Turn-in question in their profile and complete additional profile information. If ETID will be used for hazardous answer YES
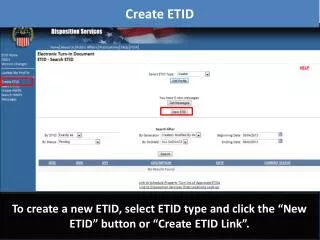
Customer can select the ETID Type. They can produce listings of ETIDs using the Search Filters. To create an ETID, select “New ETID”. Note Navigation links on left and links on bottom.
Status Codes in ETID for Customers. ETIDs are tracked in the system by the changes in Status Codes.
The input screen has been redesigned to fit on one screen. Customers will enter DTID information, General Item Information, Certifications, and can also add Attachments.
NSNs will continue to pre-populate characteristics if used. Standardized LSNs have been incorporated into ETID. LSNs choices listed are based on FSC entered.
When a LSN is chosen, Item Nomenclature, Unit of Issue and Demil Code will populate.
DoD Manual 4160.28, Volume 3, “Defense Demilitarization: Procedural Guidance,” Current Edition DoD Manual 4160.28, Volume 3, “Defense Demilitarization: Procedural Guidance,” Current Edition Check the box to the left of the certification title. Click “Save Cert Selection”. To view a certification, click on the certification title.
To view a selected certification, click on certification title
After viewing a certification, select “Close Window” to go back to the ETID.
To attach a document or image to an ETID, click on “Attach Images/Documents.
3 1 2 Select the file to upload by selecting Browse. Save the uploaded File. To return back to ETID, select “Back To Document”
Click on image to view respective documents. After closing windows, select “Back”.
An ETID can be Saved or Submitted. An ETID can be saved unfinished and then finished later or saved finished and submitted later.
Error messages will be given at top if ETID not correct or complete when submitted.
Message after submitting an ETID. Wait for Disposition Services Site review.
Message for a saved but unfinished ETID. This ETID can be completed later and submitted.
Customers can Edit, Delete, or Copy ETIDs in Pending, Rejected or Redirected Status.
Customers can Cancel Approved ETIDs. Customers will also get messages when approved ETIDs that qualify for Intransit Control tracking are not received within 90 days.
Customers may also receive information related to an approved ETID. View an approved ETID to check for additional information.
Customers can Print Approved ETIDs. Customers should wait for ETIDs to be reviewed before they print.
New After you select print, you can choose what you want to print. You can print labels, DD 1348-1A, Certifications, and a Shipping Manifest. Customers can now print a DLIS 1867 Hard Drive Label.
The 1348-1A in ETID now has 3 bar codes Rejected ETIDs now have a watermark.
ETID has a scrap module. Drop down choices assist customer in completing the scrap turn ETID. A QRP certification is also available.
ETID has a Hazardous Waste Module. Select and Attach Supporting Documentation. Enter additional required HW information.
Your can create a Hazardous Waste Profile Sheet (HWPS) within ETID. You can save a HWPS. Certify (or Re-Certify) and Submit your HWPS to be authorized for use by the Disposition Services Site.
Your can manage, view, and sort Hazardous Waste Profile Sheets (HWPS) within ETID. You can create multiple versions of a HWPS, copy a HWPS, and recertify a HWPS.
ETID has a Hazardous Material Module for turning in hazardous material. Select and Attach Supporting MSDS Documentation. Enter additional required HM information.
ETID has a Special Service Request module for submitting requests under your disposal contract. Drop down choices assist customer in completing the Special Service Request.
Get Messages provides a central location to view/process ETID’s based on actions taken by Disposition Services Sites. It can be used as an alternative way to managing ETIDs in lieu of by Status Code. Customers will receive messages notifying them that an ETID has been approved, rejected, or redirected.
The “ETID – Messages” screen provides a summary of messages by priority. “Action Required” means some action identified in the message will be required of the user. “Warning” and “Info”, inform of some action that has been taken on an ETID or WPS, but no further direct action is required. You can use the filters to get listings of messages.
ETIDs related to a message may be viewed. To view an ETID from the Message center check the box and select “Select for Viewing” or click on the DTID number.
Note the message given in red at the top of the screen. Action buttons allow a customer to take various actions based on the ETID status.
When you view a ETID, the status of a message will change from “New” to “Read”. For action required messages, the action taken will automatically delete the message.
Read messages can be deleted. For Action Required messages, the action taken will automatically delete the message.
For additional information on using ETID: Contact your local Disposition Service Site for questions regarding specific turn-ins http://www.dispositionservices.dla.mil/drmo/drmo-locations.shtml For Customer Support: By email: DLA Contact Center By Phone: 1-877-352-2255