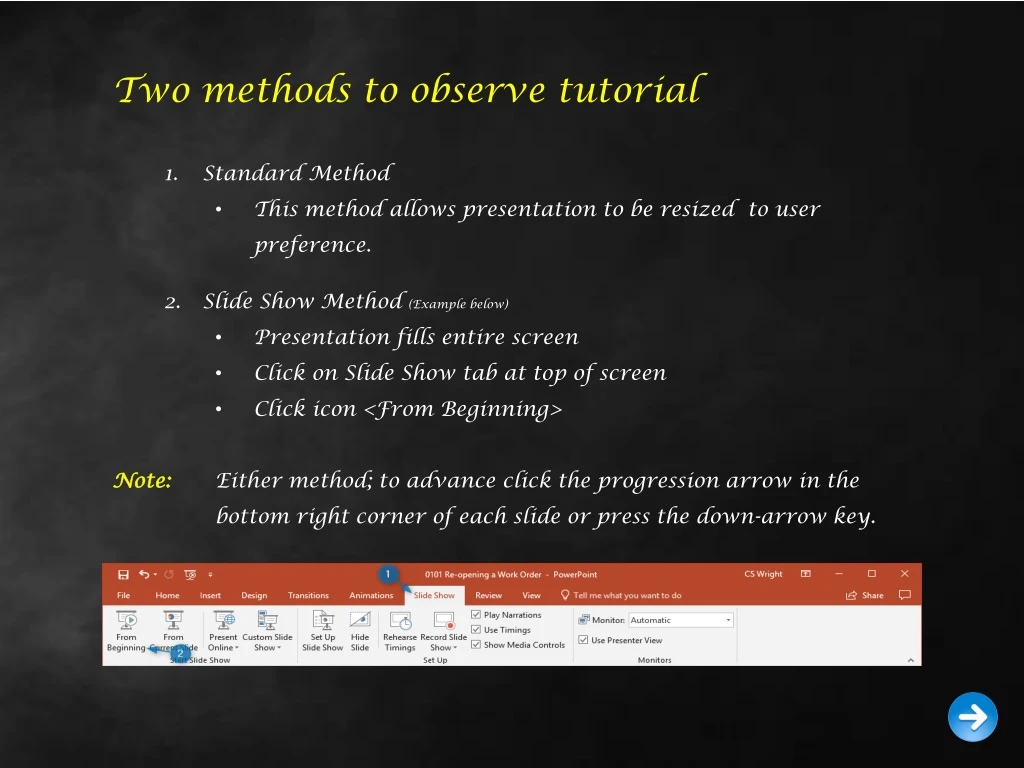

Two methods to observe tutorial Standard Method
E N D
Presentation Transcript
Two methods to observe tutorial • Standard Method • This method allows presentation to be resized to user preference. • Slide Show Method (Example below) • Presentation fills entire screen • Click on Slide Show tab at top of screen • Click icon <From Beginning> • Note: Either method; to advance click the progression arrow in the bottom right corner of each slide or press the down-arrow key.
Welcome to BSIP 101 Transaction Procedures Initial Setup Instructor: Stephen Wright DPI Technical Consultant
Six transactions are required to complete initial setup. • Interface Settings • Default Printer • Single Screen work Orders • Extend Material Setup • Setting up Purchase Orders • Monthly/Yearly Cost Reports Let’s get started -
Interface Settings Purpose:To setup the primary screen to display better information.
From the SAP R/3 Easy Access screen • From the top menu click on Extras.This will activate a drop menu to display. • Click on Settings
A new window appearsSettings • Input: • üCheck the boxes: • Do not display picture • Display technical names • Click the Continue icon to record changes. • Tip:This process speeds up access to the primary menu screen and adds transaction codes to the items on the favorites list.
Printer Settings Purpose:To setup a default printer.
From the SAP R/3 Easy Access screen • From the top menu click on System.This will activate a drop menu to display. • Click on User Profile
From the SAP R/3 Easy Access screen • This will activate a second drop menu to display. • Click on Own Data
A new window appearsMaintain User Profile • Select the middle tab labeled Defaults
Under the Spool Control heading - click in the field titled Output Device; this will activate the field.Select the Matchcode iconat the end of the field.
A new window appearsSpool Output Device • Input: • In the field titled Output Device; key DPI*. • (* = Keypress Shift-8) • Click the Start Search iconor press <Enter> to continue.
A new window appearsSpool Output Device (2) • Two Selections appear: • DPI_PRINTER (Recommended) • DPI_PRINTER_SELECT(Described on next slide)
The difference of the selections DPI_PRINTER_SELECT includes a Printer Options Selection window (shown to the right) every time the user chooses to print. Tip: This feature is useful if the user consistently desires to use a different printer for certain tasks (ex: 30 Day Inspections at printer A; Preventative Maintenance prints at printer B, etc.) If the user prints to an individual printer; we suggest the option DPI_PRINTER utilized.
A new window appearsSpool Output Device (2) • Input: • Click on the selection preferred (This will highlight the type) • Click the Copy icon or press <Enter> to continue.
A new window appearsMaintain User Profile • Input: • üPrint Now • üDelete After Output • Click the Save icon to record all changes.
Single Screen Work Order Purpose:To set defaults; optimizing usage of work orders
From the SAP R/3 Easy Access screen box type IW33 or from your favorites menu, select transaction IW33 – Display PM Order. Your screen should look similar to the example at the right.
A new window appearsDisplay Order: Initial Screen • Input any valid 11 digit work order number in the Order field. • Click the Enter icon or press <Enter> to continue.
A new window appearsDisplay DPI Corrective Maintenance Order {###########}: Central Header • From the top menu click on Extras.This will activate a drop menu to display. • Click on Settings
A new window appearsDisplay DPI Corrective Maintenance Order {###########}: Central Header • This will activate a new drop menu to display. • Click on Default Values
A new window appearsUser Default Values • General Tab (Input) • Planning Plant = 6000 (Always)
A new window appearsUser Default Values • General Tab (Input) • Planner groupClick within the field; this will cause the Match Code iconto display. • Click the Match Code icon
A new window appearsPlanner Group for Customer Service and Plant Maintenance • General Tab (Input) • Planner groupUse the scroll bar to the right of this window to discover the name of your county. • When the name is discovered click on the county name (this will highlight the name); then click on the Copy icon to make the selection or you may double click the county name.
A new window appearsUser Default Values • General Tab (Input) • Main Work Center1st field = TECHWORK2nd field = LEA’s Plant Code • Tip: For training purposes with permission from the county; Macon County’s numbers are used: • Planner group = 056 • Main work center = 6056
A new window appearsDisplay DPI Corrective Maintenance Order {###########}: Central Header • Click on the Ext. procurement tab • Your screen should look similar • to the example at the right.
A new window appearsUser Default Values • External Procurement Tab (Input) • Purchase Group = A99 (Always) • G/L Account = 52331003 (Always) • Material Group = VMRS (Always) • Click the Save icon to record changes. • Click the Continue icon to close the dialogue box. • Click the Exit icon to close the dialogue box.
Extend Material Setup Purpose:To setup defaults; to extend materials
From the SAP R/3 Easy Access screen box type ZMM01Z or from your favorites menu, select transaction ZMM01Z – Extend Material for Plant. Your screen should look similar to the example at the right.
A new window opens: • Create Material (Initial Screen) • Input: • Material - Enter any valid material number. (Ex: For training purposes we selected FQA008425) • Copy from… Material - Repeat the material number you used above.
A new window opens: • Create Material (Initial Screen) • Input: • Click • Tip: If appears at the bottom of the Create Material (Initial Screen) then the number keyed is invalid or used by the port authority only. • Please recheck the DOT number and retry.
A new window appearsSelect View(s) • Input: • Click on the Select All iconfor this new window.
A new window appearsSelect View(s) • Input: • Use the right-hand scroll bar; scroll down until you see: • Warehouse Management 1 • Warehouse Management 2 • Remove the highlight from these two items by clicking on the button to the left of each of them. • Place a ü in Create views selected box. • Click to record your selections made.
A new window appearsSelect View(s) • Input: • Place a ü in View selection only on request • Click to record your selections made. • Click to record your selections made.
A new window appearsOrganizational Levels • Input: • Organizational Levels • Plant (Your County) • Storage Location (Your County) • Copy from • Plant = 6000 (Always) • Storage Location = 8000 (Always) • Click
A new window appearsOrganizational Levels • Choose: • Extend MaterialClick if you wish to extend this particular material to your plant. • Click (to save) • Click (to menu) • Do NOT Extend MaterialClick to not extend this particular material to your plant. • Click (to menu)
Setting Up ME21N Purpose:To setup Purchase Order Screen layout
From the SAP R/3 Easy Access screen box type ME21N or from your favorites menu, select transaction ME21N – Create Purchase Order Your screen should look similar to the example at the right.
A new window appears: • Create Purchase Order • Click to advance to the default settings menu.
A new window appears: • Personal Settings • Default Values tab – PO Header • Doc. Type = Dummy Purchase Order • Purchasing Org. = DOT • Purchase Group = Unassigned • Company Code = NCDPI • Tip: To assist in populating the fields you may click on the drop down icon and then choose the selection from the fields option list. • Click on
A new window appears: • Change Layout • Add Currency to Display Fields • Move Currency from the Hidden fields section to the Display fields section by clicking on the selection button to the left of Currency. • Next click the Show Selection Fields Icon ; Currency will now be in the Display fields section under Purchasing Group. • Click to record selection changes.
A new window appears: • Personal Settings • Default Values tab - PO Header • Currency = USD • Tip: To assist in populating the field you may click on the drop down icon and then choose the selection from the fields option list. • Default Values tab - PO Item • Click on Default Values tab – Purchase Order Item tab
A new window appears: • Personal Settings • Default Values tab - PO Item • Plant (Your County) • Storage Location (Your County) • üThe fields Always Propose to the right of Plant and Storage Location • Click the Save icon to record changes.
A new window appears: • Create Purchase Order • Arrange Columns (Your Preference) • Q. How? • A. Click on column header; while holding the mouse button down drag column to left or right.
A new window appears: • Create Purchase Order • Arrange Columns (Your Preference) • Q. How? • A. Click on column header; while holding the mouse button down drag column to left or right.
A new window appears: • Create Purchase Order • Arrange Columns (Saving your Preference) • Click Table Setting icon to open the Table Settingswindow. • Enter your username in the Variant field. • Click the button to create the new table. • Click to record changes. • Click Exit icon to return to main menu.
Questions Email: Stephen.Wright@dpi.nc.gov
Thank You! Stephen Wright Technical Consultant