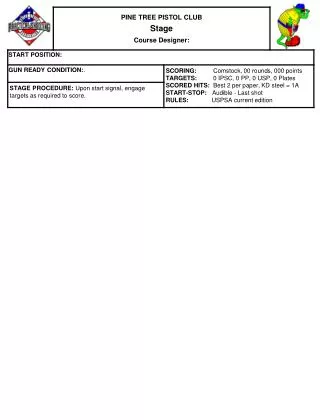
Firearm Range Design Tool for Precision Shooting
Optimize your range setup with this tool - adjust walls, ports, doors, and grid scales easily. Prevent shoot-through issues and setup frustrations on match day. Includes ruler guides for accuracy.

Firearm Range Design Tool for Precision Shooting
E N D
Presentation Transcript
PP2 USP2 USP1 T10 PP1 Flop-Up Drop Out Shoot Drop Out Shoot Drop Out Penalty Drop Out Penalty Out & Back NS Flop-Up Flop-Up Out & Back Target Plate Flop-Up Plate Flop-Up Flop-Up Can-Can Array
Ungroup a wall section, select some boards and remove them to create a port, then group the object again.
PORT COVER, copy and paste to cover or change size of see-thru ports Ungroup this wall, then click above, below, left or right of the port and resize the opening, then group the object again. Walls with see-thru ports
Walls with see-thru doorways & removable doors Copy and paste, resize or edit points of this panel to cover or change a see thru doorway. Doors- copy and paste these to make a door wall.
Rulers for taking measurements and scaling drawings. Red marks indicate the minimum distance for steel targets. To size a drawing to a different grid scale, group the drawings ruler with the drawing. Next copy and paste the ruler for the grid scale you want to resize to next to the drawings ruler. Now resize the drawing until its ruler matches the length of the 2nd ruler. (press & hold Shift & Alt during resizing). 32 Yard Grid Ruler: Scale = Feet 20 Yard Grid Ruler: Scale = Feet 15 Yard Grid Ruler: Scale = Feet
Background Drawing Grid: 15 Yards x 21 Yards READ THIS BEFORE DELETING THIS TEXT BOX GRID BACKGROUND INSTRUCTIONS The grid lines on this page are a background object. You cannot select, resize or move them. WARNING: If you reformat this background, and save this template, you will loose the background grid permanently. To remove the background for printing or viewing, use the Format Menu to Format the Background as White. To preserve the original template, save your work to a new filename by selecting File, Save as from the file menu. Another method is to copy this slide and add it to the template as a new slide. If you use this method, you will protect yourself from inadvertently deleting the grid permanently. After copying the slide, do your work on the copy instead of the original. Remove any text boxes and the ruler as you need. HELPFUL HINTS DO NOT RESIZE THE RULER Use this grid to do overhead view setup drawings. This will yield a properly scaled drawing you may use to eliminate shoot through targets, etc, and use as a measured drawing for match setup. To maintain the proper scale, size all your objects by using the ruler as a guide. Placing 2 Stages on 1 Range After completing your drawing, place the ruler at the bottom of the drawing and Group it with your drawing. Now you can copy and paste multiple drawings onto one slide. Next, resize your drawings relative to each other. Do this by placing one drawing on top of the 2nd drawing, then resize the drawing (press and hold SHIFT and ALT to maintain the proper ratio when resizing) and resize until both rulers are the same length. This will put both drawings into the same scale, something you will need to do if one is drawn on a 15 yard grid and another is drawn on a 20 yard grid, etc. After rescaling you can move and rotate the stages to properly place them on the range you are designing for. This is a must for designing 2 stages that occupy the same range. It is the only way to eliminate setup headaches on match day. No more shoot through problems on adjacent stages! See example on last page. Ruler Scale = Feet Move and rotate ruler as need for measurements Grid Background Scale = Yards
Background Drawing Grid: 18 Yards x 23 Yards READ THIS BEFORE DELETING THIS TEXT BOX GRID BACKGROUND INSTRUCTIONS The grid lines on this page are a background object. You cannot select, resize or move them. WARNING: If you reformat this background, and save this template, you will loose the background grid permanently. To remove the background for printing or viewing, use the Format Menu to Format the Background as White. To preserve the original template, save your work to a new filename by selecting File, Save as from the file menu. Another method is to copy this slide and add it to the template as a new slide. If you use this method, you will protect yourself from inadvertently deleting the grid permanently. After copying the slide, do your work on the copy instead of the original. Remove any text boxes and the ruler as you need. HELPFUL HINTS DO NOT RESIZE THE RULER Use this grid to do overhead view setup drawings. This will yield a properly scaled drawing you may use to eliminate shoot through targets, etc, and use as a measured drawing for match setup. To maintain the proper scale, size all your objects by using the ruler as a guide. Placing 2 Stages on 1 Range After completing your drawing, place the ruler at the bottom of the drawing and Group it with your drawing. Now you can copy and paste multiple drawings onto one slide. Next, resize your drawings relative to each other. Do this by placing one drawing on top of the 2nd drawing, then resize the drawing (press and hold SHIFT and ALT to maintain the proper ratio when resizing) and resize until both rulers are the same length. This will put both drawings into the same scale, something you will need to do if one is drawn on a 15 yard grid and another is drawn on a 20 yard grid, etc. After rescaling you can move and rotate the stages to properly place them on the range you are designing for. This is a must for designing 2 stages that occupy the same range. It is the only way to eliminate setup headaches on match day. No more shoot through problems on adjacent stages! See example on last page. Ruler Scale = Feet Move and rotate ruler as need for measurements Grid Background Scale = Yards
Background Drawing Grid: 20 Yards x 28 Yards READ THIS BEFORE DELETING THIS TEXT BOX GRID BACKGROUND INSTRUCTIONS The grid lines on this page are a background object. You cannot select, resize or move them. WARNING: If you reformat this background, and save this template, you will loose the background grid permanently. To remove the background for printing or viewing, use the Format Menu to Format the Background as White. To preserve the original template, save your work to a new filename by selecting File, Save as from the file menu. Another method is to copy this slide and add it to the template as a new slide. If you use this method, you will protect yourself from inadvertently deleting the grid permanently. After copying the slide, do your work on the copy instead of the original. Remove any text boxes and the ruler as you need. HELPFUL HINTS DO NOT RESIZE THE RULER Use this grid to do overhead view setup drawings. This will yield a properly scaled drawing you may use to eliminate shoot through targets, etc, and use as a measured drawing for match setup. To maintain the proper scale, size all your objects by using the ruler as a guide. Placing 2 Stages on 1 Range After completing your drawing, place the ruler at the bottom of the drawing and Group it with your drawing. Now you can copy and paste multiple drawings onto one slide. Next, resize your drawings relative to each other. Do this by placing one drawing on top of the 2nd drawing, then resize the drawing (press and hold SHIFT and ALT to maintain the proper ratio when resizing) and resize until both rulers are the same length. This will put both drawings into the same scale, something you will need to do if one is drawn on a 15 yard grid and another is drawn on a 20 yard grid, etc. After rescaling you can move and rotate the stages to properly place them on the range you are designing for. This is a must for designing 2 stages that occupy the same range. It is the only way to eliminate setup headaches on match day. No more shoot through problems on adjacent stages! See example on last page. Ruler Scale = Feet Move and rotate ruler as need for measurements Grid Background Scale = Yards
Background Drawing Grid: 32 Yards x 43 Yards READ THIS BEFORE DELETING THIS TEXT BOX GRID BACKGROUND INSTRUCTIONS The grid lines on this page are a background object. You cannot select, resize or move them. WARNING: If you reformat this background, and save this template, you will loose the background grid permanently. To remove the background for printing or viewing, use the Format Menu to Format the Background as White. To preserve the original template, save your work to a new filename by selecting File, Save as from the file menu. Another method is to copy this slide and add it to the template as a new slide. If you use this method, you will protect yourself from inadvertently deleting the grid permanently. After copying the slide, do your work on the copy instead of the original. Remove any text boxes and the ruler as you need. HELPFUL HINTS DO NOT RESIZE THE RULER Use this grid to do overhead view setup drawings. This will yield a properly scaled drawing you may use to eliminate shoot through targets, etc, and use as a measured drawing for match setup. To maintain the proper scale, size all your objects by using the ruler as a guide. Placing 2 Stages on 1 Range After completing your drawing, place the ruler at the bottom of the drawing and Group it with your drawing. Now you can copy and paste multiple drawings onto one slide. Next, resize your drawings relative to each other. Do this by placing one drawing on top of the 2nd drawing, then resize the drawing (press and hold SHIFT and ALT to maintain the proper ratio when resizing) and resize until both rulers are the same length. This will put both drawings into the same scale, something you will need to do if one is drawn on a 15 yard grid and another is drawn on a 20 yard grid, etc. After rescaling you can move and rotate the stages to properly place them on the range you are designing for. This is a must for designing 2 stages that occupy the same range. It is the only way to eliminate setup headaches on match day. No more shoot through problems on adjacent stages! See example on last page. Ruler Scale = Feet Move and rotate ruler as need for measurements Grid Background Scale = Yards
Drawing Grid Object: 16 Yards x 21 YRDS This is an object that is click selectable, may be reformatted, etc. You can change the line color, move it, resize it, etc. Use this page for printing your own graph paper.
Drawing Grid Object: 18 Yards x 23 YRDS This is an object that is click selectable, may be reformatted, etc. You can change the line color, move it, resize it, etc. Use this page for printing your own graph paper.
Drawing Grid Object: 23 Yards x 27 YRDS This is an object that is click selectable, may be reformatted, etc. You can change the line color, move it, resize it, etc. Use this page for printing your own graph paper.
Drawing Grid Object: 32 Yards x 42 YRDS This is an object that is click selectable, may be reformatted, etc. You can change the line color, move it, resize it, etc. Use this page for printing your own graph paper.

