Creating a button in Photoshop 7.0
E N D
Presentation Transcript
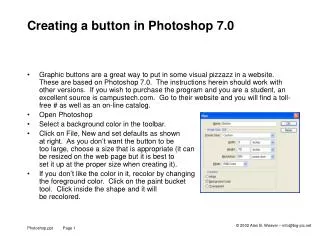
Creating a button in Photoshop 7.0 • Graphic buttons are a great way to put in some visual pizzazz in a website. These are based on Photoshop 7.0. The instructions herein should work with other versions. If you wish to purchase the program and you are a student, an excellent source is campustech.com. Go to their website and you will find a toll-free # as well as an on-line catalog. • Open Photoshop • Select a background color in the toolbar. • Click on File, New and set defaults as shown at right. As you don’t want the button to betoo large, choose a size that is appropriate (it canbe resized on the web page but it is best toset it up at the proper size when creating it). • If you don’t like the color in it, recolor by changing the foreground color. Click on the paint bucket tool. Click inside the shape and it will be recolored.
1. Click in here to choose a new color 2. Click in here to get the paint bucket. If it is not there, click and hold down and make the choice from the drop down menu. 3. Click in the object or layer that you wish to recolor and it will be changed. 4. When creating a text box for the website that you will be using for links, it is best to create the LONGEST one first to make sure they are sized properly. (of course you can put text on several lines such as: Home Page After clicking on the “T”, insert mouse in area and draw a rectangle. Choose font size and style on above menu. Insert the text that you wish in the text box.
Adding text Click on the selection that you prefer….it shows different qualities and sizes of files. Give the file a specific file name. Note: the .jpg file will consist of ONLY one layer and cannot be modified. The .psd file CAN be modified. The psd file is 30.5 kb and the .jpg file is 2.05 kb. Try to keep your images as small as possible in memory…if their size is too large, they will take a very long time to download if someone has dial-up. The example shown above consists of two layers, the text and the green background. When a Photoshop document is saved, it has .PSD extension which is useless for a website. You may wish to keep the original files (which are memory hogs) so that you can edit. (click on File, Save to do this) However, to make them work on the website, they need to be saved as .JPG files. To create a .JPG file for the Internet, click on File, Save for Web