
Two methods to observe tutorial Standard Method
E N D
Presentation Transcript
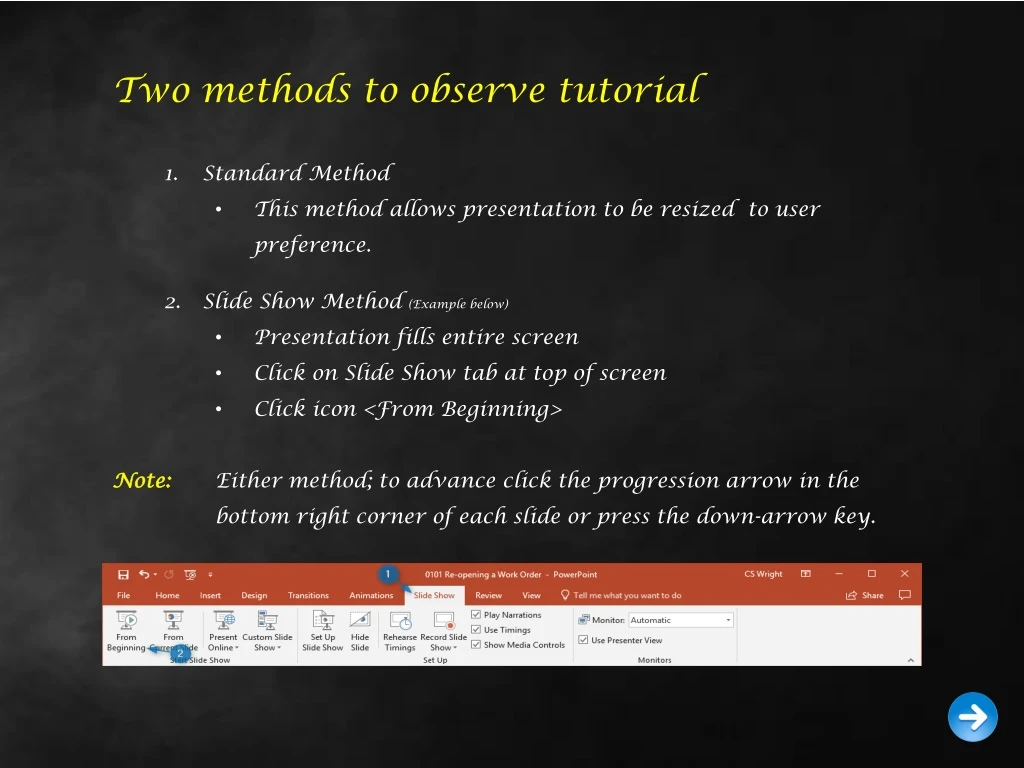
Two methods to observe tutorial • Standard Method • This method allows presentation to be resized to user preference. • Slide Show Method (Example below) • Presentation fills entire screen • Click on Slide Show tab at top of screen • Click icon <From Beginning> • Note: Either method; to advance click the progression arrow in the bottom right corner of each slide or press the down-arrow key.
Welcome to BSIP 101 Transaction Procedures “Odometer Downward Adjustment” Instructor: Stephen Wright DPI Technical Consultant
Purpose:Use this procedure to adjust odometer readings; by canceling prior incorrect entries.
One transaction is required to complete this procedure: • IK18 Let’s get started -
From the SAP R/3 Easy Access screen box type IK18 or from your favorites menu, select transaction IK18 – Change Measurement Documents Your screen should look similar to the example at the right.
A new window opens: Change Measurement Documents: Measurement Document Selection Two options: • Enter the vehicles equipment number; or • Click on the Matchcode icon to open a search window. (Next Slide demonstrates)
A new window opens: Display Equipment: Equipment Selection • Input the vehicles inventory number. (Left column; fourth line down; under the tab header General Data). • Click the Execute Icon
A new window opens: • Change Measurement Documents: • Measurement Document Selection • This window now contains a valid Equipment number. • Click the Execute icon to continue.
A new window opens: • Change Measurement Documents: • Measurement Document List Select the Odometer measuring point(s) to cancel. This is accomplished by clicking on the block to the left of the line to select. If multiple lines are required to be selected hold down the <CTRL> key while clicking the additional lines.
Important! • You MUST cancel all documents from the most current through to the original error. • In the example below the original error occurred on 02-27-2019; everything that occurred after that point must also be removed.
A new window opens: • Display Measurement Documents: • Measurement Document List Click on Change Display iconThe title will change from reading “Display…” to “Change…” indicating the software is in change mode. Click on Details icon
A new window opens: • Change Measurement Document: • General Data The screen will open to the most the current selection; canceling odometer counter readings works in descending order. Click on “Measurement Document” at the top of the screen.
A new window opens: • Change Measurement Document: • General Data • This will allow a dropdown window to appear. Allow the cursor to hover over the word “Functions” it will allow “Reversal Indicator” to appear. Allow the cursor to hover over it as well and the word “Set” will appear. • Click on the word “Set”
A new window opens: • Information • Click the Continue icon
A new window opens: • Change Measurement Document: • General Data Click the Save icon . The software will automatically increment to the next selected file. Repeat the steps starting with clicking on “Measurement Document” as needed.
A new window opens: • Change Measurement Document: • General Data When all selections are completed the software returns you to Measurement Document List. Click on the Update icon . The list will refresh and the canceled odometer readings will no longer show.
Questions Email: Stephen.Wright@dpi.nc.gov
Thank You! Stephen Wright DPI Technical Consultant