Download
1 / 34
350 likes | 560 Vues
PerSys Adult Bone Injection Gun B.I.G. Simply Saving Lives. ANZRC Guidelines Guideline 11.2 Protocols for Adult Advance Life Support. “Obtain Intravenous or Intraosseous Access” (Class A: LOE 2) Dec 2010. INTRAOSSEOUS ACCESS.

E N D
PerSysAdult Bone Injection Gun B.I.G. Simply Saving Lives
ANZRC GuidelinesGuideline 11.2Protocols for Adult Advance Life Support • “Obtain Intravenous or Intraosseous Access” (Class A: LOE 2) • Dec 2010
INTRAOSSEOUS ACCESS • Penetration of the bone in order to access the intravascular compartment • Device inserted into medullary cavity • Proximal tibia, distal tibia, proximal humerus, distal radius • Appropriate for adult and paediatric application • Temporising, emergency measure
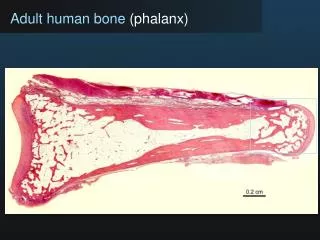
Bone Structure • Consists of hard outer layer (cortex) • Covers fatty tissue, marrow and nerves • Covers vascular cancellous bone at distal ends of long bone • Vascular access by needle insertion into cancellous bone
Indications • Difficult or impossible IV Access • Appropriate for Adult or Paediatric application • Urgent requirement for fluid and/or drug administration (Cardiac Arrest, Hypovolaemia, Shock)
CONTRAINDICATIONS • Infection at insertion site • Local fracture • Existing trauma at insertion site • Same bone osteomyelitis • Ipsilateral femoral fracture • Osteogenesis imperfecta • Recent prior attempt in same bone • Osteporosis
Complications(Generic for all devices) • Compartment Syndrome • Osteomyelitis • Local tissue infection • Pain (most often with fluid infusion in awake patient) • Malplacement
Bone Injection Gun • Two devices • Blue = Adults • Red = Paediatrics (0-12 years)
Adult Bone Injection GunHow it works • Trocar and Cannula contained within blue plastic barrel • Powered by spring loaded piston in white plastic handle • Trocar and cannula propelled from barrel, into bone, when device is triggered
You will need ……. • Adult Bone Injection Gun • Disposable dressing pack • Skin clean up solution • Gloves • Adhesive surgical tape (1 cm wide) • 10ml syringe • 10ml Normal Saline • Giving Set • IV Fluid
Location Place a rolled towel under knee with the foot facing outward . Find the outset point : Tibial Tuberosity- A rounded protrusion distal to the patella. *Locate the Tuberosity and feel it on your leg .
Location From the Tibial Tuberosity Go approx. 2 cm (1 inch) to the inner part of the leg to find a flat site. This is the Tibial Plateau.
Location FromTibialplateauGo UP approx. 1cm (0.5 inch) toward the patella. *You are looking for the thinnest portion of the cortex.
Location Summary (adult patient): From Tibial Tuberosity Go approx. 2 cm (1 inch) IN (inner leg). And approx. 1 cm (0.5 inch) UP (toward patella). *Try to find the insertion site on your leg.
IMPORTANT The Bone Injection Gun must be held FIRMLY by the blue barrel against the selected insertion site It is important that the correct insertion site is selected You are aiming to penetrate the THINNEST part of the bony cortex
How NOT to Use the B.I.G The selected site is too distal Too anterior Not held firmly against insertion site Insufficient pressure whilst triggering the B.I.G. Click on the below link to view the Video How NOT to use the B.I.G. (internet connection required)
Alternate Adult Locations 1-2 cm proximally to the base of the Medial Malleolus . Posterior-Distal metaphysis of the Radius.
Head of Humerus Draw the imaginary line connecting the Acromion and the Coracoid Process. From the midpoint of the line, go 2 fingers Distally (This is the Humeral Head) In certain patients, in addition: Go one finger Anteriorly (Toward the Chest)
*Once located the insertion site, confirm the exact position, by verifying the Greater Tubercle’s outer margins.
Setting Insertion depth Adjust blue barrel to determine depth of cannula insertion according to insertion site These sites are clearly marked on the B.I.G. Proximal tibia, malleolus, distal radius Proximal tibia setting applies for anterior humerus
Positioning With one hand holding blue barrel firmly against the selected insertion site……
Safety latch Pull out the safety latch by squeezing the two ends together . *Do not discard, it will later be used.
Important The red safety latch is NEVER removed before the B.I.G. is correctly positioned at the insertion site Do not discard the safety catch Used to stabilise cannula following insertion
Triggering While continuing to hold the bottom part firmly against the leg, Place 2 fingers of your other hand under the ‘winged portion’ and the palm of that hand on the top. Trigger the BIG by gently , but firmly pressing down . Note: Extra force is not required.
Stylet trocar Pull out the stylet trocar. Only cannula remains in the bone.
Fixation The safety latch provides additional stability.
Aspiration Venous blood can be aspirated into a syringe for laboratory sampling. Note: Lack of blood return does not mean the IO is improperly placed.
Flushing Flushing 10-20ml (5-10ml in Paediatrics) of saline is recommended before the injection of fluids or drugs. *In conscious patients- consider local anaesthesia prior to administering fluids.
Administration Fluids and drugs may now be administered A pressure infusion cuff may be required Optional : Connect a stopcock to the cannula and then use a standard I.V set.