LightSPEED Sound Enhancement Equipment
170 likes | 417 Vues
LightSPEED Sound Enhancement Equipment. LightSPEED Sound Enhancement Equipment. Student Achievement

LightSPEED Sound Enhancement Equipment
E N D
Presentation Transcript
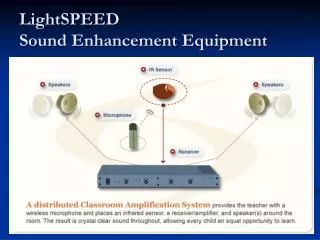
LightSPEEDSound Enhancement Equipment Student Achievement • LightSPEED classroom amplification systems allow every child in a classroom to hear clearly all the speech components of the teacher’s voice—no matter where a child is seated or where the teacher is standing—enhancing their ability to learn. • Improves Student Attention & On-task Times • Increases Classroom Interaction & Participation • Easily overcomes high ambient noise levels in the classroom
Amplifier Overview What is the effective coverage of a Classroom Amplification System? Only volume control knobs on front of the unit should be adjusted . These are “set it and forget it” controls. There is no need for constantly adjusting volumes. As an exception, not a rule, the second (B) microphone may need to be adjusted periodically for a very soft-spoken or very loud student. There are other volume controls for auxiliary equipment, such as your computer and DVD/CD player. The LightSPEED system should be turned off and microphones removed from the charging cradle each weekend.
Sensors • The sensor can sometimes be mistaken for a security camera similar to those at Wal-Mart! • The black IR receiver is attached to the ceiling. • Sound is transmitted through the black sensor at the top of the microphone.
Microphone ChargingHow often should I charge my microphone? • The “Charging Cradle” is used nightly to charge microphones. • When microphones will not be used for more than 5 days remove them from the charger. • Microphones charged overnight will usually last through a typical school day. • Turn off microphones during extended times such as lunch or planning time to save battery life. • The MIC will charge in the cradle with the amplifier unit on or off. (Remove mics while system is off over weekends.) • Turn the mic off during charging to get a full charge. • The red light on the battery charger indicates the MIC is charging. No light means the MIC is fully charged.
Microphone PlacementWhere should I position the LightMic™ for best results? • It is important to wear the microphone correctly. • The top of the microphone should be placed right at the “V” notch of the collarbone or just below. • Improperly worn microphones will require the amp volume to be turned up too much and speaker feedback may be experienced. • Remove the MIC by using the clip on the lanyard.
Coverage AreaWhat is the effective coverage of a Classroom Amplification System? • The IR sensor coverage area allows your voice to be heard just outside the classroom door. • Standing outside the door, facing the door may result in the sensors transmitting your voice through the system. • The microphone can be turned off for private conversions. • Another option is to simply cover the top of the microphone (the sensor) with your hand to block the reception of IR light. • If volume adjustment is required teachers should get another faculty member to assist with setting the volume while he/she uses the MIC to avoid setting the volume too high.
General Information • Remember, the sound system is designed to enhance your voice. It is not a public address system. • Ideally, the teacher should be able to just BARELY hear himself/herself through the system speakers. The ideal sound level in the room should exactly like the sound level the teacher hears in his/her own ears when speaking. • If a teacher can clearly hear themselves through the system, it is too loud. • Necklaces and buttons can cause interference.
FAQ(Frequently Asked Questions) • Q. Can the TV/DVD player in my classroom be integrated with the classroom amplification system? • A. Yes, anything that you want to have amplified through the system speakers can be integrated. If the audio output is available, a simple patch cable can connect the TV/DVD to the system via AUX input on the back of the amplifier. • Q. Should I take any precautions when storing my system over the summer? • A. The only precautions that are necessary are to fully charge the batteries, and then make sure the transmitter and receiver are unplugged from the power source.
Additional Product Information Links What is a LightMic™?Why should I get an extra microphone?Where should I position the LightMic™ for best results?How often should I charge my microphone?How do I connect a personal FM unit to my classroom system?How many IR microphones can I operate simultaneously?What is the effective coverage of a Classroom Amplification System?I need portable amplification. What is my best option?Does LightSPEED sell rechargeable batteries?What is the life span of the rechargeable NiMH batteries?Can I use alkaline batteries in my microphone?What is the expected life span of a classroom amplification system?How much maintenance is involved?