Download
1 / 8
80 likes | 409 Vues
ClearCanvas Workstation 2.0 SP1. How To Install and Use. ClearCanvas Workstation 2.0 SP1. Register & Download Workstation www.clearcanvas.ca Install Workstation Google: clearcanvas workstation guide Follow Install ImageViewer Only instructions AE Title must be unique

E N D
ClearCanvas Workstation 2.0 SP1 How To Install and Use
ClearCanvas Workstation 2.0 SP1 • Register & Download Workstation • www.clearcanvas.ca • Install Workstation • Google: clearcanvas workstation guide • Follow Install ImageViewer Only instructions • AE Title must be unique • Port cannot be same as ConquestDICOM (12345 recommended) • Request Access to AIRCPACS and/or MOUNTHOOD • Fill out the AIRC Account Request Form for DICOM Server Access • Open your firewall for the ClearCanvas.Server.ShredHostService.exe • Instructions on following slides… • Add AIRCPACS and/or MOUNTHOOD to your ClearCanvas Workstation Server List • Instructions on following slides…
ClearCanvas Workstation 2.0 SP1:Opening your firewall port • Open your control panel to Windows Firewall settings Exceptions tab • Click Add Program • Click Browse…
ClearCanvas Workstation 2.0 SP1:Opening your firewall port (cont.) • Browse to… • C:\Program Files\ clearcanvas\clearcanvas workstation • And select • Feel free to call or email Eric or Brendan with any questions • Eric Earl (earl@ohsu.edu, x81567) • OR • Brendan Moloney (moloney@ohsu.edu, x81529)
ClearCanvas Workstation 2.0 SP1:Adding a server • Right-click My Servers and choose Add Server • Enter necessary information (red)
Under the “Servers” pane, left-click “My Studies” If the study you are looking for does not appear on the right side, then “Search” for it Left-click the study of interest and then left-click the green check button to Open study ClearCanvas Workstation 2.0 SP1Opening a retrieved study
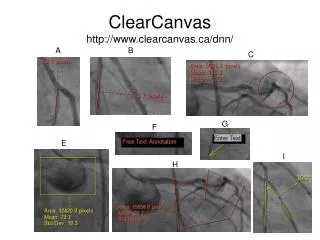
Left-click and highlight the series and image you are interested in Go to Tools > Utilities > Locate on Disk This will take you to the study’s folder and highlight the selected series’ image ClearCanvas Workstation 2.0 SP1Locating study files
DONE! + dicom_sort script • In order to retrieve spectroscopy, DTI, and structured reports, request the custom Workstation software from Brendan Moloney • ClearCanvas workstation is great for acquiring and viewing data, but if you need to determine where every instance of one series out of a larger study is on your hard disk then it becomes more difficult • Each instance in a dataset is named by a unique ID • The dicom_sort script provides a sorting solution • It sorts any amount of DICOM data from any amount of unsorted folders and returns human-readable folders and image names • Contact Eric Earl to integrate the dicom_sort script as a menu option within ClearCanvas Workstation