
Scratch
E N D
Presentation Transcript
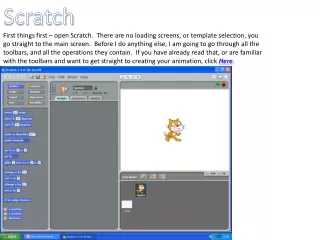
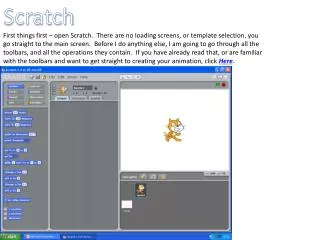
Scratch First things first – open Scratch. There are no loading screens, or template selection, you go straight to the main screen. Before I do anything else, I am going to go through all the toolbars, and all the operations they contain. If you have already read that, or are familiar with the toolbars and want to get straight to creating your animation, click Here.
The Screen This is the main screen of Scratch. On the far left you have the toolbars, where you can select commands to use. To the right of that, you have the scripts/costumes/sounds box. In Scripts you can view/edit the commands a certain sprite is getting. (A sprite is an object in you animation – for example the orange cat is a sprite). In costumes, you can change what a sprite looks like, and in sounds you can record or import sound affects that you want the sprite to make. The first sound you have is ‘meow’ – keeping with the cat theme. On the top right you have the stage, where you can see the result of your actions. The red stops all running scripts, and the green starts any scripts with the ‘when pressed’ command. Under that you have the ‘area’ where you can view all your sprites, draw new ones and delete unwanted ones. You can also change what the stage looks like (the white area behind the cat).
Toolbars I - Motion Ok then, before I explain anything else I need to explain the toolbars. There are eight different toolbars, and each one contains a specific type, or species , of command. First on the list we have the ‘MOTION’ toolbar. Here you can give you can find the commands that cause your sprite to move. If a command has a white rectangle with text in it, you can change what the text says just by clicking and typing: First we have the move X steps command. This commands your sprite to move X steps in the direction it is pointing. Below that we have the turn clockwise X degrees and the turn anti-clockwise X degrees. These turn your sprite X degrees in the desired direction from the direction it is currently pointing. Under that we have the point in direction X . Here you may have noticed there is a little box where you can type, and a drop down box. You can type any angle you like, from 0 to 360, with 0 meaning up, and 180 being down. This command will make your sprite face in the direction X. Next you have point towards . Here you cannot type your own value, but must select an object. This can be either another sprite, or the mouse-pointer. This command will make your sprite point towards whatever you select. After this you have go to . This send your sprite to another sprite, or the mouse pointer. Under this you have glide X secs to x: Yy: Z . This command tells your sprite go to coordinates Y,Z in time X seconds. Next we have change x by X . This changes the x position of the sprite by X – X can be wither positive or negative, with a positive value meaning ‘right’ and a negative value meaning ‘left’. Set x to X sets the x coordinate of the sprite to the value X. For the change y by Xand the set y to X commands, see above. Last in the motion toolbar – if on edge, bounce. This command tells your sprite to reverse its direction if it reaches the edge of the screen. Tick-box commands are covered on slide 13.
Toolbars II - Looks The second toolbar down is the LOOKS toolbar. As you may have guessed, this affects what your sprite, looks like – and allows you to insert things like thought bubbles and speech bubbles without having to make additional sprites and draw each letter – which would take ages! On the top of the list we have switch to costume . This changes the costume that your sprite is using to any of the other costumes you have created or imported for it. On the same theme as this, the next costume command tells your sprite to use the next costume on the list, whichever that may be. Tick-box commands are covered on slide 13. Onto our though bubbles and speech bubbles, the say XYZ for X secs command causes a square text box with an arrow to appear, with the text XYZ in it for X seconds. The say XYZcommand tells your sprite to display the text XYZ until the stop button is pressed. The think XYZ for X secs and think XYZ commands are the same as above, but with a though bubble not a text box. The next commands are very useful for those who cannot draw very well, like me, but want complex looking affects. The change effect by X increases by X the degree of the specified effect – there are a number to choose from, and you can find out what they all are by simple trial and error. A negative X will sometimes do the opposite of the positive, but not always. The set effect to X changes the selected effect to a different intensity of value X. Clear graphic effects resets the effects on your sprite so it looks like what you had originally. Next on the list, change size by X changes the size of your sprite, either decreasing od increasing it depending on whether your X value is positive or negative. Similarly, set size to X %sets the size of your sprite to a value X % of the original. Tick-box commands are covered on slide 13. Show makes your sprite visible, while hide makes it invisible. Go to front, much like in power point, brings your sprite to the front of the stage. Last, but not least, go back X layers sends your sprite back by the number of layers specified by X.
Toolbars III - Sound The third toolbar we are going to look at is the SOUND toolbar – here you can put in sound effects for sprites to make – as well as create your own music themes for your animation. On the top of the list we have play sound . This command tells you to play the sound you choose from the list, it goes onto the next command instantly, while the sound is still playing. Next, we have play sound until done. This commandplays the sound again, but waits for the sound to finish before it goes onto the next command. Stop all sounds stops all the sounds that are playing. Play drum X for Y beats plays a drum, where the type can be either typed (X) or selected, for Y beats. After that, we have rest for X beats which is like a delay, but in musical terms. It causes the script to pause for the number of beats specified by X. Play note X for Y beats is the same as with the drum, but this time with a note from a keyboard. Set instrument to X changes the instrument which is playing, you can select it either by typing (X) or using the selector arrow. Change volume by Xincreases the volume by X – a negative value decreases the volume. Set volume to X % sets the volume to X% of the current volume. Tick boxes are covered on slide 13. Change tempo by X increases the tempo by X – a negative value decreases the volume. Set tempo to X % sets the tempo to X% of the current tempo. Tick boxes are covered on slide 13
Toolbars IV - Pen Toolbar number four is the PEN toolbar – used if you want your sprite to draw things, or if you want to be able to see where it has been going. I know that I have often written a command, and my sprite promptly vanished. I have been forced to make it draw a line so that I can see where it has gone! First, and probably most useful of all we have the clear command – as you could imagine this completely deletes anything that your sprite(s) have drawn on the stage. After that we have the pen down command, which causes the sprite to put the ‘pen’ ‘down’ – meaning that it will draw a line behind it. Next we have the Pen up command, which makes the sprite stop drawing the line behind it. Set pen colour to allows you to choose a colour for the pen, which you can choose from a PowerPoint esque colour chart. After that we have change pen colour by X – this increases the pen colour by X - a negative number would decrease the value. Set pen colour to Xchanges the pen colour the the value X. The next command is change pen shade by X – this command increases the pens shade by X. The shade is how dark the colour is – you could think of it moving the pointer up or down on the colour chart. Set pen shade to X changes the pen shade to the value of X. After that we have change pen size by X – this increases the size of the ‘pen’ – making the link thicker or thinner by X. (X is how many pixels thick the like is) Set pen size to X changes the pen size the the value X. Last, but not least, stamp puts a picture of the sprite in the sprites current location – so if the had the cat go left, stamp, the go right you would end up with two cats, one in the middle and one where the stamp command was given.
Toolbars V – Control I Now we come to toolbar number 5 – perhaps the most important toolbar of them all. It is the CONTROL toolbar – and this is the toolbar that gives the commands for you to start, stop and repeat scripts. First of all we have the when clicked command. This starts the script underneath it when the green flag is pressed. Next we have the when space key pressed command – this starts the script underneath it when the specified key is pressed. The key can be chosen from the drop down menu. After that we have when sprite1 clicked command. This starts the script underneath it when you click on sprite1 on the screen. This command only allows you to click on the sprite that script is for, so if the script was controlling sprite1, the command would be when sprite1 clicked. Similarly if you were controlling sprite37, the command would be when sprite37 clicked. After that we have a very useful command, a delay. Wait X secs causes the script to pause at this block for a time X. Now we have a slightly strange looking command. Forever repeats endlessly the script in the yellow bracket. Similarly repeat X repeats the script in the brackets X times – then moves on to the script after the bracket. Broadcast sends a message to all the other sprites, casing them to do whatever it is that their scripts tell them to do. The script with the broadcast command continues onto the next block instantly. Broadcast and wait again broadcasts a message, but then waits for the other sprites scripts to finish before its script continues. When I receive is the other half of the broadcast command, this command causes the script below it to start when the specified message is broadcast by another sprite. Forever if repeats the script in the bracket if the terms in the hexagonal section are true. If they are false, it waits until they are true, or the scripts are stopped.
Toolbars VI – Control II Next on the list we have if . This command runs the script in the bracket if the conditions are met, if they are not then it continues with the script underneath the bracket. If else commands your script to run the scripts in the first bracket if the conditions are met, the scripts in the second bracket if the conditions aren’t met, then continues with the script below. The next command, wait until causes the script to wait at this block until the conditions are met, then it continues with the script underneath it. Repeat until repeats the script in the bracket until the conditions are met, then it continues with the script underneath. Stop script stops the current script. Stop all stops all the running scripts. Note that all require OPERATORS – which are covered on slide 10. A true output from an operator is equivalent to a Boolean output of 1.
Toolbars VII – Sensing Now we have toolbar number 6 – the SENSING toolbar. This toolbar is used to ‘get’ information about your sprite and its surroundings, and then use it to make decisions. First of all we have touching? This command lets your sprite sense when it is either touching the mouse-pointer, the edge or another sprite, al of which can be selected from the drop down menu. Next of all we have touching colour ? – this lets your sprite sense if it is touching the anything of the colour specified. After that we have colour is touching ? – this tells your sprite when the first colour selected is touching the second colour selected. Now we have ask XYZ and wait – this poses the question XYZ and then lets you reply with a dialogue box. The script waits for the reply to have been entered and the tick or enter button pressed before the script continues. The reply is stored in the ‘answer’ memory slot, which is dealt with on slide 13. Tick boxes are dealt with on slide 13. Mouse x tells the sprite the x position of the mouse. Mouse y tells the sprite the y position of the mouse. Mouse down? tells the sprite whether the mouse is ‘clicked’ or not. Key space pressed? tells the sprite if the selected key is pressed or not. After that we have distance to . This command tells your sprite how far away it is from the selected object, be it another sprite or the mouse pointer. Reset timer sets the timer to 0. Tick box commands are dealt with 13. x position of Sprite1 tells your sprite any number of things, selectable in the first menu, about the object selected in the second menu. The object in question can either be a sprite, or the stage itself. **Note: when I say it ‘tells’ the sprite, in actual fact it stores in a memory slot the requisite information, which can then be accessed via another command **
Toolbars VIII – Operators Toolbar number seven is the OPERATORS toolbar – this contains all your mathematical functions for more complex animations, and games. These are also used for any ‘conditional’ commands, such as ‘if’, or ‘when’ First we have X + Y. This command adds the two values for X and Y. Next we have X - Y. This command Y from X. After that we have X * Y. This command multiplies X by Y. Next we have X / Y. This command divides X by Y. After that is pick random X to Y – this generates a random number of any value in between X and Y. X < Y tells the sprite if X is smaller than Y – with these commands you can put calculations within calculations, or use information like ‘x position’ blocks. X = Y tells the sprite if X equals Y. X > Y tells the sprite if X is greater than Y. and - this function is used in ‘if’ commands – it gives a ‘true’ output (or 1 for those who prefer Boolean) when the statement in the first box and the statement in the second box are true. (A.B = Q) or - this function is used again in ‘if’ commands – it gives a true output if either the first box or the second box are true. (A+B = Q) Not - gives a true output if the term in the box is false. (Ā = Q) After that we have Join XYZ ABC – this function allows you to display text where part of the text is a sentence, and the other half is a variable, or a calculation. For example: join sinx = (SIN X * 90) would allow you to display the sentence sinx = 90 (assume variable X = 90). Letter Xof XYZ tells the sprite what the Xthletter of the word XYZ is. Length of XYZ tells the sprite how many characters are in the word XYZ. X mod Y – this finds the mod of X and Y. (I wont explain what mod is – that’s a project by itself) Round X – this rounds X to zero decimal places. Sqrt of X tell you a mathematical function (i.e. sqrt, sin, cos, tan) of the value X.
Toolbars IX – Variables I Last, but not least, toolbar eight, VARIABLES. These are the most crucial parts of any complex animation, especially any that involve interaction or data handling. First we have Make a variable. This command allows you to create a variable, and give it a name. I have created one called example, so that you can see the commands Delete a variable deletes the selected variable from the animation. THIS CANNOT BE UNDONE Tick boxes are dealt with on slide 13 First we have set example to X. – This sets the value of the variable example to X. You can choose which variable you are changing with the drop down menu. Next we have change example by X – this increases the value of the selected variable by the value of X. Show variable example - this displays the value of the variable example on the stage. Hide variable example - this removes the value of the variable example on the stage. Next we have lists. These are useful to store more than one value, or word, or whole sentence without the need for many variables. However their commands are a lot more lengthy that those for variables. First we have Make a list. This command allows you to create a list, and give it a name. I have created one called example2, so that you can see the commands. Delete a list deletes the selected list. Tick boxes are dealt with on slide 13 Add XYZ to example2 - this adds the text or value represented by XYZ to the bottom of the list. Delete X of example2. This command deletes the information in the Xthposition in the list.
Toolbars X – Variables II After that we have insert XYZ at X of example2. This puts the text or value XYZ into the Xthposition of the selected list. Now we have the longest command yet: replace item X of example2 with ABC.This command replaces the Xthitem on the list with the text/value ABC. item X of example2tells the sprite what the Xth value of the selected list is. length of example2tells the sprite how many items are stored in the selected list. Last but not least example2 contains XYZ – this gives a true (1) output if the selected list contains the text/value XYZ and a false (0) output if it doesn’t.
Toolbars X – Tick Boxes Lastly – tick boxes. These are not like other commands in that they do not tell the sprite what to do, and can not be used as commands. They are how you access the information ‘written’ on them – e.g. the box ‘x position’ contains the x position of the sprite in question. The tick itself is so that you can have the information displayed on the stage. The box can be used like a variable in that it can be inserted into operators as part of a calculation. This is quite hard to explain, so I put together some examples:
First steps Ok then – now we have covered the toolbars we can start putting our animation together. First of all lets make something simple. Lets make the cat move forwards by 10 steps when we press the space bar. For this we’ll need two commands. The ‘when space key pressed’ command, and the move 10 steps command. Ok, drag the requisite commands into the scripts viewer, from the toolbars. Now – drag the move 10 steps command to the when space key pressed command. Like so: Now when you press the space bar, the cat will move ten steps in the direction it is facing. This is how you put any blocks together – a white line will appear at the join.
First steps So our cat moves. Unfortunately, it only moves in one direction. Lets see if we can make it go left, and right. For this we are going to need some more commands. Lets use the ‘when right arrow key pressed’ and ‘when left arrow key pressed’ commands, along with the ‘rotate clockwise 90 degrees’ and ‘rotate anticlockwise 90 degrees’ commands. Have a go at that, and see if your solution looks anything like mine. Ok then. Now we have a cat, that can move forward in the direction it is facing, and turn left and right. What if we want to go back the way we came? Not only will we be upside down, we’ll have to go round in a complete square to get back to where we started from. Lets make this a bit better shall we? This is quite complex, so ill walk you through this one. First of all, lets make a new costume of the cat, but flipped upside down. Duplicate costume1, then edit it. On the top left there is a ‘flip horizontally’ button. Click this, then finish editing. Now we need a ‘when clicked’ command to start it all of. Then we’ll need a ‘forever if’ command, so that we our cat is always the right way up. Now we’ll need to give some parameters, so that our cat knows when we want it to change costume. From the operators, get a X = Y calculation, and in the X put the ‘direction of sprite1’ (from the sensing toolbar), and in the Y put -90. Inside the bracket, put ‘switch to costume3’. Now, when the cat is upside down, it will wear a costume so that it looks the right way up. Now, duplicate the script we just made, and change the direction to 90, and the costume to costume1. It should look like this: Hopefully, if you have made it right, your cat should be the right way up whichever way it is facing. Click To Reveal
Second steps So far so good – we have a cat which can move up, down, left and right, and doesn’t float around upside down. Lets now look at the other aspect of scratch – slightly more useful animations. I am doing this mainly so that I can go over variables – so that you can see how to use them. So, what are we going to do? Lets do something nice and simple. Lets make a little animation that draws a circle. First of all, lets get rid of the cat. Go into costumes, and click on the paint button. Now we have a choice. We want something ‘pointer like’ so we can see where we’re going, but not too big. I’ll leave this up to you – and I’ll draw myself something simple. Once you’ve done that, delete the two cat costumes you have got. Your costumes page should now look like this: Now we’ve got our ‘pointer like’ costume, lets make it draw a circle. Now, before we start we need to understand that there are two ways to do this – we can either set how long we want each side to be, and then draw a shape with a very large number of sides – essentially a circle. Or, we can set the radius, and then have the sprite draw the circle for us. I am going to show you both methods. First of all, changing the size of the sides of the circle. Lets think about this. We need something that will do the same thing many times. The repeat command. Now we need a number of repeats. This is affected by how much the sprite turns each time. So if it turns 1 degree each time, it will need to have 360 repeats. If it turned 0.5 degree each time, it would need to have 720 repeats. What else? We need some way to tell the sprite how large we want to sides to be. That, is an ‘ask XYZ and wait’ command. You will also need to use the value of ‘answer’ in there. Try and put this together, my solution, and an explanation is on the next slide. Good luck.
My Method This is my way of doing this – does it look anything like yours? From the top – When you click the arrow, the sprite asks how long you want the sides to be. Then, it puts the pen down so that you can see the circle. After that, we repeat 36 times, forward by ‘answer’ – the value you just entered, then turn right by 10 degrees. Then we put the pen up. The problem with this method is that the bigger the shape you want, the less sides it can have. The second method, while more complex, avoids this problem totally, and draws a ‘truer’ circle. I’ll walk you through this one – its quite a bit more complex. First we have a little section which I put into all my animations as standard – a graphical reset that puts your sprite in the middle, pointing the right way, with a blank stage. Now, we take the pen up (in case it isn’t up already), and again ask a question, this time though we are asking what the radius is going to be. Now, we go across by the given amount, this is just so that our circle is in the middle of the stage. Then we put the pen down, and are ready to draw. The final solution is on the next slide.
Setting the radius - solution The last bit of my solution is the meaty bit – this is the bit where we tell the sprite how far it needs to go before it turns. Now, we know that the circumference of a circle is Pi times by the diameter. We are setting the radius of the circle. Also we know that we are rotating by 0.5 degree each time, and doing that 720 times. From that we can work out that we need to go the size of the circumference, divided by 720 each time. This means that we want to repeat 720 times, the script ‘forward by (3.142[Pi] times ‘answer’ times 2, all divided by 720) Then we rotate by 0.5 degree. If you try this out, and then measure the diameter of the circle, you should find that it is roughly double of what you specified the radius to be. This is not exact, as the value of Pi is a never ending integer, and we are only using it two three decimal places. Ok then, hopefully you understand what we just did – its not the maths that is important, but that fact that we used a variable ‘answer’ to make our program work. OK. Now we have used a variable that they supplied. Lets now use one of our own. Why don’t we make an animation, that involves variables and is interactive……. lets make brick breaker!
Brick Breaker This animation is very complex – and will require many small scripts, and many sprites. First of all, lets get the essentials, a ball and a paddle. First, we’ll animate the ball. On the left are all the scripts we use. I’ll go through them one by one, and explain what they do. Before I do that however, I need to list out all the variables we are going to need. Firstly, we have ‘Ball Angle’. This is the variable that affects the starting angle of the ball. Secondly we have ‘Lives’ – this determines how many lives you have to begin with, and have at any stage during the game. Last, we have ‘score’ – this tells you your total number of points. Now, create those three variables, call them what you want, but make sure it is obvious which is which. 1) This script puts the ball back in its starting position, in the middle of the screen, near the bottom. (The exact position is determined by where you put the paddle). 2) This script determines the angle at which the ball is ‘fired’ from the paddle, its gets a random number from -50 to 50 (0 is up), and sets the variable ‘ball angle’ to this value. Then, the ball points in this direction. The last command makes sure that the ball doesn’t just fly of the edge or the top of the screen. 3) The next script is one of the important ones, this is what causes the ball to bounce off the bricks, and not just go straight through them. I have used the ‘touching colour?’ command to tell the ball if it touching one of the bricks, this will not work if you have bricks of many different colours, the script would become too long. The bit in the bracket stops the ball from just bouncing straight off, but slightly changes the angle, so that the game is not too predictable. 2 3 4 5 1
Brick Breaker continued • 4) This next command is similar to the last, but for the paddle. • 5) This last command is the command that gets the ball to move. We set the ball angle again so that when you miss the paddle and reset, the ball doesn’t go straight up. We then have the ‘if’ command that tells the script if the ball goes below the paddle, this is the condition for failure. It repeats the script in the bracket until the ball goes below the paddle. If this happens, the ball resets the middle of the screen, just above the position of the paddle, and you lose a life. • The score and lives variables’ should be ticked in the toolbars – this allows you to see them. 2 3 4 5 1
Brick Breaker continued These scripts control the paddle – these are significantly shorter than any of the other scripts as the paddle has less to do, bouncing the ball of the paddle is controlled within the ball scripts themselves. 1), 2) These are the commands that move the paddle left and right, they have to move to paddle by quite a large amount each time or the paddle cannot move quick enough to reach the ball. 3) This the the same command as in the ball’s scripts, this ensures that the paddle is centred, and that you cannot lose it of the side of the stage. 4) This final command resets the position of the paddle should the ball go ‘out’, out is defined as below the paddle in my animation. 2 3 4 1
Brick Breaker continued These are probably the most important scripts, these are what makes the bricks ‘break’, and the score increase. They are repeated twice in an attempt to get rid of a problem whose source I cannot find: the bricks don’t always break when hit by the ball. 1) This script resets the bricks when the game starts, and causes them to break when hit by the ball. 2) This script breaks the bricks as well, and increases your score every time. This script will need to be applied to every block you have, unfortunately you will need a sprite for every brick, so a game with hundreds of bricks is out of the question. 2 1
Brick Breaker continued This last script does two things, it alters how many lives you have when your ball goes ‘out’, and it displays a game over screen when your number of lives gets to 0. The first script gives you five lives, and then every time the ball goes below the paddle (out) it takes off a life. The second script tells the sprite to appear when the number of lives gets to 0. The final script resets the sprite when the flag is clicked, getting rid of the ‘game over’ image. Throughout the last few slides I have intentionally not shown you what my sprites look like – you can design them yourself, and find out what works best.
Brick Breaker – the result This is what my animation looks like – both when running and after you have lost. There are a few things I haven’t told you – the animation in this presentation does not reset after you have cleared all the blocks, also the score is a bit bugy. Unfortunately I cannot fix the score, but the reset is possible. Hint: put in a script that brings the score, and the appearance of the blocks together. Good luck!
Sin Graph I Last of all, I am going to show you a little mathematical animation that I made, This is not a fun one like the others we have done, but has a practical purpose. It draws a graph of sinX, and can be used to read of values. First of all, we have 4 variables, used to draw the axes for the grid and the line itself: GridX – used in the x axes of the grid GridY – used in the y axes of the grid SinX – used to calculate the x position of the sprite drawing the graph X3 – also used in drawing the line itself Before I give you the script for the graph itself however, I am going to go through all the other sprites. Lets Begin! Our first sprite is GridX – this sprite draws the x-grid lines for the background (I haven’t drawn one because it would be a huge amount of work, and the X,Y grid supplied by the software is not that good in my opinion). From the top – we set the pen colour to red, and set the variable GridX to -230. Then until the value of GridX is 250, take the pen up, move to the point (GridX, -180), put the pen down, glide in 0.5 seconds to the point (GridX, 180), then increase the value of GridX by ten. This draws a red vertical line every ten spaces across the entire stage – and has formed half of the background already.
Sin Graph II Once you have put together AND TESTED the GridX script, try and put together a script that does the same thing, but horizontally. I am going to give you no guidance whatsoever on this – but is should be in roughly the same format as the GridX script. Does it look anything like this? Click To Reveal From the top: We set the pen to red again, but this time we set the variable GridY to 180. Then, until GridY = -180 we repeat: Put the pen up, and go to (-250, GridY). Put the pen down, and glide in 0.5 seconds to (250, GridY). Then increase GridY by -10 (decrease by 10). This does a similar thing to GridX, but the lines are horizontal, and start from the top of the stage.
Sin Graph III Now we have our gridlines, lets give our graph some axes. This will require 4 separate sprites, but with pretty much identical scripts. They draws the axes of the graph. Their very simple, first we have another graphical reset (you can’t be too careful!), and then we have a delay, so that the rest of the grid has finished being drawn. Then, we set the pen colour to black, put the pen size to 3 (3 pixels wide), point in the requisite direction and glide to the edge of the screen. Below I have listed the four scripts that I have used. Each must be put in a separate sprite, it could be done with them all in one, but this approach looks better!
Sin Graph IV One last thing before we draw the graph itself. A little sprite that reads values of the graph for you. It consists of four scripts, two which are very simple move left and right scripts, these will be familiar to you as they are the very first scripts you made from this guide. One is a reset that ensures that when you start the animation the pointer is at (0,0) and the pen is the correct colour. The last is the important bit. It tells the sprite when the space bar is pressed, go to the y coordinate that is equal to the 90 times sin of the current x coordinate. It then displays the x and y coordinates, and resets back to the centre. Have a go at putting it together, and then have a look at my method. Click To Reveal Does yours look anything like this? It doesn’t have to be exact, before I hit on this method, my script for the pointer was 50 – 60 blocks long! Remember, at each stage test your sprites, even if you cannot draw the line, get a calculator out and check to see if the values your sprite tells you are the actual values from your calculator. If their not – you have probably made a typo somewhere. (Unless your calculator is in the wrong mode!)
Sin Graph V And now the conclusion – the graph itself. For all the suspense, its really quite a simple bit of script. From the top: We clear the stage, and send our sprite to its starting position (-360,0) (this is because the period of a sinX graph is 360). Then we set variable X3 to -360, and set sinX to 0. We put the pen down so we can see our trace, and set the pen size to 2 (2 pixels across) Now we have a 27 second wait, in order for the grid lines and axes to be drawn. After that we repeat until the variable X3 is greater that 260: Go to the x-coordinate X3, and the y-coordinate SinX increase X3 by 1 Set SinX to the sin of X3, all times by 90. (The reason we times by 90 is that the maximum value sinX can have is 1, so should you draw this graph without the times 90 in it, you would get a straight line that went from 1 to -1, this does not help you see the sinX curve at all. Try getting rid of the times 90, replace it with a times 1, and see what happens). After X3 is greater that 260, the script stops. All this does is free up a bit of memory on your computer.
Sin Graph VI – the result Here is what my final version looks like – you will notice that for all my sprites I have used a single point of the colour I want the trace to be – this is strictly a personal preference. If you don’t get something like this, go back and make sure that you have copied all your scripts correctly. If you wish to draw a graph, of cosX all you need to do is change the operator in the graph script, graphs of tanX, cosecX, cosX, cotX however will take a bit more inventiveness! You can also produce graphs of log, natural log, and inverse tan, inverse cos, and inverse sin, but again, you will need to fiddle with the operators a bit! Last of all, you can produce a graph of mod X (called abs), and square root of X.
A mathematical curiosity That’s it from me – I hope this guide has helped you with understanding scratch. One last thing, for those of you who are interested: On the next slide is a script called Random Line Generator – its function is very simple, all it does is create a random number of randomly placed points one after another, connected with lines. Then it averages all their X-Coordinates, and all their Y-Coordinates. It repeats this five times, and then draws the resultant shape from the average of the 5 X and Y coordinates. Give it a go, and you may notice you always get a very similar shape, here some of the ones I have generated: You will notice the same recurring pattern – Four points grouped closely together, with a fifth some distance from the rest. What this says about the nature of the random number generator, apart from the fact that it is not true random, I don’t know – I have not got a good enough grasp of the maths involved, but there may be some among you who find this interesting.
A mathematical curiosity