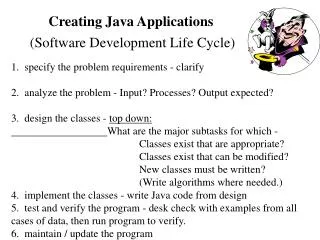
Creating Network-Enabled Applications
This guide explores various methods to connect Blackberry devices to corporate servers and the internet, focusing on secure and efficient options like BES/MDS, TCP/IP, BIS, and WiFi. It explains the functionality of the Blackberry Enterprise Server, the role of Wireless Access Protocol (WAP) in accessing mobile content, and the strengths and weaknesses of each method. Additionally, it details how to check your device's connection options and provides practical examples of establishing network connections in applications through the Connector class.

Creating Network-Enabled Applications
E N D
Presentation Transcript
CSCI 7010 UGA March 23rd, 2010 Creating Network-Enabled Applications
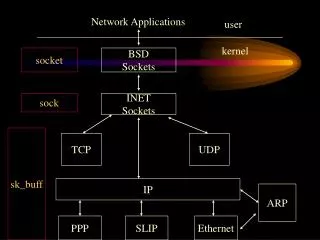
Ways to Connect • BES/MDS • TCP/IP • BIS • WiFi • WAP 2.0 • WAP 1.0
BES/MDS • Blackberry Enterprise Server/Mobile Data System • used if the Blackberry device is owned by a company and is set up to run through their servers • lets the Blackberry device make a secure connection to corporate servers
TCP/IP • Transmission Control Protocol/Internet Protocol • a “regular” internet connection • works with most devices
BIS • Blackberry Internet Service • for devices that aren’t under a BES • used to send email • Internet connections, but less secure than BES • but you need to be part of the Blackberry Alliance Program to use it
WiFi • 802.11 B/G and sometimes A • allows device to connect to network via a WiFi router • device user has to configure device to connect to the router • Pro: better speed, lower latency, no carrier data charges • Con: WiFi coverage less than wireless network coverage • can write app so that it looks for WiFi first and then falls back to BES or BIS
WAP 2.0 • Wireless Access Protocol • connects through wireless carrier’s WAP gateway • no Blackberry-specific infrastructure • but user’s plan must support WAP 2.0 (most do) • don’t need to configure as with TCP/IP
WAP 1.0 • older version of WAP • supported by all Blackberry devices • but doesn’t support secure connections as do other methods
So many choices ... • What should you do? • If activated on a BES: • use BES/MDS • If not activated on a BES: • use WAP 2.0 • fall back to TCP/IP • In either case, might want to check for WiFi
The “Service Book” • how the device maintains info about its configuration • records about optional applications • email account configuration • connection methods available on a device
Service Book • open device Options • click Advanced Options • Service Book • Demo on the simulator
Service Book records • Two parts: • CID – defines the type of record • UID – a unique identifier • most connection methods have a record in the service book
The Connector class • javax.microedition.io.Connector • used it before to open files • can also use it to open network connections • Example: • HttpConnection connection = (HttpConnection) Connector.open(“http://www.cnn.com”); • or • HttpConnection connection = (HttpConnection) Connector.open(“http://www.apress.com”);
In general ... • Connection_type connectionName= (Connection_type) Connector.open(URL); • Connection_type is some subclass of Connection • connectionName is a variable name that you choose • URL takes the form scheme://host:port/path[optional parameters] • Example URLs: • file://myfile.html • http://www.apress.com:80/book/catalog • socket://www.apress.com:80 • https://www.amazon.com/gp/flex/sign-in/select.html
HTTP Basics • Hypertext transfer protocol • protocol of the World Wide Web • connectionless • request-response
http client • opens a connection to an http server • sends a request message • receives the response • displays result
http server • listens for a connection from client • receives a request • delivers a response • closes the connection
http message • initial line (different for request & response) • header lines (zero or more) • blank line • optional message body
initial request line • METHOD path http_version • GET /path/to/file/index.html HTTP/1.0 • METHOD: • GET – “Please send this resource” • POST – “Here are some details about it” • HEAD – “Just checking some info about it” • PATH: • the part of the URL after the host name
initial response line • also know as “status line” • HTTP_versionstatus_codereason_phrase • HTTP/1.0 200 OK • HTTP/1.1 404 Not Found • status codes: • 100s – informational • 200s – success of some kind • 300s – redirect to another URL • 400s – client error • 500s – server error
The Sample Application • Let’s run it from a web browser first ...
NetworkingApplication.java package com.beginningblackberry.networking; import net.rim.device.api.ui.UiApplication; public class NetworkingApplication extends UiApplication { public NetworkingApplication() { NetworkingMainScreenscr = new NetworkingMainScreen(); pushScreen(scr); } public static void main(String[] args) { NetworkingApplication app = new NetworkingApplication(); app.enterEventDispatcher(); } }
NetworkingMainScreen.java package com.beginningblackberry.networking; import net.rim.device.api.ui.container.MainScreen; public class NetworkingMainScreen extends MainScreen { private EditField urlField; private BitmapField imageOutputField; private RichTextField textOutputField; .... methods on following slides }
Constructor public NetworkingMainScreen() { setTitle("Networking"); urlField = new EditField("URL:", ""); textOutputField = new RichTextField(); imageOutputField = new BitmapField(); add(urlField); add(new SeparatorField()); postDataField = new EditField("Post data:", ""); add(postDataField); add(new SeparatorField()); add(new LabelField("Image retrieved:")); add(imageOutputField); add(new SeparatorField()); add(new LabelField("Text retrieved:")); add(textOutputField); }
Creating a menu protected void makeMenu(Menu menu, int instance) { super.makeMenu(menu, instance); menu.add(new MenuItem("Get", 10, 10) { public void run() {getURL();} } ); menu.add(new MenuItem("Post", 10, 10) { public void run() {postURL();} } ); menu.add(new MenuItem("Socket Get", 10, 10) { public void run() {socketGet();} } ); }
Threads http://www.purpletech.com/talks/Threads.ppt More on multi-threading (if you’re interested): http://www.cs.uga.edu/~eileen/Concurrency_tutorials
MenuItem, in more detail • You can learn about any component by looking at the API documentation. See: http://www.blackberry.com/developers/docs/4.1api/index.html to learn more about the MenuItem component
When the user clicks “Get” private void getURL() { HttpRequestDispatcher dispatcher = new HttpRequestDispatcher(urlField.getText(), "GET", this); dispatcher.start(); } • ... creates a new thread for the network-related operation • ... and starts it up
HttpRequestDispatcher package com.beginningblackberry.networking; /* * Class to handle creating the request, sending it off, * and receiving the response */ public class HttpRequestDispatcher extends Thread { private String url; private String method; // GET or POST private NetworkingMainScreen screen; private byte[] postData; ... }
Constructors public HttpRequestDispatcher(String url, String method, NetworkingMainScreen screen) { this.url = url; this.method = method; this.screen = screen; } public HttpRequestDispatcher(String url, String method,NetworkingMainScreen screen, byte[] postData) { this.url = url; this.method = method; this.screen = screen; this.postData = postData; }
run() – simple version public void run(){ try{ HttpConnection connection = (HttpConnection) Connector.open(url); intresponseCode = connection.getResponseCode(); if (responseCode != HttpConnection.HTTP_OK){ screen.requestFailed(“Unexpected response code: “ + responseCode); connection.close(); return; } ...
run() – simple version, continued String contentType = connection.getHeaderField(“Content-type”); ByteArrayOutputStreambaos = new ByteArrayOutputStream(); InputStreamresponseData = connection.openInputStream(); byte[] buffer = new byte[10000]; intbytesRead = responseData.read(buffer); while (bytesRead > 0){ baos.write(buffer, 0, bytesRead); bytesRead = responseData.read(buffer); } baos.close(); connection.close(); screen.requestSucceeded(baos.toByteArray(), contentType); } catch (IOException ex){ screen.requestFailed(ex.toString()); } }
requestSucceeded(...) public void requestSucceeded(byte[] result, String contentType) { if (contentType.equals("image/png") || contentType.equals("image/jpeg") || contentType.equals("image/gif")) { Bitmap bitmap = Bitmap.createBitmapFromBytes(result, 0, result.length, 1); synchronized (UiApplication.getEventLock()) { imageOutputField.setBitmap(bitmap); } } else if (contentType.startsWith("text/")) { String strResult = new String(result); synchronized (UiApplication.getEventLock()) { textOutputField.setText(strResult); } } else { synchronized (UiApplication.getEventLock()) { Dialog.alert("Unknown content type: " + contentType); } } }
requestFailed(...) public void requestFailed(final String message) { UiApplication.getUiApplication().invokeLater (new Runnable() { public void run() { Dialog.alert("Request failed. Reason: " + message); } }); } }
... .... and we’ve skipped some gory detail for now
Let’s run the web application from a browser again ... • See: http://beginningblackberry.appspot.com • Enter some words in the form – • apple berry cinnamon doughnut • returns • doughnut cinnamon berry apple
Two-way interaction:Sending data with HTTP POST • What’s in the web application? <html> <head><title>Form</title></head> <body><imgsrc="img/apress_logo.png" /> <br /> <form action="/" method="POST"><br /> <input type="text" name="content"></input> <input type="submit" value="Go!"/> </form> </body></html>
<form> <form action="/" method="POST"> • defines a form that the browser uses to send data to the web application • send data to the ULR “/” (the base URL ) • using HTTP POST
<input> • <input type="text" name="content"></input> • defines the text box • gives it the name “content” • the application expects the content to be something like: • content = ONE+TWO+THREE • “+” interpreted as a space
<input type="submit" value="Go!"/> • defines the “Go” button as invoking POST • </form> • indicates end of the form
Modified HttpRequestDispatcher private byte[] postData; - to pass the POST body to the dispatcher public HttpRequestDispatcher(String url, String method, NetworkingMainScreen screen, byte[] postData){ this.url = url; this.method = method; this.screen = screen; this.postData = postData; } - constructor to initialize
check for POST data before sending if (method.equals(“POST”) && postData != null){ connection.setRequestProperty(“Content-type”, “application/x-www-form-urlencoded”); OutputStreamrequestOutput = connection.openOutputStream(); requestOutput.write(postData); requestOutput.close(); }
postURL private void postURL(){ String postString = postDataField.getText(); URLEncodedPostDataencodedData = new URLEncodedPostData(null, false); encodedData.append(“content”, postString); HttpRequestDispatcher dispatcher = new HttpRequestDispatcher(urlField.getText(), “ POST”, this, encodedData.getBytes()); dispatcher.start(); }
HEAD • let’s look at the code
Socket Basics • explanation • ... and let’s look at the code ...
private void socketGet() { • SocketConnector connector = new SocketConnector(urlField.getText(), this); • connector.start(); • } • private void postURL() { • String postString = postDataField.getText(); • URLEncodedPostDataencodedData = new URLEncodedPostData(null, false); • encodedData.append("content", postString); • HttpRequestDispatcher dispatcher = new HttpRequestDispatcher(urlField • .getText(), "POST", this, encodedData.getBytes()); • dispatcher.start(); • }