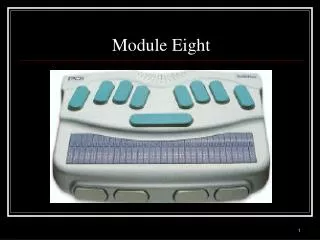
Module Eight
Learn to protect and unprotect files, use place markers, and erase folders on your Braille Note device efficiently. Master these techniques for better organization and file management.

Module Eight
E N D
Presentation Transcript
Module Eight • Protecting & Unprotecting Documents • Using Place Markers • Erasing a Folder
Protecting & unprotecting files • Protecting a file avoids accidentally erasing or changing an important file. However, when a file is protected, it prevents you from being able to use place markers. • This module will teach you how to protect and unprotect files.
Protecting & unprotecting files (continued) • From Main Menu, choose File Manager Menu (F) • Choose Protection(P) • Braille Note says, “Protect file on which drive? Press enter for flash disk” Press enter. • Navigate to the appropriate file and press enter.
Protecting & unprotecting files (continued) • Braille Note speaks the status of the file – it will either say, “…filename is unprotected. Option?”Or it will say “…filename is protected. Option?” • To protect a file, type P • To unprotect the file, typeU • To leave the file unchanged, pressenter.
Using Place Markers • Up to 26 positions in an unprotected file can be marked with a place marker. • Place markers are identified with the letters A through Z. • Place markers are both announced with speech and appear in the braille display but they do not print out.
Using Place Markers (continued) • Place markers can be very helpful. For example, suppose you are answering a homework question that refers back to a section in the chapter with a map, a table, or a quotation. • If you set a place marker at that location, you can go back and forth for reference very quickly.
Define a Place Marker • Move the cursor to the place you want to mark. • Press backspace with D • Braille Note says, “Define Place Marker, Letter?” • Type the letter A • Braille Note says, “Place A”
Jump to a Place Marker • Press space with J • Braille Note says, “Jump to Place Marker, Letter?” • Type the letter A • The cursor is placed just to the right of the place marker.
Delete a Place Marker • Press space with J to jump to the place marker you want to delete. • Press the backspace to delete the marker.
Erasing a Folder • When you erase a folder on the Braille Note, you first have to erase any files stored in that folder. • You can erase multiple files from a folder by using the multi-character wild card (dots 3,5)
Erasing Multiple Files • From Main Menu, choose File Manager Menu (F) • From File Manager Menu choose Erase File (E) • Navigate to the drive and folder that contain the files you want to erase and press enter.
Erasing Multiple Files (continued) • When asked “file name?”press space with dots 3,5. • Braille Note will say “multiple character wild card” Press enter. • Braille Note will tell you how many files were selected and ask you if you want to “confirm each file” as you delete. If you press N, you will hear how many files were erased.
Erasing a Folder (continued) • From Main Menu, choose File Manager Menu (F) • From File Manager Menu choose Folder Manager (F) • From Folder Manager Menu choose Erase Folder (E) • Navigate to the folder you want and press enter. • Press the letter Y to confirm.