Download

1 / 13
130 likes | 160 Vues
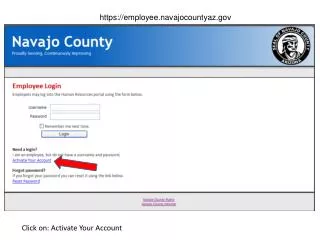
Activate your KU Leuven account. 2. KU Leuven Account. Activating your r- number Via KU Leuven https://activation.kuleuven.be. Activate your KUL account. KUL-account can be r-, s-, m- or c- number e.g. email, registration ISP, access to learning platform Toledo, ….

E N D
2. KU Leuven Account • Activatingyourr-number • Via KU Leuvenhttps://activation.kuleuven.be
Activateyour KUL account • KUL-account • canbe r-, s-, m- or c-number • e.g. email, registration ISP, access tolearning platform Toledo, …
KU LOKET Where? • http://toledo.kuleuven.be - KULoket - My ISP What? • My individual study program (ISP) • Student file • Study Progress File • Timetable • Consult exam results
Register your ISP • Go To: • www.kuleuven.be/kuloket-> Education & Students -> Individual Study Programme (ISP) • Enter your R-number + password (to login) • Click on ‘programme for exchange students…’
Individual Study programme (ISP) (2) Overview of electronicregistration: 1) Initial 2) Temporarilysaved 3) Submitted (sent) 4) Approved
Register your ISP • You’ll get toseethis screen andwill have tochooseyour courses byclicking on the box next to “search via module number or title” • This screen willappear
Register your ISP • Enter the course code and click on the course • Afterclicking on the course you’llseethatthe course has been addedtoyour ISP
Register your ISP • Whenyouaddedallthecourses toyour ISP and have chosenyour event, youcanchooseto save it, whenyou’renotsureyet or send it.(no changes possible)
ISP & Schedule Check your course schedule Make surethatthehoursdo not overlap! ECTS credits Course number Semester = first = second Course selected? Course name
Personal course schedule • Important remark: use Mozilla Firefox, the course schedule will not open correctly with Internet Explorer… • Also possible to see your schedule via Toledo