Orion Telecom Network Installation & Maintenance Guide
Detailed guide for installing and maintaining Orion Telecom Networks' hardware, including system setup, cabling connections, power requirements, and safety precautions. Learn about chassis mounting, ventilation, grounding, and power installation procedures.

Orion Telecom Network Installation & Maintenance Guide
E N D
Presentation Transcript
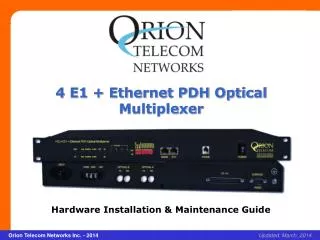
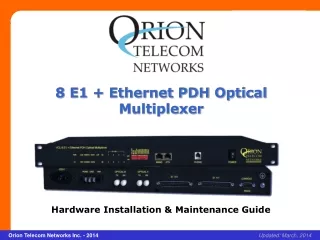
8 E1 + Ethernet PDH Optical Multiplexer Hardware Installation & Maintenance Guide xcvcxv Orion Telecom Networks Inc. - 2014 Updated: March, 2014
Select an ideal site for System Installation Install the chassis into a Telco rack Correctly connect power and grounding cables to the chassis Correctly connect E1, Ethernet and Optical cables to the chassis Correctly connect Management (RS232 and LAN) cables to the chassis Perform basic Maintenance. Objectives Upon successful completion of this course the technician will be able to . .
System Installation Chassis Requirements Mounting Ventilation requirements Facilities Chassis/cabinet Power Requirements Grounding Installation Installation & Maintenance Outline Maintenance and Management • DIP Switches • RS232 Serial Port • TCP/IP • SNMP • GUI (Graphical User Interface)
Site Survey and Preparation The ideal installation site offers the following features. . . • Access to Fiber Optic Cable • Access to E1, Ethernet & Optical Services • Cool, Dry, Static-free and Dust-Free Environment • Easily Accessible for Equipment Delivery • Generous Clearance for Air-flow & Maintenance • Electrical Power and Ground Source Easily Accessible • Cable Management System • (Raised Floor, Cable Ladders, etc)
Chassis Dimensions • Height 1U (44 mm) • Width 19 in. (standard EIA rack mount) • Depth 6.2 in (155 mm) • Weight 2.2 Kg.
Chassis Rack Mounting (1) • Requirements • Minimum Chassis Clearance • 1U chassis (44 mm) • Side clearance 4 inches (10.2cm) • Tools • 1 – Phillips screwdriver (1/4 x1 inch) • 1 – Mounting Hardware Set 1U 4” 4”
Chassis Rack Mounting (2) • PLACEthe chassis in the desired position within the rack • FASTENin place as follows. . . • Insertthe mounting screws through the rack ears on both sides of chassis • Tightenthe mounting screws
Ventilation • Requirements Room cooled to a constant temperature of 70ºF (21ºC) If using Telco cabinets, these should offer enough perforations for air flow (preferably equipped with fan forced air flow) Dry, static-free and Dust-Free Environment Fan Housing Fully Perforated Rear Door For Air Flow Telco Cabinet
Site Power Requirements • Power Source DC • -48V DC (18-72V DC typical range) • Must meet chassis power budget • Power Disconnect Device • Upstream from Chassis Equipment • Operator Accessible • Minimum 3.0 mm contact separation • Grounding • Connect DC Source and Chassis to same ground • Single ground circuit (no daisy chains) • Continuous circuit (no switches)
Rear Power Input Modules Dual-Redundant (AC+DC) AC (220V) AC power slot (110 ~ 240V AC, 50/60 Hz) DC (-48V) DC power slot (18 to 72V DC) Power Consumption < 10 Watts AC and/or DC Typically Factory-Installed Power Modules
IDENTIFY a ground source. . . The building ground rod(often located at the main power service entrance) A sprinkler system pipe A cold-water pipe Building structural steel ASSEMBLE a grounding wire (#10 AWG) CONNECT the grounding screw to the grounding source. Ground wire resistance shall be less than 0.01 Ohm. Electrical Grounding WARNING! Ground wire distance must not exceed the specified Local / National Electrical Codes Grounding Screw
Verify correct polarity (reverse polarity protection provided) Strip supply wire ends to ¼” Insert positive lead in -48V input and tighten fastening screw Insert negative lead in GND input and tighten by fastening screw Insert safety ground lead in PGND input and tighten fastening screw. DC Power Installation
Safety when working with electricity This device contains no user serviceable parts. The equipment shall be returned to Orion Telecom for repairs. Mains Voltage (AC): Line voltages are present when the power cord is connected. The mains outlet shall be within 10 feet (3 meters) of the device, shall be easily accessible, and protected by a circuit breaker. For AC powered units, ensure that the power cable used meets all applicable standards for the country in which it is to be installed, and that it is connected to a wall outlet which has earth ground. Hazardous network voltages are present in WAN ports, regardless of whether power to the unit is ON or OFF. To avoid electric shock, use caution when near WAN ports. When detaching the cables, detach the end away from the unit first. Do not work on the system or connect or disconnect cables during periods of lightning activity. AC Power Installation - 1
Install a power cable into an IEC-320 connector The AC main socket outlet shall be within 3 meters of the equipment and shall be easily accessible AC Power Installation - 2
For Testing / Installation: Always install optical attenuators. For distance of less than 10 KM optical attenuators must be installed on the optical links, otherwise, the optics will be permanently damaged. Unmated connectors may emit invisible laser radiation. Do not look directly into the end of connector. Do not inspect with magnifying devices. Maintain cap on unmated optical connectors. Optical Connections - 1
Wavelength 1310 nm / 1550 nm Distance 50 Km / 80 Km Connector FC Optical Connections - 2 WARNING! Do not expose to the naked eye as unmated optical connector may emit harmful laser radiation.
Cable Type DB37 (F) to 8xRJ45 (F) Impedance 120 Ohms Compliance ITU-T G.703 E1 Connections
ETH Ethernet data port (RJ45, MDI/MDI-X) Ethernet Connections
DIP Switches RS232 Serial Port TCP/IP SNMP CLI Commands Graphical User Interface (GUI) Maintenance and Management
CV-CLR Clears Code Violation alarm MUTE Mutes buzzer sound, buzzer will not sound if any alarm appears MASK All current E1 loss alarms will be masked. In addition, alarms will be triggered if new event of E1 signal loss happens even if switch is ON ALS_EN Enables Auto Laser Shutdown function LOOP 1-8 Enables Remote loop-back of corresponding E1 (1-8) Maintenance and Management – DIP Switches
CONSOLE RS232 Management Port (DB9-M) Maintenance and Management – RS232 Serial Port
MANG TCP/IP Management port for TELNET and SNMP (RJ45, MDI/MDI-X) Maintenance and Management – TCP/IP
SNMP V2 Management through MIB browser Maintenance and Management – SNMP
Maintenance and Management – GUI • Managing multiple systems from a central location over RS232 serial connection (Local), TCP/IP TELNET and SNMP Protocol (LAN or Remotely) with the help of GUI.
Maintenance and Management – GUI Monitoring a single system
Maintenance and Management – GUI Monitoring multiple systems
Thank you for your attention For more details visit us at our Website at http://www.oriontelecom.com Headquarters: Phoenix, Arizona Orion Telecom Networks Inc. 16810, Avenue of the Fountains, Suite # 108, Fountain Hills, AZ 85268 U.S.A. Phone: +1 480-816-8672, Fax: +1 480-816-0115 E-mail: sales@oriontelecom.com Website: http://www.oriontelecom.com Regional Office: Miami, Florida Orion Telecom Networks Inc. 4000 Ponce de Leon Blvd. Suite 470, Coral Gables, FL 33146 U.S.A. Phone: 1-305-777-0419, Fax: 1-305-777-0201 E-mail: sales@oriontelecom.com Website: http://www.oriontelecom.com