Download

1 / 12
140 likes | 171 Vues
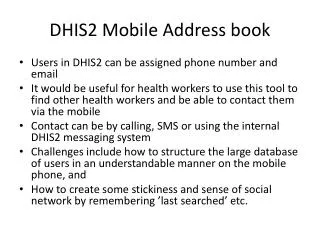
Learn how to configure and use your personal address book effectively using MCS Messaging software. Step-by-step instructions for adding, editing, and searching entries. Create and manage distribution lists easily.

E N D
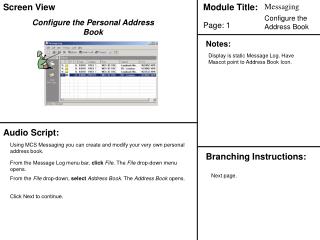
Configure the Personal Address Book Display is static Message Log. Have Mascot point to Address Book Icon. Using MCS Messaging you can create and modify your very own personal address book. From the Message Log menu bar, clickFile. The File drop-down menu opens. From the File drop-down, selectAddress Book. The Address Book opens. Click Next to continue. Next page.
Configure the Personal Address Book Display is static Address Book. The Address Book consists of five features. Menu Bar - Features include File, Edit, View, Tools and Help Toolbar - Contains icons for commonly used features, such as New Message, New Multicast Group, New Distribution List, Name Search, Setup IP/URN parameters, Setup Hostname/URN Parameters, Add new unit to the Master VMF List, Properties, Delete, Add to Personal Address Book, and Help. URN field - Displays the Unit Reference Number of the entry in the Address Book. Names List - Displays the names of the available address books. Address Book viewer - The entries in the active address book are displayed in this area. Click the Next button to continue. Next page.
URN Field Use the Mascot to point to each step. • The URN field of the Address Book is used to to select an entry from the address book. • Select the desired address from the Friendly Name field or type the first letter of the desired entry into the URN field. The first entry that starts with the letter is highlighted. • If the first entry is not correct, continue to enter additional letters to locate the correct entry. For example, if you entered “ab” in the URN field, the ABCS-BDE entry would be highlighted. • Click Next to continue. Next page.
Names List Use the Mascot to point to Show Names from the: field. • You can select entries from the Master VMF List, Personal VMF List or Search Results. • Use the down arrow to expand the Show Names from the list. • Click a list to select it. The name of the list is displayed in the URN field, the contents of the list are displayed in the address book viewer area. • Click the Next button to continue. Next page.
Create a New Distribution List Have a working Menu bar and Tool bar. Have the Find window appear after clicking New Distribution List in the File menu or by clicking the Address Book icon. • You can create new distribution lists to be included in the Personal VMF list, as needed. There are two ways to initiate the creation of the new distribution list: The Address Book File menu and the New Distribution List icon on the Address Book toolbar. • From the Address Book menu bar, click File. The File menu drops down. SelectNew Distribution List. The Edit Distribution List window opens. • Alternatively, click the New Distribution List icon on the Address Booktoolbar. The Edit Distribution List window opens. • Click Next to continue. Next page.
Create a New Distribution List Make interactive till about 3 names are added. • Enter the name of the new distribution list in the List Name field. Click the Add/Remove Members button. The Edit Membership window opens. • From the Available Lists box, select the appropriate list. • Use the slide bars to locate the desiredRole in the list. Click the desired Role. Click the Add button. The selected Role is added to the Current Members of the new distribution list. Repeat to add additional members to the new distribution list. • Click the Next button to continue. Next page.
Create a New Distribution List Make interactive for both clicking OK to close the Edit Members window and Distro window. • On the Edit Membership window, clickOK. The Edit Membership window closes and the selection is added to the distribution list members on the Edit Distribution List window. • On the Edit Distribution List window, clickOK to complete the creation of the new distribution list. • Click Next to continue. Next page.
Search for Names Static screen of the address book • To locate an entry in a large list, use the Find option from the Address Book Tool menu or the Find icon located on the Address Book Toolbar. • Through the Find option, large lists can be searched by URN, Friendly Name, Role, Group and BFA.You may use single characters or text strings for one or more of these fields. Search results are displayed in the Address Book Viewer. • Click the Next button to continue. Next page.
Search for Names Use the Mascot to point to each step. • In the Address Book, select the list to be searched from the Show Namesfrom the drop down. • After selecting the list to be searched, click the Find icon on the toolbaror from the Tools menu. The Find pane opens. • Enter a single character or string in one or more of the fields. ClickOK. The list is searched and the results are shown in the Address View. • Click Next to continue. Next page.
Edit the Group Properties Make interactive having 6 or distribution lists, each name in the disto list be available and appear in the Edit window with info. • In the Address Book Viewer, double-click on an entry. The Edit Group window opens. • To add members to a group, follow these steps: • From the Edit Group window, click the Add/Remove Members button. The Edit Membership window opens. • From the Edit Membership’s Available Lists, select a unit to be added to the group. The unit name is highlighted. • Click the Add button. The unit is added to the Current Members. • Repeat as needed to add additional units to the Current Members. Click the OK button to complete the addition. The Edit Membership window closes and the newly added members of the group appear in the Group Members area of the Edit Group window. • Click the Next button to continue. Next page.
Edit the Group Properties Make interactive • Using a similar process, units can be removed from a group. • From the Edit Group window, clickAdd/Remove Members. The Edit Membership window opens. • From the list of Current Members shown in the Edit Membership window, select the member to be removed. • Click the Remove button in the Edit Membership window. The memberis removed from the Current Members list. • From the Edit Membership window, clickOK. The Edit Membership window closes and the member is removed from the Group Members shown in the Edit Group window. • Stop and restart GTCS. • Click Next to continue. Next page.
Conclusion This page just a static graphic with Quiz button. • Congratulations! You performed the basic functions of Configuring the Address Book. • Click the Quiz button to test your knowledge, the Course Map to take another lesson, or the Exit button to leave the learning system. Quiz or exit (or course map).