Filesystems
Filesystems. Objectives to understand Unix filesystem concepts Contents disk terminology fdisk raid, lvm Make filesystem filesystem utilities Check filesystems Repair Quota Practical to make and mount a disk filesystem Summary. File System Structure. Single inverted tree structure

Filesystems
E N D
Presentation Transcript
Filesystems • Objectives • to understand Unix filesystem concepts • Contents • disk terminology • fdisk • raid, lvm • Make filesystem • filesystem utilities • Check filesystems • Repair • Quota • Practical • to make and mount a disk filesystem • Summary
File System Structure • Single inverted tree structure • individual disks are hidden from the casual user • Filesystems define how disks are structured • different disks can be formatted with different filesystems • all filesystems have a superblock (disk information) • all filesystems have the concept of file i-nodes • Filesystems must be mounted into the tree structure • a disk/partition can be mounted onto any directory • directory is referred to as a mount point • Unix accessed through file interface • file permissions used to control user access to the system
File System Types • A filesystem type defines how the disk data is structured • Unix supports many different filesystem types (typically 12 or more) • UFS standard across all platforms • many systems support DOS FAT filesystems • ext2fs classic Linux filesystem (UFS like) • Most well known, many proven recovery toolkits • ext3fs next generation Linux filesystem • Journalled filesystem for servers with mixed size large number of files • NFS • Network file system • ISO 9660 & Joilet • CD-Rom • MSDOS • DOS filesystem • VFAT • Originally to be compatible with Windows95 to overcome 8.3 limit
File System Types, continued. • Reiserfs alternate filesystem for linux • Used by many homeusers, fast for many small files • UFS (or Fast File System) from Berkeley • long filenames (255), faster and more efficient than many other filesystems • Journaling filesystems • Veritas or VFX (HP, SNI, UnixWare), JFS (AIX) • self repairing filesystems (more reliable) • may support Logical Volume Management with virtual filesystems, striping and mirroring • VFS • Virtual filesystems belong to device levels • Managed by LVM, grouped partitions • RAID • RAID system work below filesystem level, and belong to device level • Soft raid, stores data over several disks, based on linux drivers • Hard raid, like softraid but special hardware controls datastore
Unix filesystems • Partition and Slices • Physical partitons, INTEL plateform splits disk in up to 4 pices • Logical partitions, reside inside physical partitions, extended partitions • Slice is an are of the disk described by start and stop cylinder • Cylinder is a number of disk blocks which size can be altered • Disk block is a number of disk sectors which usally is 512 or 1024 bytes • Physical diskdevices are named • ATA types: /dev/hd[a-z][’ ’,1-16] • SCSI types: /dev/sd[a-z][’ ’,1-16] (Also SATA belong here) Examples) /dev/hda - IDE disk 0 [whole disk] /dev/hda1 - IDE disk 0 first partition /dev/sda1 - SCSI disk lun 0 part 0 • Linux configurable dynamic device naming support udev • User defined device name,practicalfor hotpligged devices, will eventually replace devfs in future. • If using devfs naming are different (scsi) /dev/scsi/host0/bus0/target1/lun0/disc [whole disk] /dev/scsi/host0/bus0/target1/lun0/part6 [partition 6] /dev/scsi/host0/bus0/target1/lun0/generic [sg device for disk]
Working with FDISK, view disk part. • cfdisk • General partitioning toolkit, vt100 • DiskDruid • Guided ANSI/VT100 graphics partition manager • Parted • Work with partition and softraid • FDISK (preferred) • Create partitions and partition types • You must allways operate on the whole disk not partitions • Look on disk partitions /dev/hda (p-rint partititon) # fdisk /dev/sda Command (m for help): p Disk /dev/hda: 255 heads, 63 sectors, 1244 cylinders Units = cylinders of 16065 * 512 bytes Device Boot Start End Blocks Id System /dev/sda1 * 1 17 136521 83 Linux /dev/sda2 18 83 530145 82 Linux swap /dev/sda3 84 475 3148740 83 Linux
Working with FDISK, +100M partition. • Add partition to disk • You must have unallocated disk-space or delete existing part. • If you have used all 4 primary partition, extended will be activated • After selecting primary or logical partition you will be asked Command (m for help): n Command action e extended (5 or over) p primary partition (1-4) Partition number (1-4): 4 First cylinder (1-1244, default 476): Using default value 1 Last cylinder or +size or +sizeM or +sizeK (1-1244, default 1244): +100M Using value 489
Working with FDISK, set type 83 linux • Select partition type to linux (83) for normal partitions • Fdisk will ask you what partition to change • After writing typ q to exit fdisk • Make a filesystem on the clean partition • We select ext3fs! • Mounting the filesystem Command (m for help): t Partition number (1-4):4 Hex code (type L to list codes):83 Command (m for help): w . . . # mkfs -t ext3 /dev/hdb1 . . . # mkdir /mnt/extradisk # mount –t ext3 /dev/hdb1 /mnt/extradisk # ls –1 /mnt/extradisk lost+found
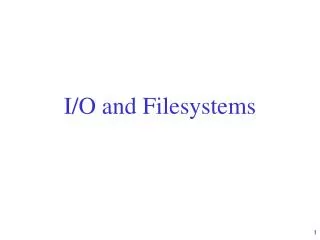
Raidlevels, RAID 0 • For increasing storage only, no fault tolerance.
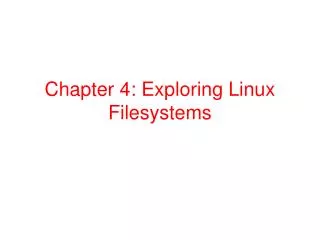
Raidlevels, RAID 1 • Data is mirrored to one or more disks. • Minimum 2 disks
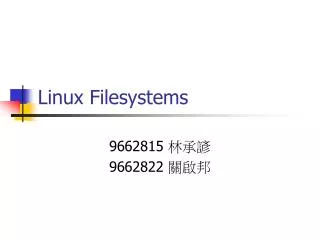
Raidlevels, RAID 3 • Data is striped over disks, parity is kept on separate disk. • Minimum 2 disks
Raidlevels, RAID 5 • Data and parity is striped over disks. • Minimum 3 disks
Preparing for software RAID • Should I Software RAID Partitions Or Entire Disks? • Both works, but preformance and redundancy is in danger • Use of a SPARE disk is preventing system stop. • RAID Partitioning • Smallest partition set maxim partition size in RL1-5 Example) (32G) /dev/sdc1 (32G) /dev/sdd2 (64G) /dev/sde1 32G will be maxim size • Raid level 0 is additative and slices can vary in size • Determining Available Partitions Unmount partitions that should join the raid, if they are mounted! Filesystem is added on top of the raid, after it has merged. # fdisk –l [long list will follow] # umount /dev/sdd2
Preparing the software RAID, part. type. • Change filesystem typ of partition’s • You have to change each partition in the RAID set to be of type FD • FD=(Linux raid autodetect. • Waring message is normal, if it appairs! • Edit The RAID Configuration File RAID 5 on using 3 disks. The set will be called /dev/md0. Filename is: /etc/raidtab # fdisk /dev/sdc1 Command (m for help): t Partition number (1-5): 1 Hex code (type L to list codes): fd Changed system type of partition 1 to fd (Linux raid autodetect) Command (m for help): w
Preparing the software RAID, raidtab • /etc/raidtab • Create the RAID Set • This is the funny part! raiddev /dev/md0 raid-level 5 nr-raid-disks 3 persistent-superblock 1 chunk-size 32 parity-algorithm left-symmetric device /dev/sdc1 raid-disk 0 device /dev/sdd2 raid-disk 1 device /dev/sde1 raid-disk 2 # mkraid /dev/md0 analyzing super-block disk 0: /dev/sdc1, 104391kB,raid superblock at 104320kB disk 1: /dev/sdd2, 104391kB,raid superblock at 104320kB disk 2: /dev/sde1, 104391kB,raid superblock at 104320kB
Creating the software RAID filesystem • Creating filesystem on the New RAID Set • Almost any filesystem will suit on your RAID set • Load The RAID Driver For The New RAID Set • Create A Mount Point For The RAID Set • Can be in any catalog • Edit The /etc/fstab File • Make raidset mount every time machine is started # mke2fs -j -b 4096 -R stride=8 /dev/md0 . . . # raidstart /dev/md0 # mkdir /mnt/raid /dev/md0 /mnt/raid ext3 defaults 1 2
Maintaining the soft RAID • Checking raidset status • Stopping/Starting the raidset • Manually mounting/unmounting raidset • Like any filesystem! # cat /proc/mdstat Personalities : [raid5] read_ahead 1024 sectors unused devices: <none> # raidstop /dev/md0 # raidstart /dev/md0 # mount /dev/md0 /mnt/raid # umount /mnt/raid
Virtual File System, LVM devices • Study LVM admin instruction pages http://www.gentoo.org/doc/en/lvm2.xml and http://tldp.org/HOWTO/LVM-HOWTO/ • A virtual filesystem is built up from • Physical Volume’s PV (partitions on disks that form a volume group) • Volume Group’s VG (virtual disk’s) • Logical Volume’s LV (logical volume or mountable partition) • Physical Extent PE (Physical Extent, mini partitions who build up LV) • Virtual filesystem is flexable • You can increase/decrease ”disk-space” while running • Easy manage fast growing virtual disks • Use dynamic growing virtual disks • Works like standard disk devices • Can be raided • Is not dependent on single disks for storage
Virtual File System, LVM concept • LVM Concept One or several disks have one or morepartitions VG is build up from several partitions on several disks LV is a part of or a whole VG The LVcan be mounted as any other disk device
Configuring LVM Devices • Backup Your Data • Logout all users! • Use the tar command or some other method to backup your data in /home. The LVM process will destroy the data on all physical volumes. • Going into single user mode # init 1 • Unmount your /home filesystem # umount /home • Determine The Partition Types # fdisk -l /dev/hde • Change partition type to 8e for all lvm partitions # fdisk /dev/hde Command (m for help): t Partition number (1-6): 5 Hex code (type L to list codes): 8e Changed system type of partition 5 to 8e (Linux LVM)
Define LVM physical devices & VG • Define each Physical Volume PV # pvcreate /dev/hde5 pvcreate -- physical volume "/dev/hde5" successfully created # pvcreate /dev/hdf1 pvcreate -- physical volume "/dev/hdf1" successfully created # fdisk -l /dev/hde • Run VGscan # vgscan vgscan -- reading all physical volumes (this may take a while...) • Create A VG (VolumeGroup) for the PV’s above • This is our device containing both physical volumes # vgcreate vg1 /dev/hdf1 /dev/hde5 Volume group ”vg1" successfully created
Create Logical Volume’s • Look into the Volume Group # vgdisplay vg1 . . . PE Size 4 MB Total PE 212 Alloc PE / Size 0 / 0 Free PE / Size 212 / 848 MB . . . - We have 212 Physical Extents free to create logical volumes with. • Create LV:s # lvcreate -l 212 vg1 -n lv1 Logical volume "lv1" created
Make filesystem on the Logical Volume • Make filesystem • Almost any filesystem will do, in both examples we use ext3fs # mkfs -j /dev/vg1/lv1 Or # mkfs -t ext3 /dev/vg1/lv1 • Create a mount point # mkdir /mnt/lvm1 • Update /etc/fstab /dev/vg1/lv1 /mnt/lvm1 ext3 defaults 1 2 • Mount the logical volume # mount –a # ls –1 /mnt/lvm1 lost+found
Making a general Filesystem • Use the mkfs command • use -t to override filesystem default • specify raw disk device /dev/hd[a-z] or /dev/sd[a-z] • usually need to state disk size (in 512 byte blocks) • Additional parameters vary according to filesystem type • Like filesystem block size that can vary from 1024 up to 65535 • Creates superblock and i-node list • inode list fixed in size, cannot be extended • can override number of i-nodes when filesystem created • Use small block sizes for disk with many small files • Make large block sizes for disks with large files • FRAGS is the loss of diskspace in not filled out blocks # mkfs -t ext2 /dev/sdb3 102400
Mounting a Filesystem • Use mount to add a filesystem to the tree structure • the root file system is mounted by the kernel at boot time • filesystem can be mounted manually or automatically in multi-user mode • use the blocked device for mount • Filesystems can be mounted onto any directory • will hide files already in directory (usually choose empty directories) • directory is called the mount point • /mnt provided as standard temporary mount point • Unmount filesystems using umount • specify the mount point to umount # mount -t ext3 /dev/sdb2 /home2 # ls /home lost+found # umount /home # ls /home #
Kernel File Cache • The kernel allocates data space to hold: • the superblock • several i-nodes • several data blocks • Cache only written back to disk periodically • the sync command is used to manually flush the cache to disk • If Unix crashes: • cached data is lost and file system is left in an inconsistent state • disk structure is recovered on reboot using fsck utility • journaling filesystems recover automatically on mount • Unix should be shutdown cleanly • disk cache is flushed as part of shutdown process
The lost+found Directory • Used to save lost files in a corrupt filesystem • created when file system is made • created large enough to hold several files as new disk blocks cannot be allocated from a corrupt filesystem • some active i-nodes may not be referenced from any directory • The file system check program (fsck) finds lost files • lost files stored in lost+found directory • filename is inode number • Use the file command to identify the types of lost files • Recreate lost+found with mklost+found if it is missing
Dealing with Corrupt Filesystems • Use fsck to repair corrupt filesystems • e2fsck –o <alternate superblock> /dev/hda4 • fsck –b <alternate superblock> /dev/vg1/lv1 First alternate superblock is reported when filesystem is created. It can be, but not allways: 1K blocksize 8192 2K blocksize 16384 4K blocksize 32768 to recover trashed filesystem! # fsck /dev/hda4 ** Phase 1 -- Check blocks and sizes ** Phase 2 -- Check pathnames ** Phase 3 -- Check connectivity ** Phase 4 -- Check reference counts UNREF FILE I = 1064 OWNER = 318 MODE = 140664 SIZE = 2186 MTIME = Feb 2 16:12 1951 FREE INODE COUNT WRONG IN SUPERBLOCK ** Phase 5 -- Check free list 1763 files 35478 blocks 6432 free *** FILESYSTEM WAS MODIFIED ***
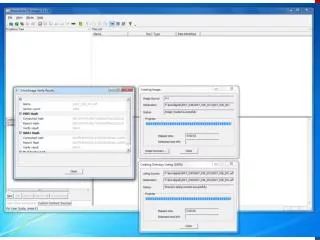
Recover files with image • Make diskimage before any attempt to run fsck # dd if=/dev/hda4 of=/mnt/hda4-backup.dd • This might fail, if there are any hard errors • Remove the faulty diskt and keep it. Prepare loopback filesystem # losetup /dev/loop0 /mnt/hda4-backup.dd • Try to mount and recover some files # mkdir /mnt/trashed # mount /dev/loop0 /mnt/trashed # umount /dev/loop0 • Try to mount and recover some files # fsck -b 32768 -f -y /dev/loop0 # fsck.ext2 -f -y /dev/loop0 Or # fsck -b 32768 -f -y /dev/loop0 - mount disk again and try recover now!
Exercise - Identifying Lost Files • Given this lost and found directory which command(s) would you use to identify the contents of each file? To identify file 000541 ? To identify file 000872 ? To identify file 001065 ? To identify file 001085 ? To identify file 000461 ? # cd /home/lost+found # file * 000541: ASCII text 000872: commands text 001065: iAPX 386 executable not stripped 001085: C source code 001461: data
Filesystem Configuration Files • Define standard filesystems in /etc/fstab • used during system startup to mount file systems automatically • One line per filesystem of form: • tab separated fields • use -p option to mount to get fstab lines for current configuration File system specifier mount point filesystem type mount options dump / fsck order # cat /etc/fstab LABEL=/ / ext3 defaults 1 1 LABEL=/boot /boot ext3 defaults 1 2 none /dev/pts devpts gid=5,mode=620 0 0 LABEL=/home /home ext3 defaults 1 2 none /proc proc defaults 0 0 none /dev/shm tmpfs defaults 0 0 /dev/sda2 swap swap defaults 0 0 /dev/cdrom /mnt/cdrom iso9660 noauto,owner,kudzu,ro 0 0 /dev/fd0 /mnt/floppy auto noauto,owner,kudzu 0 0
Free Disk Space • Use disk free (df) to report on free disk space • use -h to give sizes in human readable form • use -l to restrict local file systems only (ignore network) • works on mounted file systems only # df –hl Filesystem Size Used Avail Use% Mounted on /dev/hda10 509M 433M 50M 90% / /dev/hda1 45M 25M 18M 57% /boot /dev/md0 40G 30G 8.9G 77% /home /dev/hda7 2.0G 413M 1.4G 22% /opt /dev/hda13 509M 332k 483M 1% /tmp /dev/hda5 3.9G 2.7G 1.0G 72% /usr /dev/hda8 2.0G 705M 1.1G 37% /usr/local /dev/hda11 251M 59M 179M 25% /usr/src /dev/md2 3.4G 1.6G 1.6G 50% /var /dev/md1 3.4G 1.3G 1.9G 41% /home/httpd /dev/hdd1 56G 45G 9.1G 83% /home/ftp/pub /dev/hda6 3.9G 3.1G 682M 83% /usr/local/src
Disk Usage • Use disk usage (du) to look at files and directories • recursively looks at named file/directories • by default lists only directory sizes • use -s to summarise for named files • use -a to detail all files • linked files only counted once • size given in 512 blocks (use -k option for kilobytes not on all systems) # du -s /home/* 25 /home/frank 0 /home/hawkeye 5 /home/henry 67 /home/hotlips 0 /home/lost+found 15 /home/klinger 51 /home/mulcahy 976 /home/radar 1 /home/trapper
Disk Quotas • Read the instructions for Quota http://www.linuxnetmag.com/en/issue6/m6quota1.html and http://www.gentoo.org/doc/en/security/security-handbook.xml?part=1&chap=5 • Disk quotas under Linux have the following features: • Per-file-system implementation • Per-user space accounting • Per-group space accounting • Tracks disk block usage • Tracks disk inode usage • Hard limits • Soft limits • Grace periods • We will limit the users quota on /home
Preparing for Quota • Enter Single User Mode (actually not nessesary) # init 1 • Edit Your /etc/fstab File Old fstab LABEL=/home /home ext3 defaults 1 2 New fstab LABEL=/home /home ext3 defaults,usrquota,grpquota 1 2 • Remount the filesystem # mount -o remount /home • Create The Partition Quota Configuration Files # quotacheck -g -u -a # chmod 600 /home/aquota.user # chmod 600 /home/aquota.group • Start the Quota # quotaon -a
Setting the Quota limit • Make Linux Read The Quota Config File # edquota -u mp3user The command will invoke the vi editor which will allow you to edit a number of fields. Disk quotas for user mp3user (uid 593): Filesystemblockssofthardinodessoft hard /dev/hda324 0070 0 • Change the soft level & hard level Kalle softlimit of 5Mbyte would be 10000 Kalle hard limit could be set to 15000 • Get out of single user mod # init 3
Managing Quota • Enforcing Quotas # quotacheck –vagu - should be added as cron job • Editing Grace Periods # edquota –t • Editing Group Quotas (group users) # edquota –g users • Getting Quota Reports # repquota /home • Grace period before enforcing soft limits for users: • Time units may be: days, hours, minutes, or seconds • Filesystem Block grace period Inode grace period • /dev/hda3 7days 7days *** Report for user quotas on device /dev/mapper/vg1-lv1 Block grace time: 7days; Inode grace time: 7days Block limits File limits User used soft hard grace used soft hard grace ----------------------------------------------------------------------------------------- root -- 32828 0 0 3 0 0 steen -- 4 1000 1500 1 0 0