Invoice Processing Guide for SSA Industries Ltd: Step-by-Step Instructions
This primer outlines the step-by-step process for invoice processing at SSA Industries Ltd. Begin by selecting the date, customer name, and employee name, ensuring all mandatory fields are completed accurately. Enter amounts paid and claimed, adhering to the specified format without special characters. Utilize UPC scanning for product information, checking product status indicators for proper categorization of returns. Review the returns list for accuracy, and submit only when all data is verified. Follow guidelines for error management during the process for efficient invoice handling.

Invoice Processing Guide for SSA Industries Ltd: Step-by-Step Instructions
E N D
Presentation Transcript
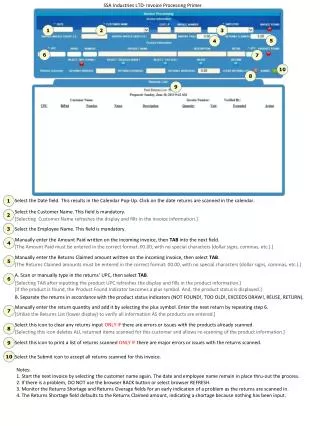
SSA Industries LTD- Invoice Processing Primer 1 2 3 5 4 6 7 10 8 9 1 Select the Date field. This results in the Calendar Pop-Up. Click on the date returns are scanned in the calendar. Select the Customer Name. This field is mandatory. 2 [Selecting Customer Name refreshes the display and fills in the invoice information.] 3 Select the Employee Name. This field is mandatory. Manually enter theAmount Paid written on the incoming invoice, then TAB into the next field. 4 [The Amount Paid must be entered in the correct format: 00.00, with no special characters (dollar signs, commas, etc.).] Manually enter the Returns Claimed amount written on the incoming invoice, then select TAB. 5 [The Returns Claimed amounts must be entered in the correct format: 00.00, with no special characters (dollar signs, commas, etc.).] A. Scan or manually type in the returns’ UPC, then select TAB. 6 [Selecting TAB after inputting the product UPC refreshes the display and fills in the product information.] [If the product is found, the Product Found Indicator becomes a plus symbol. And, the product status is displayed.] B. Separate the returns in accordance with the product status indicators (NOT FOUND!, TOO OLD!, EXCEEDS DRAW!, REUSE, RETURN). Manually enter the returnquantity and add it by selecting the plus symbol. Enter the next return by repeating step 6. 7 [Utilize the Returns List (lower display) to verify all information AS the products are entered.] Select this icon to clear any returns input ONLY IF there are errors or issues with the products already scanned. 8 [Selecting this icon deletes ALL returned items scanned for this customer and allows re-scanning of the product information.] Select this icon to print a list of returns scanned ONLY IF there are major errors or issues with the returns scanned. 9 10 Select the Submit icon to accept all returns scanned for this invoice. Notes: 1. Start the next invoice by selecting the customer name again. The date and employee name remain in place thru-out the process. 2. If there is a problem, DO NOT use the browser BACK button or select browser REFRESH. 3. Monitor the Returns Shortage and Returns Overage fields for an early indication of a problem as the returns are scanned in. 4. The Returns Shortage field defaults to the Returns Claimed amount, indicating a shortage because nothing has been input.