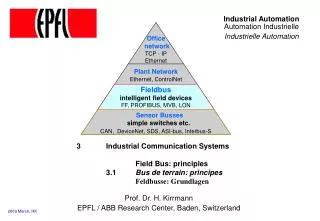
IT AUTOMATION
IT AUTOMATION. Lectures 6 and 7. Developed by Dr. Masoud Sadjadi. Powered by Kaseya & IT Scholars. Last updated on Sept. 20 , 2012. Kaseya Fundamentals Workshop. LAB REVIEW. Audit Lab Review. Part 1.


IT AUTOMATION
E N D
Presentation Transcript
IT AUTOMATION Lectures 6 and 7 Developed by Dr. Masoud Sadjadi Powered by Kaseya & IT Scholars Last updated on Sept. 20, 2012
Kaseya Fundamentals Workshop LAB REVIEW
Audit Lab Review
Part 1 • Create a machine group under the “FIU-<USERNAME>” organization for templates, called “Templates”. • Create three agent templates • “Server” • “Instructional” • “Guest” • Put the agent template in the template machine group.
Please Skip Part 2 to 4 • Baseline Audit and System Info should be executed only once. • Baseline Audit, System Info, and Latest Audit are done by default when an AGENT is installed on a machine. • You can safely skip Part 2, 3, and 4 of the Audit Lab.
Part 5 • Prepare an audit report that contains a list of all the computers within each building.
Patch Management Lab Review
Part 1 • Using Patch Management > Scan Machine, schedule a scan to run every day at 3:00am on all the agent templates.
Part 2 • Create a patch policy for servers • Name it W2K3-PM-Policy-<USERNAME>. • Approve all future Security Updates. • Pending Approval for everything else. • Deny patches that are optional and have not been superseded by other updates. • Create a patch policy for workstations • Name it XP-PM-Policy-<USERNAME> • Approve all future Security Updates. • Pending Approval for everything else.
Note • If the links on this page are not available or some of the patch categories are not listed, it basically means that you have not yet done any patch scan on your machines. • Make sure to perform a patch scan on dc and one of the XP machines before defining the patch policies.
Part 3 • Using File Source set up all the machines so that they download their updates from the DC. • If the DC is unreachable, the machine should then download it from the Internet. • The UNC path should be • \\192.168.0.10\PatchTemp • The local directory should be • C:\PatchTemp
Part 4 • Use Reboot Action to set the Guest and Instructor templates to Skip reboot if user logged in immediately after applying new patches and updates. • Then, set the Server template to notify you immediately, via email, when a reboot is required after applying new patches and updates.
Part 5 • Now that we have setup the patch policies to our liking, we need to schedule automatic update on the agent templates too.
Part 6 • Copy the settings from the templates to the specified computers on the network. • Server template will be used for the MR building. • Instructional template will be used for the SCIS and CEC buildings. • Guest template will be used for the GL building.
Verify the File Source SettingsScreenshot taken after Part 6
Part 7 • Disable Windows Automatic Update for all computers.
Part 8 • Prevent Internet Explorer from installing by using KB Override. • The KB article is KB944036.
Note • If this patch has already been denied, it means that another administrator who shares this Kaseya server with you have already performed this task. • If this is the case, you can first remove it, by clicking on the X icon, and add this setting by going through the above steps. • This way, you will make sure that your work is reflected in the system logs for future reference.
Part 9 • Prepare a patch management report that contains a brief overview of the patches.
Progress Check • Are you done with all the Audit and Patch Management labs? • Have you checked the correctness of your work?
Questions? • Please type your questions in the chat section of your GoToMeeting window. • Remember that you can always send your questions to training@kaseya.com too. • If you are falling behind the steps in the lab, please just watch the presentation, take some notes, and perform your labs after the lecture.
Kaseya Fundamentals Workshop MONITOR
Motivation • Knowing that disk space utilization on a computer has reached a predefined threshold can trigger a few simple automated steps to prevent disastrous situations. • Proactive and preventive system maintenance is only possible with accurate and easily accessible information regarding the key aspects of the states of all the computers and peripherals within the network.
Background • How? • The required information must be collected • Categorized as to the severity of the issues • Be presented to the user • Warning! • Too much info. is equivalent to no information. • Be very selective on what data to collect. • What is available? • Commodity operating systems support facilities to collect the needed data on an ongoing basis.
What is an Alarm? • An alarm is a warning of an existing or approaching danger • We refer such situation by indicating that an alarm condition exists. • For example, an alarm condition exists when a machine's performance succeeds or fails to meet pre-defined criteria. • To check whether an alarm condition exist we need to monitor the environment.
How to Monitor? • Event-based • Alerts: Monitors events on agent-installed machines. • System Check: Monitors events on non-agent-installed machines. • Log Monitoring: Monitors events in log files. • State-based • Monitor Sets: Monitors the performance state on agent-installed machines. • SNMP Sets: Monitors the performance state on non-agent-installed devices.
How to monitor state? • Using Monitor Sets or SNMP Sets, i.e., sets of counter objects, counters, counter instances, services and processes used to monitor the performance of machines. • Basically we collect sample values of some counters associated with some performance object instances at a predefined interval. • For example, to monitor the percentage of processor time, we collect sample values of the “% Processor Time” counter.
Performance Object • A logical collection of counters that is associated with a resource or service that can be monitored. • For example, processors, memory, and physical disks each have their own sets of predefined counters.
Performance Object Instance • A term used to distinguish between multiple performance objects of the same type on a computer. • For example, multiple processors or multiple physical disks. • The VSA lets you skip this field if there is only one instance of an object.
Performance Counter • A data item that is associated with a performance object, or if more than one instance of the object exists, the data associated with each instance of the object. • Each selected counter presents a value corresponding to a particular aspect of the performance that is defined for the performance object and instance.
Monitor Set • Update Lists by Scan • Counters, Services, and Event Log Types • Monitor Perfmon Object Counters • Monitor Windows Services • Monitor Windows Processes
LAB • Assumptions • You have not put in place a way to monitor hardware and software performance on all computers simultaneously. • This prevents your IT technician from having an accurate way of knowing if all computers are at optimal performance. • Tasks • Use the Kaseya Monitor module facilitates to develop a proactive maintenance solution.