Download
1 / 64
640 likes | 800 Vues
Variables, Constants, and Calculations. Contn . Increment and Decrement Operators. C # also has operators that allow you to add 1 or subtract 1 from a number. The increment operator (++) adds 1 to a variable : countInteger ++;

E N D
Increment and Decrement Operators • C# also has operators that allow you to add 1 or subtract 1 from a number. • The increment operator (++) adds 1 to a variable: countInteger++; • The decrement operator (−−) subtracts 1 from the variable: countDownInteger−−; • You can place the increment or decrement operator before the variable, called a prefix notation . • If you prefix the operator, the order of calculation changes, which can modify the result if there are multiple operations: resultInteger= 100 − ++countInteger; • means “add 1 to countInteger before subtracting it from 100.” • Placing the operator after the variable is called a postfix notation . • When you use postfix notation, the increment (or decrement) is performed after other operations: resultInteger= 100 − countInteger++; • subtracts countInteger from 100 before incrementing countInteger.
Converting between Numeric Data Types • In C# you can convert data from one numeric data type to another. • Some conversions can be performed implicitly (automatically) and some you must specify explicitly. • And some cannot be converted if the value would be lost in the conversion.
Implicit Conversions • If you are converting a value from a narrower data type to a wider type, where there is no danger of losing any precision, the conversion can be performed by an implicit conversion . For example, the statement bigNumberDouble= smallNumberInteger; • does not generate any error message, assuming that both variables are properly declared. • The value of smallNumberInteger is successfully converted and stored in bigNumberDouble. • However, to convert in the opposite direction could cause problems and cannot be done implicitly.
The following list shows selected data type conversions that can be performed implicitly in C#:
Notice that no implicit conversions exist to convert from decimal data type to another type and you cannot convert implicitly from floating point (float or double) to decimal. • Double does not convert implicitly to any other type.
Explicit Conversions • If you want to convert between data types that do not have implicit conversions, you must use an explicit conversion , also called casting . • But beware: If you perform a cast that causes significant digits to be lost, an exception is generated. • (Exceptions are covered later in this chapter in the section titled “Handling Exceptions.”) • To cast, you specify the destination data type in parentheses before the data value to convert. • Examples • numberDecimal = (decimal) numberFloat; // Cast from float to decimal. • valueInt = (int) valueDouble; // Cast from double to int. • amountFloat = (float) amountDouble; // Cast from double to float. • You also can use methods of the Convert class to convert between data types. • The Convert class has methods that begin with “To” for each of the data types: ToDecimal , ToSingle , and ToDouble . • However, you must specify the integer data types using their .NET class names.
The following are examples of explicit conversions using the Convert class. • For each, assume that the variables are already declared following the textbook naming standards. • numberDecimal = Convert.ToDecimal(numberSingle); • valueInteger = Convert.ToInt32(valueDouble); • You should perform a conversion from a wider data type to a narrower one only when you know that the value will fit without losing significant digits. • Fractional values are rounded to fit into integer data types, and a float or double value converted to decimal is rounded to fit in 28 digits.
Performing Calculations with Unlike Data Types • When you perform calculations with unlike data types, C# performs the calculation using the wider data type. • For example, countInteger / numberDecimal produces a decimal result. • If you want to convert the result to a different data type, you must perform a cast: (int) countInteger / numberDecimalor (float) countInteger / numberDecimal . • Note, however, that C# does not convert to a different data type until it is necessary. • The expression countInteger/ 2 * amountDecimal is evaluated as integer division for countInteger/ 2 , producing an integer intermediate result; then the multiplication is performed on the integer and decimal value (amountDecimal), producing a decimal result.
Rounding Numbers • At times you may want to round decimal fractions. You can use the decimal. • Round method to round decimal values to the desired number of decimal positions.
The Round Method—General Form • decimal.Round( DecimalValue, IntegerNumberOfDecimalPositions); • The decimal.Round method returns a decimal result, rounded to the specified number of decimal positions, which can be an integer in the range 0–28.
The Round Method—Examples • // Round to two decimal positions. • resultDecimal = decimal.Round(amountDecimal, 2); • // Round to zero decimal positions. • wholeDollarsDecimal = decimal.Round(dollarsAndCentsDecimal, 0); • // Round the result of a calculation. • discountDecimal = decimal.Round(extendedPriceDecimal * DISCOUNT_RATE_Decimal, 2);
The decimal.Round method and the Convert methods round using a technique called “rounding toward even.” • If the digit to the right of the final digit is exactly 5, the number is rounded so that the final digit is even.
In addition to the decimal.Round method, you can use the Round method of the Math class to round either decimal or double values.
Formatting Data for Display • When you want to display numeric data in the Text property of a label or text box, you must first convert the value to string. • You also can format the data for display, which controls the way the output looks. • For example, 12 is just a number, but $12.00 conveys more meaning for dollar amounts. • Using the ToString method and formatting codes, you can choose to display a dollar sign, a percent sign, and commas. • You also can specify the number of digits to appear to the right of the decimal point. • C# rounds the value to return the requested number of decimal positions. • If you use the ToString method with an empty argument, the method returns an unformatted string. • This is perfectly acceptable when displaying integer values. • For example, the following statement converts numberIntegerto a string and displays it in displayTextBox.Text. • displayTextBox.Text = numberInteger.ToString();
Using Format Specifier Codes • You can use the format specifier codes to format the display of output. • These predefined codes can format a numeric value to have commas and dollar signs, if you wish. • Note : The default format of each of the formatting codes is based on the computer’s regional setting. • The formats presented here are for the default English (United States) values. • // Display as currency. • extendedPriceTextBox.Text = (quantityInteger * priceDecimal).ToString("C"); • The "C" code specifies currency . By default, the string will be formatted with a dollar sign, commas separating each group of three digits, and two digits to the right of the decimal point.
// Display as numeric. • discountTextBox.Text = discountDecimal.ToString("N"); • The " N " code stands for number . • By default, the string will be formatted with commas separating each group of three digits, with two digits to the right of the decimal point. • You can specify the number of decimal positions by placing a numeric digit following the code. For example, " C0" displays as currency with zero digits to the right of the decimal point. • The value is rounded to the specified number of decimal positions.
Note that the formatted value returned by the ToString method is no longer purely numeric and cannot be used in further calculations. • For example, consider the following lines of code: • amountDecimal += chargesDecimal; • amountTextBox.Text = amountDecimal.ToString("C");
Assume that amountDecimal holds 1050 after the calculation, and amount- TextBox.Textdisplays $1,050.00. • If you want to do any further calculations with this amount, such as adding it to a total, you must use amountDecimal, not amountTextBox.Text. • The variable amountDecimal holds a numeric value; amountTextBox.Textholds a string of (nonnumeric) characters. • You also can format DateTime values using format codes and the ToString method. • Unlike the numeric format codes, the date codes are case sensitive. • The strings returned are based on the computer’s regional settings and can be changed.
Note that you also can use methods of the DateTime structure for formatting dates: ToLongDateString, ToShortDateString, ToLongTimeString, ToShortTimeString.
Choosing the Controls for Program Output • Some programmers prefer to display program output in labels; others prefer text boxes. • Both approaches have advantages, but whichever approach you use, you should clearly differentiate between (editable) input areas and (uneditable) output areas. • Users generally get clues about input and output fields from their color. • By Windows convention, input text boxes have a white background; output text has a gray background. • The default background color of text boxes (BackColor property) is set to white; the default BackColor of labels is gray.
However, you can change the BackColor property and the BorderStyleproperty of both text boxes and labels so that the two controls look very similar. • You might wonder why a person would want to do that, but there are some very good reasons. • Using text boxes for output can provide some advantages: The controls do not disappear when the Text property is cleared, and the borders and sizes of the output boxes can match those of the input boxes, making the form more visually uniform. • Also, the user can select the text and copy it to another program using the Windows clipboard.
If you choose to display output in labels (the traditional approach), set the AutoSize property to false so that the label does not disappear when the Text property is blank. • You also generally set the BorderStyle property of the labels to Fixed3D or FixedSingle so that the outline of the label appears. • To use a text box for output, set its ReadOnly property to true (to prevent the user from attempting to edit the text) and set its TabStop property to false , so that the focus will not stop on that control when the user tabs from one control to the next. • Notice that when you set ReadOnly to true , the BackColor property automatically changes to Control, which is the system default for labels.
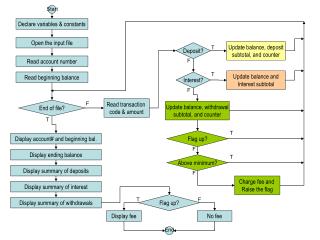
A Calculation Programming Exercise • Look Sharp Fitness Center needs to calculate prices and discounts for clothing sold. • The company is currently having a big sale, offering a 30 percent discount on all clearance clothing items. • In this project, you will calculate the amount due for items sold, determine the 30 percent discount, and deduct the discount, giving the new amount due—the discounted amount. • Use text boxes with the ReadOnly property set to true for the output fields.
Handling Exceptions • When you allow users to input numbers and use those numbers in calculations, lots of things can go wrong. • The Parse methods, int.Parse and decimal.Parse , fail if the user enters nonnumeric data or leaves the text box blank. • Or your user may enter a number that results in an attempt to divide by zero. • Each of those situations causes an exception to occur, or, as programmers like to say, throws an exception .
You can easily “catch” program exceptions by using structured exception handling. • You catch the exceptions before they can cause a run-time error and handle the situation, if possible, within the program. • Catching exceptions as they happen and writing code to take care of the problems is called exception handling . • The exception handling in Visual Studio .NET is standardized for all of the languages that use the Common Language Runtime.
try/catch Blocks • To trap or catch exceptions, enclose any statement(s) that might cause an error in a try/catch block . • If an exception occurs while the statements in the try block are executing, program control transfers to the catch block; if a finally statement is included, the code in that section executes last, whether or not an exception occurred.
The try Block—General Form try { // Statements that may cause error. } catch [( ExceptionType[ VariableName])] { // Statements for action when exception occurs. } [finally { // Statements that always execute before exit of try block. }] Note: The code shown in square brackets is optional.
The try Block—Example try { quantityInteger = int.Parse(quantityTextBox.Text); quantityTextBox.Text = quantityInteger.ToString(); } catch { messageLabel.Text = "Error in input data."; }
The catch as it appears in the preceding example will catch any exception. • You also can specify the type of exception that you want to catch, and even write several catch statements, each to catch a different type of exception. • For example, you might want to display one message for bad input data and a different message for a calculation problem. • To specify a particular type of exception to catch, use one of the predefined exception classes, which are all based on, or derived from, the SystemException class. • To catch bad input data that cannot be converted to numeric, write this catch statement: catch (FormatException) { messageLabel.Text = "Error in input data."; }
The Exception Class • Each exception is an instance of the Exception class. • The properties of this class allow you to determine the code location of the error, the type of error, and the cause. • The Message property contains a text message about the error and the Source property contains the name of the object causing the error. • The Stack- Trace property can identify the location in the code where the error occurred.
You can include the text message associated with the type of exception by specifying the Message property of the Exception object, as declared by the variable you named on the catch statement. • Be aware that the messages for exceptions are usually somewhat terse and not oriented to users, but they can sometimes be helpful. catch (FormatExceptiontheException) { messageLabel.Text = "Error in input data: " + theException.Message; }
Handling Multiple Exceptions • If you want to trap for more than one type of exception, you can include multiple catch blocks (handlers). • When an exception occurs, the catch statements are checked in sequence. • The first one with a matching exception type is used.
catch (FormatExceptiontheException) { // Statements for nonnumeric data. } catch (ArithmeticExceptiontheException) { // Statements for calculation problem. } catch (Exception theException) { // Statements for any other exception. }
The last catch will handle any exceptions that do not match either of the first two exception types. • Note that it is acceptable to use the same variable name for multiple catch statements; each catch represents a separate code block, so the variable’s scope is only that block. • You can omit the variable name for the exception if you don’t need to refer to the properties of the exception object in the catch block.
Displaying Messages in Message Boxes • You may want to display a message when the user has entered invalid data or neglected to enter a required data value. • You can display a message to the user in a message box, which is a special type of window. • You can specify the message, an optional icon, title bar text, and button(s) for the message box. • You use the Show method of the MessageBoxobject to display a message box. • The MessageBox object is a predefined instance of the MessageBox class that you can use any time you need to display a message.
The MessageBox Object—General Form • There is more than one way to call the Show method of the MessageBox class. • Each of the following statements is a valid call; you can choose the format you want to use. • It’s very important that the arguments you supply exactly match one of the formats. • For example, you cannot reverse, transpose, or leave out any of the arguments. • When there are multiple ways to call a method, the method is said to be overloaded .
MessageBox.Show( TextMessage); • MessageBox.Show( TextMessage, TitlebarText); • MessageBox.Show( TextMessage, TitlebarText, MessageBoxButtons); • MessageBox.Show( TextMessage, TitlebarText, MessageBoxButtons, MessageBoxIcon);
The TextMessage is the message you want to appear in the message box. • The TitlebarTextappears on the title bar of the MessageBox window. • The Message- BoxButtonsargument specifies the buttons to display. • And the MessageBoxIcon determines the icon to display.
The MessageBox Statement—Examples • MessageBox.Show("Enter numeric data."); • MessageBox.Show("Try again.", "Data Entry Error"); • MessageBox.Show("This is a message.", "This is a title bar", MessageBoxButtons.OK); • try • { • quantityInteger = int.Parse(quantityTextBox.Text); • outputTextBox.Text = quantityInteger.ToString(); • } • catch (FormatException) • { • MessageBox.Show("Nonnumeric Data.", "Error", • MessageBoxButtons.OK, MessageBoxIcon.Exclamation); • }
The TextMessage String • The message string you display may be a string literal enclosed in quotes or a string variable. • You also may want to concatenate several items, for example, combining a literal with a value from a variable. • If the message you specify is too long for one line, it will wrap to the next line.
The Titlebar Text • The string that you specify for TitlebarText will appear in the title bar of the message box. • If you choose the first form of the Show method, without the TitlebarText, the title bar will appear empty.
MessageBoxButtons • When you show a message box, you can specify the button(s) to display. • You specify the buttons using the MessageBoxButtonsconstants from the MessageBox class. • The choices are OK, OKCancel, RetryCancel, YesNo, YesNoCancel, and AbortRetryIgnore. • The default for the Show method is OK, so unless you specify otherwise, you will get only the OK button in your message box.
MessageBoxIcon • The easy way to select the icon to display is to type MessageBoxIcon and a period into the editor; the IntelliSense list pops up with the complete list. • The actual appearance of the icons varies from one operating system to another. • You can see a description of the icons in Help under the “MessageBoxIcon Enumeration” topic. • Constants for MessageBoxIcon • Asterisk • Error • Exclamation • Hand • Information • None • Question • Stop • Warning