Download

1 / 8
80 likes | 203 Vues
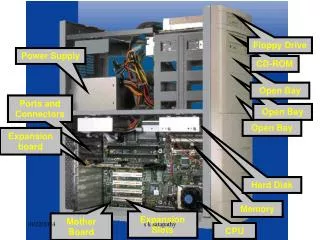
This presentation outlines the essential steps to resolve the Antec Power Supply mounting problem. It details the use of specific "L Brackets" and provides clear instructions for attachment to ensure a secure fit. The process involves measuring, drilling, and screwing to stabilize the power supply within your chassis. Each step is accompanied by necessary dimensions and tools, offering a practical guide for users facing difficulties with their Antec Power Supply installation. Follow these steps for a successful fix!

E N D
Antec Power SupplySolution Steps The following presentation highlights the steps taken to address the Antec Power Supply issue.
Antec Power SupplySolution Steps STEP 1: L Bracket #1 First, you need an “L Bracket” with the following dimensions:
Antec Power SupplySolution Steps STEP 2: L Bracket #2 You will also need another “L Bracket” with the following dimensions:
Antec Power SupplySolution Steps STEP 3: Attach the “L Brackets” to the Power Supply [Fan Up] using standard mounting screws <3/16”.
Antec Power SupplySolution Steps STEP 3: Attach the “L Brackets” to the Power Supply [Fan Up] using standard mounting screws <3/16”.
Antec Power SupplySolution Steps STEP 4: Drill 2 holes in the chassis aligned to the L Bracket “Threaded Holes” or “Pem-Nuts”.
Antec Power SupplySolution Steps STEP 5: Attach the “L Brackets” to the chassis with #6 Flathead Phillips machine screws through bottom.
Antec Power SupplySolution Steps These images show the finished product.