Download
1 / 15
150 likes | 166 Vues
Access your online competency for FirstNet training. Learn about tracking list workflow, chart tabs, placing orders, medication history, and more. Improve your skills and efficiency in using the FirstNet system.

E N D
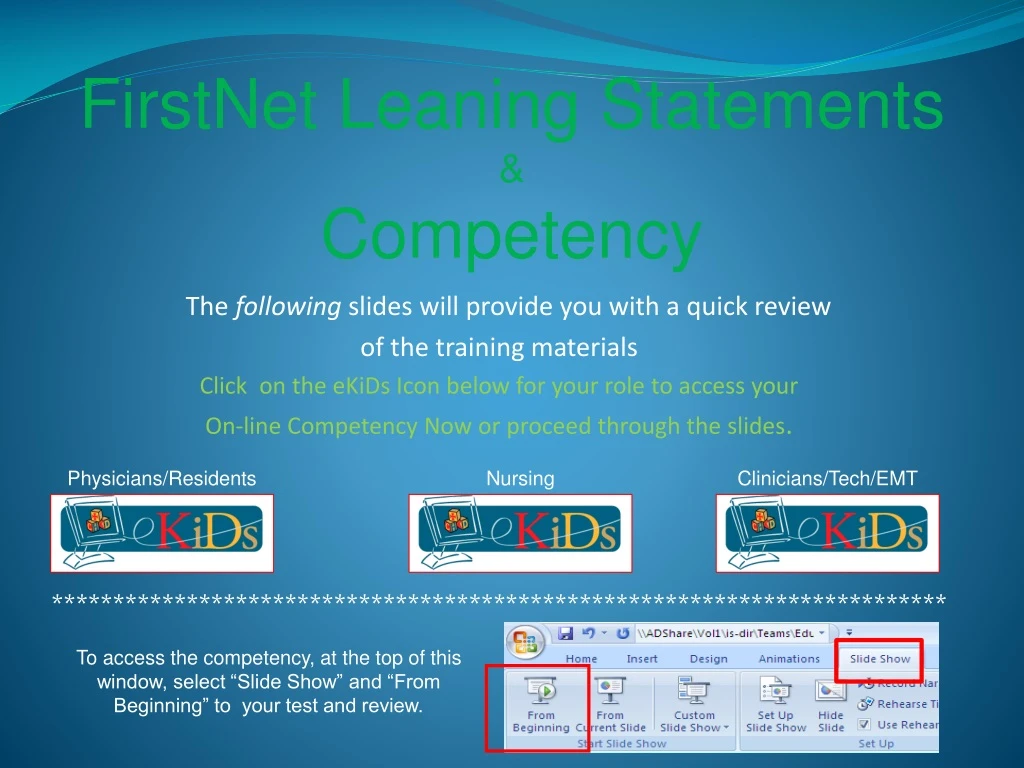
FirstNet Leaning Statements &Competency The following slides will provide you with a quick review of the training materials Click on the eKiDs Icon below for your role to access your On-line Competency Now or proceed through the slides. ************************************************************************* Physicians/Residents Nursing Clinicians/Tech/EMT To access the competency, at the top of this window, select “Slide Show” and “From Beginning” to your test and review.
#1 -- Tracking List Workflow Disconnecting from the Zero Client When you have finished using the zero client in the patient’s room or the nurse’s station but wish to login to the same application somewhere else, leave the application open and click Disconnect. When you have finished working with an application completely, close it and select Log Off from the Start menu.
#2 -- Refresh • The Tracking List is automatically refreshed once every minute. • Clicking on the Refresh button will also refresh the screen. • To insure you have an up-to-date view, click the Refresh button!
#3 -- Tracking List Workflow Provider Check-In/Check-Out Based on your security, from the Provider Check-In/Check-Out window you can select a color to be associated with your name on the tracking list. Include: Provider Role Default Relationship Click ‘Associated Provider Color’ to select a color to display with your name/initials on the ‘Tracking List’. (optional) Check ‘Available Provider’ to mark yourself available to take patients Check ‘Available Reviewer’ to review orders (if applicable)
#4 -- Chart Tabs From within a patient’s chart specific information such as orders, results and documentation are available in the Chart Tabs. The Chart Tabs provide actions based on the window that opens. Depending on your role and security, the availability and order of the tabs may differ.
#5 -- Placing Orders When placing an order it is important to make sure that you have selected the right patient, test, priority code, date, and time. For most orders, this information will default in, but you may occasionally need to change the order details and also enter required order details prior to signing your order. Clicking on the Add button will take you to the Add order window.
#6 -- Medication By History Documenting medication by history is used to enter medication orders that the parent or guardian has administered to the patient at home or for meds that were not completed in PowerChart (prescribed by a different provider). Access to adding Medications by Hx is dependant on your role and security for FirstNet.
#7 -- Accessing PowerPlans A PowerPlan is accessed from PowerOrders in the same way individual orders are accessed. Once you have clicked on Enter the name of the plan you wish to display in the ‘Find’ window and select the appropriate PowerPlan or Click the ED PowerPlans folder to display all available ED PowerPlans.
#8 -- Quick Orders The Quick Orders chart tab contains the most commonly ordered procedures and test for the ED such as Lab Orders, Micro Orders, Common Rad Orders, and CT Orders. Access to Quick Orders is dependant on your role and security for FirstNet.
#9 -- New Prescription Based on your position and security, you can enter prescriptions directly into PowerChart and send to the pharmacy via the system. Make sure the Type field is set to Prescriptions. Access to adding Prescriptions is dependant on your role and security for FirstNet.
#10 -- PowerNotes PowerNote is a method of entering clinical documents related to patient care for providers. PowerNote interacts with PowerChart, FirstNet, and SurgiNet. The information that is entered can be viewed across Cerner modules. • BENEFITS • Reduction in transcription costs • Standardized documentation Access to enter PowerNotes is dependant on your role and security for FirstNet. However, all users can view the completed PowerNote in the All Documents Chart Tab.
#11 -- Message Center Message Center can be accessed from your FirstNet toolbar. It enables you to perform tasks such as online results review, electronic signature of documents, requesting and signing electronic medication requests, approving and cosigning of orders, management of electronic message and working with proxy authentication. Residents- Use Message Center to see the status of any PowerForms submitted for signature. Attendings- Use Message Center to sign and approve orders and PowerForms submitted for signature. Many of these tasks can be completed from the FirstNet Tracking List. Access to Message Center is dependant on your role and security for FirstNet.
#12 -- Depart Process The Depart Process dialog box allows you to manage the activities associated with the process of documenting and departing a patient in FirstNet. Some of these tasks can be completed from PowerNotes. Note: Selections for the Depart process differ for the role of a Physician and that of a Nurse.
#13 -- Selecting your patient Prior to departing the patient you will need to select the correct patient from the Tracking List by clicking on the patient’s name and selecting the Depart Process Icon on the tool bar. Access to the Depart Process Icon is available for Providers and Nursing.
If you did not access the On-line Competency on the first screen click the eKiDs icon for your role below: ******************************************************************************************** Physicians/Residents Nursing Clinicians/Tech/EMT To access the competency, at the top of this window, select “Slide Show” and “From Beginning” to your test and review.