Constructing a Computer
This interactive presentation by Deanne Braley provides a detailed step-by-step guide on assembling a desktop computer, including pre-building tips, necessary parts and tools, and specific assembly instructions. Learn how to prepare the chassis, install the motherboard, CPU, RAM, PSU, and drives correctly to build your computer successfully. Whether you're a beginner or looking to enhance your computer-building skills, this presentation offers a comprehensive overview to help you construct your computer with ease and efficiency.

Constructing a Computer
E N D
Presentation Transcript
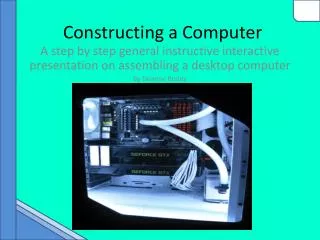
Constructing a Computer A step by step general instructive interactive presentation on assembling a desktop computer By Deanne Braley
How to Navigate Use the left and right arrows to go to the previous and next slides Use the home icon to go back to the menu Got it? Click to continue
Main Menu Click an image to continue Click to exit
What you need before building: • Parts: • Computer Chassis • Motherboard • Central Processing Unit • Random Access Memory • Hard Drive or Solid State Drive • Graphics Processing Unit • Power Supply Unit • Optical Drive • Operating System • Tools: • Screwdriver • Latex or anti-static gloves • Large wooden surface for assembly • Keyboard, mouse, and a moniter
Important pre-building tips • Make sure the parts you use to construct your computer are compatible. • If you don’t double check to make sure they work, then you may end • up getting incompatible parts and that wastes your time and money • Buy all of your parts before beginning construction, you usually want to • be able to put the whole thing together in one session • You may want an experienced friend, relative, or specialist who has • worked on computers before to supervise you while you build to prevent • any mistakes
Beginning assembly: preparations • Make sure you have all your parts • Collect parts in your work space • Set aside plenty of time; building can take anywhere from one to • three hours! • Ground yourself by plugging in your power supply to a wall socket, • turning it on, and touching it for a couple of seconds • Put on anti-static gloves (ex: Latex) and wear as little baggy clothing • as you can. Baggy or excessive clothing can rub together and collect • static, which could damage the parts!
Assembly: prepare chassis • Take the computer chassis out of its box and remove left and right side • panels • Remove any boxes or bags within the case that contain screws and such • Organize them and set them aside: • Thumb screws are screws with large handles so you can unscrew them • using your bare hands • Regular screws are small phillips head screws • Motherboard mounting screws are golden/chrome colored and are • extended so that another screw can be put inside it • Extended screws are longer screws used to mount things to the case
Assembly: Mobo, CPU, and RAM • Remove the mobo (motherboard) from its anti-static bag and place it on • your construction surface • Take the CPU (Central Processing Unit) out of its box and place it the • designated slot in the center of the mobo, aligning the pins correctly so that • the CPU simply drops into place. Do not force it in!!! • Use the CPU securing device (usually a lever you press down) to secure the • CPU • Take the CPU cooling unit (usually a large metal block with a fan that comes • with the CPU) out of its packaging and align it with the CPU. Place it on the • CPU and secure it using your hands or a screwdriver to the mobo • Remove your RAM (Random Access Memory) sticks from their packaging and • plug them into the mobo by pressing them into the appropriate slots (find • out which slots are right by checking the mobo booklet). You will need to • press hard on each end of the sticks to secure them, and you know they are • secure when you hear a click.
Assembly: Installing PSU • Remove the PSU (Power Supply Unit) from its packaging. It will come with • various power cables, set these aside for later • Open the booklet that comes with your computer case to figure out where • the PSU needs to be mounted. The mounting positions are normally on either • the top or bottom of the case towards the back • Using regular screws and your screwdriver, secure the PSU to the chassis • using the appropriate screw holes
Assembly: Installing Mobo • Take the mobo mounting screws that have been set aside and, using your • hands, screw them into the appropriate holes on the inside of your case. • Check out the booklet that came with the chassis to figure out which holes • you will be using in accordance with what size motherboard you are using • Now take your mobo (the CPU and RAM should be attached to it by now) and • align it with the mounting screws on the inside of the chassis (see image) • Screw in the case using the appropriate amount of regular screws. Be careful • not to screw them in too tight, too much force may cause permanent • damage to the mobo. • Also, be careful when turning the screwdriver, if you lose your grip or slip • off the screw, you may impale your mobo!
Assembly: Installing drives • Remove your HDDs (Hard Disk Drives) and/or SSDs (Solid State Drives) from • their packaging and locate the appropriate mounting locations for memory • drives using your chassis booklet. • Take your dives and align them with the appropriate mounting holes • Using regular screws and your screwdriver, secure each drive in place, • making sure the ports where you will insert the cords for connecting the • drives to the mobo are pointing towards the motherboard. • CD drives usually take an extra initial step before installing: you need to • remove the face plate that covers the CD drive slot where you will be • mounting the drive
Assembly: begin connecting wires • All of your computer parts will come with various cords, wires, and cables • that are needed for everything to connect and work • Organize all your cables according to what kind they are. The packaging • they come in usually indicate what kind of cables they are, so make sure to • double check so you know which cord is which • Using the booklet that came with your motherboard, identify which cords • you need to connect the various slots on the mobo. There will be many, • and it may be intimidating at first, but just take it slow and it’ll all make • sense • Take the non-mobo ends of your cables and plug them into the • corresponding slots on your various computer parts. • Identify the various cables that plug into your power supply and attach the • ends into the corresponding slots on the various computer parts
Assembly: Installing GPU • Figure out which slot you will be plugging your GPU (Graphics Processing • Unit) into by using the mobo booklet and checking what kind of slot your • GPU should be plugged into • Remove the back plate next to the correct slot from the chassis using a • screwdriver • Take the GPU out of it’s case and plug it into the appropriate slot on the • mobo, pressing with moderate force until it is secure • Take the screws you removed from the case when you took out the back • plate and re-screw them into the case to fully lock the GPU into the case • Connect the appropriate power and system cables into the GPU and their • corresponding spots on the mobo and PSU
Assembly: Second Checking • Almost done! Double check everything and look for mistakes • Check to make sure all of your cards and parts are in their correct slots • and are securely mounted within the case • Make sure all cords are plugged into the correct corresponding slots • Check that all power cords are connected to the right parts • Make sure that cables are not directly touching any vital computer parts • Look at all of the case fans and see if anything may be blocking them or • potentially preventing them from running properly • Look for any loose screws or cables sitting in the case and remove them • to prevent any damage to the parts • Connect the mouse, keyboard, and monitor to their appropriate slots on • the back of the case. Also, attach the main power cord to the PSU and flip • the I/O switch to the on position
Assembly: first power up • After the various appropriate external cables have been connected, press • the “on” switch • If the device does not start, unplug the external power cord and check • the various parts to make sure everything is attached correctly • If the device still does not start or has trouble starting, go ahead and • Google your specific problem to see how you can go about • troubleshooting and fixing it. Remember to have patience! • If you suspect that one of your computer parts may be broken, unplug • that part and try turning on the computer again. If the computer boots • up, the problem may be with that specific part. This technique doesn’t • work with the motherboard seeing as how it’s the main part and is • required for the computer to activate. • If the computer boots up and you see the motherboard’s main menu on the • monitor, then the assembly was a success!
Post Assembly Tips: • Follow the directions in your mobo booklet, you will need to set up your • computer using the BIOS (Built in Operating System) • After you’ve set everything up, use either a flash drive or a CD to install • your operating system of choice • Make sure to keep up with your system and install trust worthy anti-virus • programs • Learn basic web safety to prevent yourself from downloading malicious • software, and always check for and install updates for your system • If you ever run into a problem that you don’t trust yourself to troubleshoot • or fix, go ahead and find a recommended tech shop or electronics store • that does PC repairs and bring it to them. They’re trained to tackle a wide • array of problems and can usually be trusted to put your PC into tip top • shape • Always remember to back up your data incase your memory drive(s) break • Check the inside of your case every other month and clean out dust with a • can of compressed air. Using regular dusters make damage your computer • as they build up static and could discharge when touching your parts