Google Earth Project By: Link
Google Earth Project By: Link. This Project will show any user how to put a place mark on Google Earth. Then upload the mark onto the web. Open Google Earth. If you do not have Google Earth, download from http://earth.google.com

Google Earth Project By: Link
E N D
Presentation Transcript
Google Earth Project By: Link This Project will show any user how to put a place mark on Google Earth. Then upload the mark onto the web.
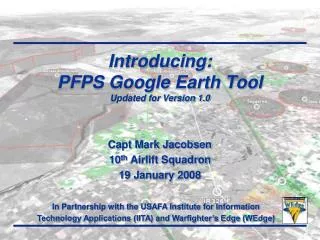
Open Google Earth. If you do not have Google Earth, download from • http://earth.google.com • Look on Google Earth until you find something you wish to “Mark.” • Double click on location. • Once found, go to the Google Earth menu bar, click the “Add” button. • When the Add window appears go and click on “Placemark.” • This puts a place mark in the • center of the screen.
Suddenly the Google Earth – New • Placemark window appears. • Fill in the name and choose which Folder you wish the button to appear under. • If wanted, click the yellow • pin button to change the appearance of the placemark that will appear on Google Earth. • Click Ok.
5. After putting the place mark on Google Earth, It appears in the Places Menu under the folder you specified in the previous step. When you’ve found the mark, right click then choose edit.
6. After clicking on Edit, the Google Earth – Edit Placemark window appears. Under the name box, there is a description box. Type in anything you wish, to describe this mark. Click Ok.
7. In the Places menu click on the placemark you have made. It becomes highlighted.
8. Go to the Google Earth Menu Bar and click File then Save As… A save window appears. Choose the KMZ or KML files and choose which folder you wish to put it in.
9. Minimize your Google Earth program and open a internet browser. Put this address in the address bar: Enid teachers and students may use http://enid.alcaweb.org/v3. Other users of ALCA may use http://www.alcaweb.org/v3. Choose the Login link, Log in. If you don’t have a user name, use the directions to get one.
10. On the left menu bar, there is a series of links, choose Folder.
11. Next click the Add Resource Type and scroll down options selecting the File option. If first time to upload files, click Run found on the popup window. The latest JAVA application will need to be installed from Sun.
End - Once you’ve chosen the Kmz or Kml file you created, go back to My Desk on the AlcaWeb website, it will be there. Congratulations you’ve uploaded your own File.