Texture Synthesis for Non-Photorealistic Shading: Advancements in Artistic Rendering
This work presents a method for non-photorealistic shading using texture synthesis derived from paint samples. It focuses on processing shaded 3D models with user-provided samples that specify color transitions. Key techniques include image-based texture synthesis, view-dependent interpolation, and volume texturing to create painted appearances on 3D models. The approach allows for a dynamic range of artistic styles and adds user-defined color trajectories, enhancing both artistic freedom and precision in the rendering process.

Texture Synthesis for Non-Photorealistic Shading: Advancements in Artistic Rendering
E N D
Presentation Transcript
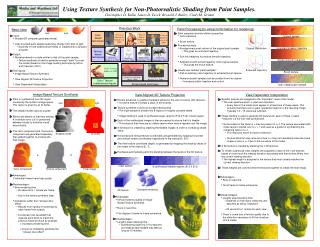
Using Texture Synthesis for Non-Photorealistic Shading from Paint Samples. Christopher D. Kulla, James D. Tucek, Reynold J. Bailey, Cindy M. Grimm Previous Work Paint Processing (to extract information for rendering) Basic Idea dark light Paint samples have two distinct properties: • Color transition. • Brush texture. The Lit Sphere, Gooch et al. 2001. Color-based techniques Technical Illustration, Gooch et al. 1998. Cartoon Shading, Lake et al. 2000. Input: • Shaded 3D computer generated model. • User provided paint sample specifying change from dark to light. • Scanned in from traditional art media or created with a 2D paint program. Original sample Processing steps: • Average every pixel column of the original paint sample. • This gives an unsorted trajectory. • Sort this trajectory to produce smooth trajectory. • Subtract smooth sorted trajectory from original sample. • This gives the brush texture. Unsorted (streaky) trajectory Original distribution Texture-based techniques Output: • Model rendered in a style similar to that of the paint sample. • Texture synthesis is used to generate enough “paint” to cover the model (based on the Image Quilting technique by Effros and Freeman, 2001). Hatching, Praun et al. 2001. Half-toning, Freudenberg. 2002. Charcoal, Majumder. 2002. Stippling, Deussen. 2000. Sorted (smooth) trajectory Volume texturing, Webb et al. 2002. Create user defined “paint samples”: • Add an arbitrary color trajectory to extracted brush texture. • Numerous paint samples can be created from the original. • Increases artistic freedom and control. Extracted trajectory Techniques: • Image Based Texture Synthesis. • View Aligned 3D Texture Projection. • View Dependent Interpolation. Brush texture Painterly rendering, Meier. 1996. WYSIWYG NPR, Kalnins et al. 2002. Color / Texture combined techniques Stroke-based techniques User created paint sample Image Based Texture Synthesis View Aligned 3D Texture Projection View Dependent Interpolation Paint is synthesized over the region covered by the model in image space. This region is given by an ID buffer. The shaded model used as a guide. Blocks are placed so that they overlap. A “minimum error cut” is performed between blocks to minimize visual discontinuity. The color component and the texture component are generated separately then added together to produce the final image. Specific textures are assigned to the “important” views of the model. • The user specifies which n views are important. • Every face in the model must appear in at least one of these views. This ensures that there are no gaps (unpainted regions) in the resulting image. Typically 12 – 15 views are sufficient. Recent advances in graphics hardware allows for the use of volume (3D) textures. • A volume texture is simply a stack of 2D textures. dark light Texture synthesis is done as a preprocessing step. • The input sample is divided into 8 regions of roughly constant shade. • Image Quilting is used to synthesize larger versions (512 X 512) of each region. Image Quilting is used to generate 2D textures for each of these n views. • Assume v is the first view synthesized. • Some subset of the faces in v may be present in v+1. The texture associated with • these faces is copied over to v + 1 and used as a guide for synthesizing the • remaining faces of v+1. • This improves frame-to-frame coherence. • Texture distortion may arise as a face in v may not necessarily have the same shape or size in v+1 due to the curvature of the model. Each of the synthesized images is then processed to ensure that it is tileable. • This ensures that there are no visible seams when texture repeats over the image. A 3D texture is created by stacking the tileable images in order of increasing shade value. Shaded model ID buffer Horizontal and vertical texture coordinates are generated by mapping horizontal and vertical screen coordinates respectively to the interval [0, 511]. The third texture coordinate (depth) is generated by mapping the shading values of the model to the interval [0, 7]. A 3D texture is created by stacking the n 2D textures. To render a particular view, weights are assigned to each of the n 2D textures based on how much the viewing direction associated with that texture differs from the current viewing direction. • The highest weight is assigned to the texture that most closely matches the • current viewing direction. Hardware automatically performs blending between the levels of the 3D texture. + = Input sample 8 synthesized tileable regions (512 X 512) These weights are used to blend the textures together to create the final image. Color component Texture component Final image Advantages: • Individual frames have high quality. Advantages: • Runs in real-time. • Good frame-to-frame coherence. Disadvantages: • Slow rendering time. • 20 seconds to 1 minute per frame. • Due to the texture synthesis step. • Animations suffer from “shower door • effect”. • Results from naively re-synthesizing each frame from scratch. • A constraint can be added that requires each block to match the previous frame as much as possible. • Increases rendering time. • Does not completely eliminate the “shower door effect”. Example rendering 3D texture Disadvantages: • Lengthy preprocessing time. • Depends on how many views the user specifies as being “important”. • 20 seconds to 1 minute for each view. • There is some loss of texture quality due to • the distortion necessary to fit the curvature • of the model. Advantages: • Almost matches quality of Image • Based Texture Synthesis. • Runs in real-time. • Fair degree of frame-to-frame coherence. Disadvantages: • Lengthy preprocessing time. • Synthesizing eight 512 X 512 textures and making each tileable may take as long as 15 minutes.