Using 3D Printing in Engineering Design Education
190 likes | 578 Vues
3 D Print Conference, Almaty, 29 th May, 2014. Using 3D Printing in Engineering Design Education . Lyazzat Zhanshayeva , Mansur Zhussupbekov , Talgat Alimbayev , Desmond Adair School of Engineering, Nazabayev University, 53 , Kabanbay batyr Ave., Astana, Kazakhstan

Using 3D Printing in Engineering Design Education
E N D
Presentation Transcript
3DPrint Conference, Almaty, 29th May, 2014 Using 3D Printing in Engineering Design Education LyazzatZhanshayeva, Mansur Zhussupbekov, TalgatAlimbayev, Desmond Adair School of Engineering, Nazabayev University, 53, Kabanbaybatyr Ave., Astana, Kazakhstan E-mail: dadair@nu.edu.kz
Introduction • Effective engineering education should incorporate, cooperative learning, promote active learning in the classroom, balance concrete and abstract information in every course, establish relevance of course material and teach inductively, formulate and publish clear instructional objectives, provide a challenge and convey a sense of concern about students’ learning. • It is the intention here to describe the development of a hands-on, integrative, multifaceted design course providing sound engineering skills and knowledge. • Essential to a good outcome of this course is the ability to manufacture the product easily and accurately. This was accomplished using 3D printing as opposed to manufacture in a workshop by skilled staff, which would have been time consuming and costly. • In the following slides, design course development, the design phase, the manufacturing stage and the testing phase are described. What the students and thought of the course, including their views on improvement is also reported.
Design Course Development • The module was designed for mechanical engineering students’ undergraduate course, who were bright and high achievers, at the top of their high-school class. The students however came from backgrounds with high school experiences of being passive recipients rather than active participants in the learning process and although extremely well versed in mathematics in particular, they had not some of the intellectual skills and abilities required for engineering. • What was the main objective of this course? • This was to give the students a flavor of what a typical process in a mechanical engineering design office might look like, that is, to give the students a first exposure to the full life-cycle of product development and provide a platform by which they can exercise their engineering judgment and intuition, in a practical case study involving the design of an impeller. • The module was divided into two distinct sections: • Background teaching of skills and knowledge • Design Project
Background Teaching The teaching and learning of this first section is summarized on Figure:- Figure: Design project preparation summary
Typical Drawing Practice The computer software package CATIA was used to teach the CAD section of the course, with exercises such as “design of an angle bracket” as shown on Figure, used for practice. Figure : Typical drawing practice
Design Project – Design Phase The second section of the course starts with the Design Phase, which lasted 8 weeks. The scenario for the project was that: “new pumps were required for the cooling system of a large power station. To win this contract a more efficient version of the existing pump design is needed but there was insufficient resources to redesign and manufacture an entirely new pump. So the decision was taken to use an existing casing and redesign only the rotor and to save money, design and assessment will be performed on a small model. The hydrodynamic performance of the model will be assessed on a test rig”.
Specifications Table: Requirements and parameters Table: System requirements Table: Design parameters
Typical Design produced by CAD • Following on from the above calculations the students produced individually a CAD drawing with a typical one shown on Figure. • Groups of 5 students were then formed and in a committee like atmosphere they debated and choose the best design within each group.
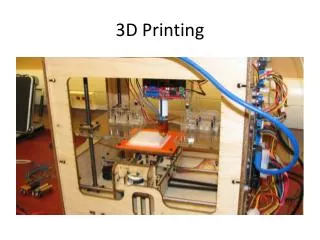
Design Project – Manufacturing Phase Manufacturing was carried out using the Projet 450 from ZCorp as shown on Figure
Building the Impeller • 3-D printer builds the impeller layer by layer from composite material powder as shown on Figure. • Each layer thickness was 0.1 mm and the vertical built speed was 23 mm/hr.
Processing & Chemical Curing • First excessive powder was collected using a vacuum cleaner for recycling. • The impeller was then cured by a special infiltrate which makes the manufactured part stronger and more vibrant. • The part was then dried and ready for testing.
Design Project – Testing Phase • The test rig and associated software • were capable of, • producing head/flow rate plots • measuring brake power input • determining the efficiency for various rpm • measuring the variation of capacity with speed • giving indication of the presence of cavitation
Design Project – Results • Typical results for the manufactured impellers are shown in the Table below • It is interesting to note that the test rig manufacturers produce an impeller with 79% and 72% at rpms of 2500 and 3000 respectively.
Design Project – Comments Three concerns regarding the manufacturing proved unfounded: • First, would the materials stand up to the rigorous testing, especially the pressure differences between suction-side and pressure-side of the impeller blades. • Second, would the immersion in water of the impeller have any effect of the impeller. • Third,would the surface roughness be small thus avoiding undue skin friction and hence drag of the blades. All of these concerns did not materialize, although after about 10 hours in water the proto-type impeller did begin to show some softening and flaking.
Student Evaluation of the Course • Generally it can be seen that the course was positively viewed by the students in all respects. • There appears to have been quite a generation of enthusiasm, • There was good interactions between students and faculty • There was a creation of good work habits.
Conclusion • A mechanical design course was developed which actively engaged students, provided good interaction between students and staff and between student and student, • It provided a hands-on project which stimulated students’ interest and allowed them sufficient time to develop important engineering skills. • Integration of mathematical and scientific knowledge and mechanical engineering skills proved a strong combination to allow students to obtain a flavour of their chosen future profession. • Without the use of 3D Printing this course would not have been possible to conduct. The speed and versatility of rapid proto-tying was essential to the outcomes of this course.