Film Storyboarding: Scene Planning & Team Coordination
80 likes | 100 Vues
Organize scenes, assign roles, and prepare resources for filming. Complete storyboards, dialogue script writing, prop collection, and equipment setup. Collaborate effectively with artists, writers, and logistics team.

Film Storyboarding: Scene Planning & Team Coordination
E N D
Presentation Transcript
Activity: 1. Determine more orlesshowmany and whichscenesyouwillshoot (film.) In thisstepyouwillmakedecisionsaboutplot, resolvingallissueregardingwhatwilloccur and howitwilloccur. Example:The bus stationscene (and whathappensthere), the taxi scene (and whathappensthere), the bar scene (and whathappensthere), thearrival at thehouse(“), insidethehouse(“), thebathroomscene(“), theattack and thescream(“), thegardenersuspectssomethingoutsidescene(“), thegardenerbreaksintothehousescene(“), therescuescene(“), resolutionscene(“), synopsisscene(“). 2. Numberthescenes in order of theiroccurrence. Make a secondcopy of thislist. 3. Divide theteamintofourgroups: Artists, writers, costumes and props, equipment and logistics. Forartists, artisticabilityisnot a requirement. Forwriters, onewriterwouldbe ideal. Twomaximum. Therest of thestudentsshouldparticipate in storyboarddrawing. (Theteacherwillhelpthewriterswith dialogue/natural language)
4. For 30 evidencias, each team member must prepare one of the following: A. The artists will draw storyboards for the most important shots of each scene. (Two to three storyboards per scene minimum) This work should be done by hand. B. The writers will select three or four scenes with important dialogue that cannot be improvised and they will begin writing dialogue for those scenes. (Depending on the length of the story and time available, you may be asked to write dialogue for the rest of the scenes as well.) You may print everything in black and white, burn it to a disk, or save it to a reformatted USB drive.
C. Costumes and props. Collect all costumes and props that you will use in the production and take photos of them. You may print everything in black and white, burn the photos to a disk, or save them on a reformatted USB drive. D. Editors, cameramen, equipment and logistics people: Take photos of the video camera and editing equipment (Macbook, etc) that you will use including tripods and lighting if available. In a document, describe the locations where you will film and the dates on which you plan to film. Tell who will provide transportation. You may print everything in black and white, burn it to a disk, or save it to a reformatted USB drive.
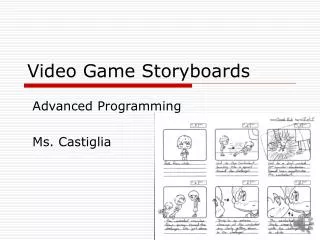
The notes that are written below each frame should contain some or all of the following: • Frame number ("John runs past; then he exits frame right") • Camera Action instructions: ("No pan") See page 87 and 88 • Take: Duration of the shot in seconds. • Dialogue: ("JOHN: Come back here with that map!") • Other audio: ("SFX: bullet ricochet") • Visual effects: ("Use black and white") See page 88 • Dialogue. (“I’ll get you, you dirty rat!”) • Note: The type of shot (long shot, big close up, etc.) does not need to be mentioned as that (the image shown on film) is what is drawn. The teacher may ask you to identify the shots later as a review activity.
Camera Movements • 1. panning • 2. tilt up • 3. tilt down • 4. Straight shot • 5. High angle shot • 6. horizontal movement • 7. vertical movement • 8. on a dolly • 9. shoulder-mounted or hand-held.
Lens Movements and Camera Effects • Lens Movements • Zoom in – sensation of getting closer • Zoom out – sensation of getting farther away • Effects • Outside voice – indicates that the person speaking does not appear in the shot • Subjective camera – Simulates the field of vision of the subject – what he is seeing. • Black out– black screen appears. Used to separate scenes. • Fade out – progressive darkening of the image until it is completely black. • Fade in – starting dark, the images appears gradually • Dissolve – the image disappears little by little until it gradually becomes another image • Flashback– Simulates a memory of past events by using fuzzy, blurry images or black and white. • Editing – The joining of images to simulate continuity • Montage or parallel take—Joins two scenes, alternating between the two.
Indicate subject movement with arrows in the frame. Show zooms by sketching the wide-angle position, drawing a box around the telephoto position within it and adding diagonal arrows to show whether the movement is in or out. For pans or tilts between two distinct compositions, show each one as a separate frame, with an arrow between frames to link them.