
Designing a Professional Banner in Photoshop: Step-by-Step Guide
In this guide, I will walk you through the process of creating a professional banner using Photoshop. Starting with a blank document, I demonstrate how to remove the background, add a decorative border, and incorporate imagery from previous designs. I'll also show you how to insert a logo and add text effectively, ensuring the slogan grabs attention. Lastly, we will enhance the banner with animations for a dynamic look. This comprehensive process will help you design a visually appealing banner that showcases your brand.

Designing a Professional Banner in Photoshop: Step-by-Step Guide
E N D
Presentation Transcript
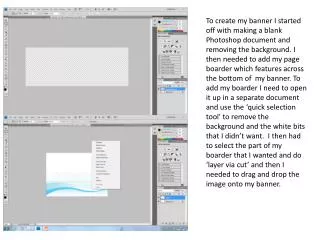
To create my banner I started off with making a blank Photoshop document and removing the background. I then needed to add my page boarder which features across the bottom of my banner. To add my boarder I need to open it up in a separate document and use the ‘quick selection tool’ to remove the background and the white bits that I didn’t want. I then had to select the part of my boarder that I wanted and do ‘layer via cut’ and then I needed to drag and drop the image onto my banner.
Once I had added in my background I then needed to add in my banner picture, I decided to keep the same image I used for my second advert because I felt it was a good strong image and helped show the Academy off to it’s full benefits. To insert the image I had to open it into a new document and once again select the part of the image I wanted, then do ‘layer via cut’ and drag and drop the image onto my banner.
Now that I have my boarder and background image I need to add my logo in somewhere. To do this I once again had to open my logo up into a different Photoshop document. Once I had done this I need to select the parts of my logo I wanted, then do ‘layer via cut’. Once I had done that I needed to drag and drop the logo onto my banner.
Now that I have the basic of my logo done I just needed to add text. To do this I clicked on the ‘T’ on the tool bar and it brought up the text box. I then typed in the Academy’s contact information and my slogan. I did the Academy's contact information smaller than my slogan because I feel that my slogan is more important to grab the attention of the cliental.
I now needed to add the animation part to my banner, to do this I went to the ‘windows’ tab at the top of my page and went down to animations and this brought up the animation tab a cross the bottom of my screen. I then decided that I would want my slogan flashing and everything else staying still. So I went to my slogan animations on the animation tab and selected ‘opacity’ and made my animation two frames long. I then made the opacity of my of my slogan at the start of frame one 20% and a quarter though I made it to 80% then three quarters of a way though I made it to 20 % again followed by at the end of it the opacity was back at 80%.