Your Home Directory
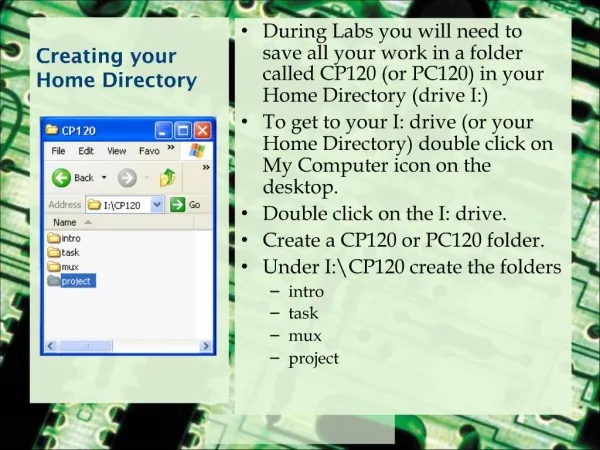
Your Home Directory. When you login to the server, you always start in your Home directory. Create sub-directories to store specific projects or groups of information, just as you would place folders in a filing cabinet.

Your Home Directory
E N D
Presentation Transcript
Your Home Directory • When you login to the server, you always start in your Home directory. • Create sub-directories to store specific projects or groups of information, just as you would place folders in a filing cabinet. • Do not accumulate thousands of files with cryptic names in your Home directory
File & Directory Commands • This is a minimal list of Linux commands that you must know for file management: • All of these commands can be modified with many options. Learn to use Linux ‘man’ pages for more information.
Navigation • pwd (present working directory) shows the name and location of the directory where you are currently working:> pwd /home/jtang • This is a “pathname,” the slashes indicate sub-directories • The initial slash is the “root” of the whole filesytem • ls (list) gives you a list of the files in the current directory: • > ls assembin4.fasta Misc test2.txt bin temp testfile • Use the ls -l (long) option to get more information about each file > ls -l total 1768 drwxr-x--- 2 browns02 users 8192 Aug 28 18:26 Opioid -rw-r----- 1 browns02 users 6205 May 30 2000 af124329.gb_in2 -rw-r----- 1 browns02 users 131944 May 31 2000 af151074.fasta
Sub-directories • cd (change directory) moves you to another directory >cd Misc > pwd /u/browns02/Misc • mkdir (make directory) creates a new sub-directory inside of the current directory > ls assembler phrap space > mkdir subdir > ls assembler phrap space subdir • rmdir (remove directory) deletes a sub-directory, but the sub-directory must be empty > rmdir subdir > ls assembler phrap space
Shortcuts • There are some important shortcuts in Linux for specifying directories • . (dot) means "the current directory" • .. means "the parent directory" - the directory one level above the current directory, so cd .. will move you up one level • ~ (tilde) means your Home directory, so cd ~ will move you back to your Home. • Just typing a plain cd will also bring you back to your home directory
Create new files • pico • nano • vi/vim • emacs
Linux File Protections • File protection (also known as permissions) enables the user to set up a file so that only specific people can read (r), write/delete (w), and execute (x) it. • Write and delete privilege are the same on a Linux system since write privilege allows someone to overwrite a file with a different one.
File Owners and Groups • Linux file permissions are defined according to ownership. The person who creates a file is its owner. • You are the owner of files in your Home directory and all its sub-directories • In addition, there is a concept known as a Group. • Members of a group have privileges to see each other's files. • We create groups as the members of a single lab - the students, technicians, postdocs, visitors, etc. who work for a given PI.
View File Permissions $ ls -l total 2 -rw-r--r-- 1 jtang None 56 Feb 29 11:21 data.txt -rwxr-xr-x 1 jtang None 33 Feb 29 11:21 test.pl • Use the ls -l command to see the permissions for all files in a directory: • The username of the owner is shown in the third column. (The owner of the files listed above is jtang) • The owner belongs to the group “None” • The access rights for these files is shown in the first column. This column consists of 10 characters known as the attributes of the file: r, w, x, and - rindicates read permission w indicates write (and delete) permission x indicates execute (run) permission - indicates no permission for that operation
Change Protections • Only the owner of a file can change its protections • To change the protections on a file use the chmod (change mode) command. [Beware, this is a confusing command.] • Taken all together, it looks like this: > chmod 644 data.txt This will set the owner to have read, write; add the permission for the group and the world to read 600, 755, 700,
Commands for Files • Files are used to store information, for example, data or the results of some analysis. • You will mostly deal with text files • Files on the RCR Alpha are automatically backed up to tape every night. • cat dumps the entire contents of a file onto the screen. • For a long file this can be annoying, but it can also be helpful if you want to copy and paste (use the buffer of your telnet program)
more • Use the command more to view at the contents of a file one screen at a time: > more t27054_cel.pep !!AA_SEQUENCE 1.0 P1;T27054 - hypothetical protein Y49E10.20 - Caenorhabditis elegans Length: 534 May 30, 2000 13:49 Type: P Check: 1278 .. 1 MLKKAPCLFG SAIILGLLLA AAGVLLLIGI PIDRIVNRQV IDQDFLGYTR 51 DENGTEVPNA MTKSWLKPLY AMQLNIWMFN VTNVDGILKR HEKPNLHEIG 101 PFVFDEVQEK VYHRFADNDT RVFYKNQKLY HFNKNASCPT CHLDMKVTIP t27054_cel.pep (87%) • Hit the spacebar to page down through the file • Ctrl-U moves back up a page • At the bottom of the screen, more shows how much of the file has been displayed • Similar command: less
Copy & Move • cp lets you copy a file from any directory to any other directory, or create a copy of a file with a new name in one directory • cp filename.ext newfilename.ext • cp filename.ext subdir/newname.ext • cp /u/jdoe01/filename.ext ./subdir/newfilename.ext • mv allows you to move files to other directories, but it is also used to rename files. • Filename and directory syntax for mv is exactly the same as for the cp command. • mv filename.ext subdir/newfilename.ext • NOTE: When you use mv to move a file into another directory, the current file is deleted.
Delete • Use the command rm (remove)to delete files • There is no way to undo this command!!! • We have set the server to ask if you really want to remove each file before it is deleted. • You must answer “Y” or else the file is not deleted. • But can use –f • rm –rf
Some More Advanced Linux Commands • grep: searches a file for a specific text pattern • cut: copies one or more columns from a tab-delimited text file • wc: word count • | : the pipe — sends output of one command as input to the next • > : redirect output to a file • sed : stream editor – change text inside a file
Basic Concepts • Variables and Assignment • Conditions • Loop • Input/Output (I/O) • Procedures/functions
Strings • Text is handled in Perl as a string • This basically means that you have to put quotes around any piece of text that is not an actual Perl instruction. • Perl has two kinds of quotes - single ‘ and double “ (they are different- single quote will print as is)
Print • Perl uses the term “print” to create output • Without a printstatement, you won’t know what your program has done • You need to tell Perl to put a carriage return at the end of a printed line • Use the “\n” (newline) command • Include the quotes • The “\” character is called an escape - Perl uses it a lot
#!/usr/bin/perl $DNA = 'ACGT'; # Next, we print the DNA onto the screen print $DNA, "\n"; print '$DNA\n'; print "$DNA\n"; exit;
Do the Math (your 2nd Perl program) #!/usr/bin/perl print "4+5\n"; print 4+5 , "\n"; print "4+5=" , 4+5 , "\n"; [Note: use commas to separate multiple items in a print statement, whitespace is ignored]
Variables • To be useful at all, a program needs to be able to store information from one line to the next • Perl stores information in variables • A variable name starts with the “$” symbol, and it can store strings or numbers • Variables are case sensitive • Give them sensible names • Use the “=”sign to assign values to variables $one_hundred = 100; $my_sequence = "ttattagcc";
Array • @DNA = (1, 2, 3); • shift, unshift • push, pop • Index using []
Hash • %TABLE=(A=>’CGT’, B=>’CCC’,);
Hash • Initialize: my %hash = (); • Add key/value pair: $hash{$key} = $value; • Add more keys: • %hash = ( 'key1', 'value1', 'key2', 'value2 ); • %hash = ( key1 => 'value1', key2 => 'value2', ); • Delete: delete $hash{$key};
String Operations • Strings (text) in variables can be used for some math-like operations • Concatenate (join) use the dot . operator $seq1= "ACTG"; $seq2= "GGCTA"; $seq3= $seq1 . $seq2; print $seq3; ACTGGGCTA
#!/usr/bin/perl -w $DNA1 = 'ACGGGAGGACGGGAAAATTACTACGGCATTAGC'; $DNA2 = 'ATAGTGCCGTGAGAGTGATGTAGTA'; $DNA3 = "$DNA1$DNA2"; $DNA4 = $DNA1 . $DNA2; exit;
#!/usr/bin/perl –w $DNA = 'ACGGGAGGACGGGAAAATTACTACGGCATTAGC'; print "Here is the starting DNA:\n\n"; print "$DNA\n\n"; # Transcribe the DNA to RNA by substituting all T's with U's. $RNA = $DNA; $RNA =~ s/T/U/g; # Print the RNA onto the screen print "Here is the result of transcribing the DNA to RNA:\n\n"; print "$RNA\n"; # Exit the program. exit;
#!/usr/bin/perl -w # The filename of the file containing the protein sequence data $proteinfilename = 'NM_021964fragment.pep'; # First we have to "open" the file open(PROTEINFILE, $proteinfilename); $protein = <PROTEINFILE>; # Now that we've got our data, we can close the file. close PROTEINFILE; # Print the protein onto the screen print "Here is the protein:\n\n"; print $protein; exit;
#!/usr/bin/perl -w # The filename of the file containing the protein sequence data $proteinfilename = 'NM_021964fragment.pep'; # First we have to "open" the file open(PROTEINFILE, $proteinfilename); # Read the protein sequence data from the file, and store it # into the array variable @protein @protein = <PROTEINFILE>; # Print the protein onto the screen print @protein; # Close the file. close PROTEINFILE; exit;
#!/usr/bin/perl -w # array indexing @bases = ('A', 'C', 'G', 'T'); print "@bases\n"; print $bases[0], "\n"; print $bases[1], "\n"; print $bases[2], "\n"; print $bases[3], "\n"; exit;
String functions • Chomp • Length of a string • Substring
#!/usr/bin/perl -w $proteinfilename = 'NM_021964fragment.pep'; open(PROTEINFILE, $proteinfilename); $protein = <PROTEINFILE>; close PROTEINFILE; chomp $protein; $len = length $protein; print $len, ""; exit;
#!/usr/bin/perl -w $name = "PALLAPP"; $st1 = substr($name, 3); $st2 = substr($name, 1, 2);
Comparison • String comparison (are they the same, > or <) • eq (equal ) • ne(not equal ) • ge(greater or equal ) • gt (greater than ) • lt(less than ) • le(less or equal )
#!/usr/bin/perl –w $word = 'MNIDDKL'; if($word eq 'QSTVSGE') { print "QSTVSGE\n"; } elsif($word eq 'MRQQDMISHDEL') { print "MRQQDMISHDEL\n"; } elsif ( $word eq 'MNIDDKL' ) { print "MNIDDKL-the magic word!\n"; } else { print "Is \”$word\“ a peptide?\n"; } exit;
$x = 10; $y = -20; if ($x <= 10) { print "1st true\n";} if ($x > 10) {print "2nd true\n";} if ($x <= 10 || $y > -21) {print "3rd true\n";} if ($x > 5 && $y < 0) {print "4th true\n";} if (($x > 5 && $y < 0) || $y > 5) {print "5th true\n";}
But • Use ==, <, <=, >, >=, !=, ||, && for numeric numbers • Use eq, lt, le, gt, ge, ne, or, and for string comparisons
$x = 10; $y = -20; if ($x le 10) { print "1st true\n";} if ($x gt 5) {print "2nd true\n";} if ($x le 10 || $y gt -21) {print "3rd true\n";} if ($x gt 5 && $y lt 0) {print "4th true\n";} if (($x gt 5 && $y lt 0) || $y gt 5) {print "5th true\n";}
#!/usr/bin/perl -w $num = 1234; $str = '1234'; print $num, " ", $str, "\n"; $num_or_str = $num + $str; print $num_or_str, "\n"; $num_or_str = $num . $str; print $num_or_str, "\n"; exit;
More Arithmatics • +, -, *, **, /, % • +=, -=, *=, **=, /=, %= • ++, --
$x = 10; $x = $x*1.5; print $x*=3, "\n"; print $x++, "\n"; print $x, "\n"; print ++$x, "\n"; print $x, "\n"; print $x % 3, "\n"; print $x**2, "\n";
#!/usr/bin/perl -w print "Please type the filename of the DNA sequence data: "; $dna_filename = <STDIN>; chomp $dna_filename; open(DNAFILE, $dna_filename); $name = <DNAFILE>; @DNA = <DNAFILE>; close DNAFILE; $DNA = join('', @DNA); $DNA =~ s/\s//g; $count_of_CG = 0; $position = 0; while ( $position < length $DNA) { $base = substr($DNA, $position, 1); if ( $base eq 'C' or $base eq 'G') { ++$count_of_CG; } $position++; } print "CG content is ", $count_of_CG/(length $DNA)*100, "%\n";
#!/usr/bin/perl –w print "Please type the filename of the DNA sequence data: "; $dna_filename = <STDIN>; chomp $dna_filename; open(DNAFILE, $dna_filename); $name = <DNAFILE>; @DNA = <DNAFILE>; close DNAFILE; $DNA = join('', @DNA); $DNA =~ s/\s//g; $count_of_CG = 0; for ( $position = 0 ; $position < length $DNA ; ++$position ) { $base = substr($DNA, $position, 1); if ( $base eq 'C' or $base eq 'G') { ++$count_of_CG; } } print "CG content is ", $count_of_CG/(length $DNA)*100, "%\n";
$DNA = "ACCTAAACCCGGGAGAATTCCCACCAATTCTACGTAAC"; $s = ""; for ($i = 0, $j = 5; $i < $j; $i+=2, $j++) { $s .= substr($DNA, $i, $j); } print $s, "\n";
sub extract_sequence_from_fasta_data { my(@fasta_file_data) = @_; my $sequence = ''; foreach my $line (@fasta_file_data) { if ($line =~ /^\s*$/) { next; } elsif($line =~ /^\s*#/) { next; } elsif($line =~ /^>/) { next; } else { $sequence .= $line; } } # remove non-sequence data (in this case, whitespace) from $sequence string $sequence =~ s/\s//g; return $sequence; }
Subroutine • Some code needs to be reused • A good way to organize code • Called “function” in some languages • Name • Return • Parameters (@_)
#!/usr/bin/perl –w print "Please type the filename: "; $dna_filename = <STDIN>; chomp $dna_filename; open(DNAFILE, $dna_filename); $name = <DNAFILE>; @DNA = <DNAFILE>; close DNAFILE; $DNA = join('', @DNA); $DNA =~ s/\s//g; $count_of_G = countG($DNA); print $count_of_G; sub countG { my($dna) = @_; my($count) = 0; $count = ( $dna =~ tr/Gg//); return $count; }
#!/usr/bin/perl –w print "Please type the filename: "; $dna_filename = <STDIN>; chomp $dna_filename; open(DNAFILE, $dna_filename); $name = <DNAFILE>; @DNA = <DNAFILE>; close DNAFILE; $DNA = join('', @DNA); $DNA =~ s/\s//g; $count_of_G = count($DNA, 'Gg'); print $count_of_G; sub count { my($dna, $pattern) = @_; my($count) = 0; $count = ( eval("$dna =~ tr/$pattern//") ); return $count; }
Scope • my provides lexical scoping; a variable declared with my is visible only within the block in which it is declared. • Blocks of code are hunks within curly braces {}; files are blocks. • Use use vars qw([list of var names]) or our ([var_names]) to create package globals.