The VPN Menu
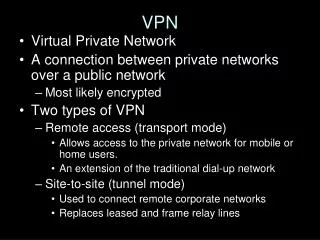
The VPN Menu. The VPN Menu. VPN The GD eSeries can be set up either as an OpenVPN server or as a client, and even play both roles at the same time, in order to create a network of OpenVPN -connected appliances and/or clients. The menu items available in the sub-menu are the following:


The VPN Menu
E N D
Presentation Transcript
The VPN Menu • VPN • The GD eSeries can be set up either as an OpenVPN server or as a client, and even play both roles at the same time, in order to create a network of OpenVPN-connected appliances and/or clients. The menu items available in the sub-menu are the following: • OpenVPN server: set up the OpenVPN server so that clients (both road-warriors and other appliances in a Gateway-to-Gateway setup) can connect to one of the local zones. • OpenVPNclient (Gw2Gw): set up the client-side of a Gateway-to-Gateway setup between two or more appliances • IPSec: set up IPSec-based VPN tunnels • L2TP: manage L2TP VPNs • VPN Users: manage users for VPN connections.
The VPN Menu • OpenVPN server – Server configuration OpenVPNserver enabled: Tick this checkbox to make sure the OpenVPN server is started. Bridged: To run the OpenVPN server in bridged mode, i.e., within one of the existing zones. VPN subnet: This option is only available if bridged mode is disabled. It allows the OpenVPN server to run in its owndedicated subnet, which can be specified in the text box and should be different from the subnets of the other zones. Bridge to: The (available) zone to which the OpenVPNserver should be bridged. Dynamic IP pool start address: The first possible IP address in the network of the selected zone that should be used for the OpenVPN clients. Dynamic IP pool end address: The last possible IP address in the network of the selected zone that should be used for the OpenVPN clients.
The VPN Menu • OpenVPN server – Advanced Port & Protocol: The UDP/1194 combination for protocol and port is the default OpenVPN setting and it is a good practice to keep it unchanged. To make OpenVPN accessible via other ports, port forwarding rules to redirect incoming traffic to port 1194 should be defined accordingly. The protocol should be set as TCP only in some borderline case, like e.g., when accessing the OpenVPN server through some 3rd HTTP proxy, otherwise the default settings should be used. Block DHCP responses coming from tunnel: Tick this checkbox when receiving DHCP responses from the LAN at the other side of the VPN tunnel that conflict with the local DHCP server.
The VPN Menu • OpenVPN server – Advanced Don’t block traffic between clients: By default, the OpenVPN server isolates clients from each other. To change this behavior and allow traffic between different VPN clients, tick this option. Allow multiple connections from one account: Usually one client is allowed to connect from one location at a time. Selecting this option permits multiple client logins, even from different locations. Push these networks: The routes to the specified networks defined here (typically not managed by GD) are sent to the connected clients. Push these nameservers: The specified nameservers are sent to the connected clients. Push domain: The search domains used for local name resolution are added to those of the connected clients.
The VPN Menu • OpenVPN server – Example
The VPN Menu • OpenVPN server – Example • From the GD eSeries main menu, select VPN and immediately you will be taken to the SSL VPN (OpenVPN) server configuration page. The first thing to do is to ensure the OpenVPN server is enabled by checking the first box. • The next step is to choose whether you want the OpenVPN server to run in bridged mode (i.e. included in the interface bridge) or you want it to run in non-bridged mode with a separate, unique VPN IP subnet pool. The default is to run in bridged mode to the Green zone and this is recommended for most common VPN deployments. If you choose to run in bridged mode, you may also specify which network zone you want the VPN interface to be bridged to. • The last thing is to set aside a range of IP's within the bridged interface network to be used exclusively by the VPN server. Keep in mind that these IP's shouldn't be allocated anywhere else on the Endian device (e.g. DHCP range, Static IP's , etc.). Once you're done, you can click Save and restart to enable the VPN server.
The VPN Menu • OpenVPN server – Example • Select “Add new user” from the VPN Server menu and create a new remote user VPN account: • The main things to configure for the new road-warrior VPN account are the Username and Password. • Some of the other options you can specify include the client routing options where you can determine specific routes being pushed to the remote VPN device as well as some custom push configuration options that allow you to override the settings from the global options (VPN-Advanced). Remember anything provided here will override the settings you configured for the VPN global options so only use these if this client account requires a different configuration. Once you've completed the necessary fields, click Add to proceed.
The VPN Menu • OpenVPN server – Example • From Panda Perimetral Management Console, once logged in, you should see the available VPN installer packages under “Downloads”, at which point you can get the one suitable for your operating system - Windows, Mac OS X, or Linux (.deb - Ubuntu). • Direct link: https://managedperimeter.pandasecurity.com/downloads_panda.php • Once the download is complete, follow your operating system's normal installation procedure to run the PandaVPNinstallation package.
The VPN Menu • OpenVPN server – Example • When you open the client the first time you will need to configure the appropriate settings for the client to connect sucessfully. To do this, click the [ + ] icon and add a new VPN account profile. • Now all that is left is to configure is the VPN account information. For Description, you can provide any brief string to identify the VPN account. Under Server, you need to specify the IP address or fully-qualified name of the VPN server (e.g. vpn.example.com). Next, you must choose the server certificate file you previously downloaded from GD eSeries (.pem or .cer). Lastly, you must provide the Username and Password for the previously created VPN account.
The VPN Menu • OpenVPN server – Example • Select the appropriate VPN account and click Connect to establish your VPN connection. • You should a message saying "Connected to <vpn server ip/name>”– this indicates a successful VPN connection. • You can close the VPN Manager at any point but the VPN service it will remain running. You must click Disconnect to terminate the VPN.
The VPN Menu • L2TP/IPSectunnel– Example Setting up a L2TP tunnel is straightforward and you can achieve it in a few steps: • Go under Menubar ‣VPN ‣ On the left IPSec/L2TP‣ L2TP Tab. Enable L2TP. • Choose to which zone (among the existing ones) should the L2TP tunnel connections be directed. • Choose a pool of IP addresses that should be assigned to the clients connecting through L2TP. These interval should fall within the IP addresses allocated to the zone. • Optionally, you can activate debug mode, which results in more verbose logging. • Finally, you can save the configuration by clicking on the Save button and then on Apply in the green callout that will appear after saving the configuration.
The VPN Menu • L2TP/IPSectunnel – Example • After the L2TP tunnel has been enabled, you are just a few more steps away to enable IPSec with the L2TP tunnel. • Click on to the IPSec tab item to open the page to configure IPSec, which consists of three boxes. • In the first box, click on the checkbox to enable the VPN connections using IPSec. • You can optionally click on any of the four checkboxes to enable specific debugging options, which will result in verbose logging. • Then click on the Add button to start the configuration of the VPN.
The VPN Menu • L2TP/IPSectunnel – Example • In the first panel, choose the type of connection to use, which is in this case the third option, i.e., a "roadwarrior using L2TP", then click on Add.
The VPN Menu • L2TP/IPSectunnel – Example • The first step is to configure the VPN account by providing the Name and External Interface to listen to incoming VPN connections. Also, tick the checkbox to enable the account, otherwise it cannot be used to connect. • The second part of the VPN account creation requires providing a strong pre-shared key for authentication. • Once you are done, click on Save to store the settings.
The VPN Menu • L2TP/IPSectunnel – Example • After the VPN connection and the L2TP tunnel have been created, the only piece missing to set up the VPN/IPSec connection is represented by the L2TP users. • To create new L2TP users, go under Menubar ‣VPN ‣VPN Users, then click on “Add new User”. • In this step you define the name and the password for the VPN user. Make also sure that you check the “L2TP” and “Enabled” checkboxes to activate a new L2TP user. Finally, click on Advanced Settings to proceed to the last step. • In this last step, click on L2TP options to show the last option: the choice of the IPSec tunnel to be used from the dropdown menu and finalize the user creation by clicking on the Add button.
The VPN Menu • Connecting to GD eSeries via L2TP (IPSec) using iOS– Example • To configure your iOS device, e.g., iPhone or iPad, you need first to go under General > Network > VPN, then tap Settings and tap on Add VPN connection. • Tap on L2TP. • Enter a custom description for the connection. This is the name that will be displayed in the list of available VPN connections. • Enter the IP address or hostname next to Server. • Tap on Account and enter your username. • If you want to store your password on the device, tap Password and enter your password. • Tap Secret and enter your PSK Secret (pre-shared key). • When the configuration is done, slide the VPN switch to ON to start the connection.