Download

1 / 20
200 likes | 287 Vues
Discover the powerful Rappture Toolkit designed for scientific collaboration on the HUBzero platform. Learn how to quickly create standard desktop apps using your preferred programming language. Dive into the world of simulation code creation and deployment with this open-source toolkit. Explore the automatic generation of user interfaces and the versatility of objects as inputs or outputs. See examples, screen shots, and XML code to get started. Get hands-on experience with tools like voltage sweeps, temperature gauges, presets, grid points, and more.

E N D
Introducing the Rappture Toolkit Michael McLennanSoftware ArchitectHUBzero™ Platform for Scientific Collaboration This work licensed under Creative Commons See license online: by-nc-sa/3.0
Publish ANY X11/Linux Tool GNU Chess MATLAB Program
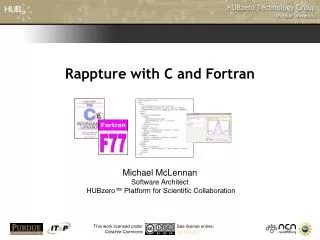
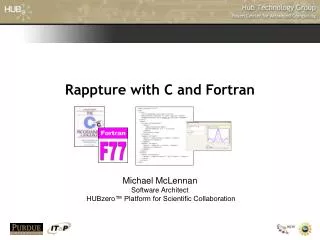
What if you have a C/C++ or Fortran program? #include <stdio.h> #include <math.h> int main(int argc, char *argv[]) { double T, Ef, E, dE, kT, Emin, Emax, f; printf("Enter the Fermi energy in eV:\n"); scanf("%lg", &Ef); printf("Enter the Temperature in K:\n"); scanf("%lg", &T); kT = 8.61734e-5 * T; Emin = Ef - 10*kT; Emax = Ef + 10*kT; E = Emin; dE = 0.005*(Emax-Emin); while (E < Emax) { f = 1.0/(1.0 + exp((E - Ef)/kT)); printf("%f %f\n",f, E); E = E + dE; } return 0; }
Scientist The Rappture Toolkit Rappture = • Rapid ApplicationInfrastructure • Released in May 2005 • Open Source (rappture.org) • Create standard desktop apps • Works with your favorite • programming language Simulation Code
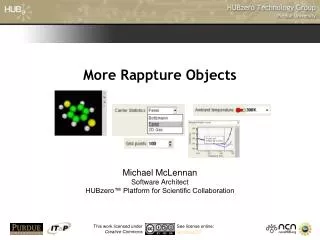
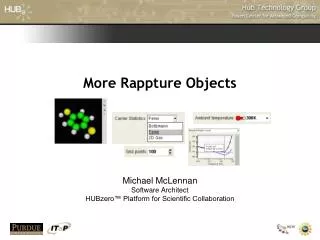
Create tools like this Demo at http://hubzero.org/tour >>
<XML> executable tool.xml Rappture GUI How does it work? description of tool, including inputs and outputs Produces the user interface automatically!
<XML> executable tool.xml Rappture GUI Focus on tool.xml Same objects act as either inputs or outputs* *not always true, but should be description of tool, including inputs and outputs <?xml version="1.0"?> <run> <tool> <about>This is my tool.</about> … </tool> <input> </input> <output> </output> </run> Produces the user interface automatically!
Tour the zoo • Zoo of Examples • Complete catalog of data objects online • See screen shots • Copy xml code
Similar structure All objects have an <about> section with <label> and <description> <number id="temperature"> <about> <label>Ambient temperature</label> <description>This is the temperature in the environment around the device.</description> </about> … </number> This is the temperature in the environment around the device. This is an example that has multiple curves. <curve id=“multi"> <about> <label>Multiple curves</label> <description>This is an example that has multiple curves.</description> </about> … </curve>
Optional system of units Constrain input values Start with this by default <number> Real number with optional units <number id="vsweep"> <about> <label>Voltage Sweep +/-</label> <description>This determines the voltage sweep used to obtain results from the model.</description> <icon> R0lGODlhGgASAKEBAAAAAP///////////yH+FUNyZWF0ZWQgd2l0aCBUaGUgR0lNUAAh+QQBCgAB ACwAAAAAGgASAAACLoyPqcvtD8CRj8VZrYw8h/tRn2eA4Eiaosa1qttC1EmW81qrtbYvdG8DCodE RQEAOw== </icon> </about> <units>V</units> <min>0V</min> <max>10V</max> <color>purple</color> <default>4V</default> </number> Optional base-64 (mime) encoded GIF image for icon Optional color is used if min/max values are set
<number> Real number with optional units <number id="temperature"> <about> <label>Ambient temperature</label> <description>This is the temperature in the environment around the device.</description> </about> <units>K</units> <min>50K</min> <max>1000K</max> <default>300K</default> <preset> <value>300K</value> <label>300K (room temperature)</label> </preset> <preset> <value>77K</value> <label>77K (liquid nitrogen)</label> </preset> </number> Temperature gauge appears if units are for temperature Presets create a little drop-down menu of common choices
Constrain input values Start with this by default <integer> Like a <number>, but accepts only integer values <integer id="points"> <about> <label>Grid points</label> <description>Number of nodes used in the simulation mesh.</description> </about> <min>10</min> <max>1000</max> <default>100</default> </integer> Buttons to adjust value up/down
Start with this by default <boolean> Simple on/off value <boolean id="iimodel"> <about> <label>Impact Ionization Model</label> <description>Used to enable/disable the effects of impact ionization on the mobility model.</description> </about> <default>yes</default> </boolean>
This by default Optional. If specified, thenreport this value when thisoption is selected <choice> Set of mutually exclusive options <choice id="stats"> <about> <label>Carrier Statistics</label> <description>Determines the model…</description> </about> <option> <about> <label>Boltzmann</label> <description>From the Boltzmann transport equation</description> </about> <value>bte</value> </option> … <default>Boltzmann</default> </choice>
width x height in characters <string> Quick line of text, or even a whole file! Binary files too. <string id="title"> <about> <label>Title</label> <description>Title for all plots.</description> </about> <default>untitled</default> </string> <string id="indeck"> <about> <label>Input</label> <description>This is the control file for the program.</description> <hints>EXAMPLE: .print ac vm(11)</hints> </about> <size>40x10</size> <default>Enter your SPICE commands here.</default> </string>
GIF, JPEG, or PNG in base-64 format <image> Data for image processing <image> <current>R0lGODlhtAA8APcAAFeBu////0VurKW829Ld7YSjQ1 8Y+r0rHE31aAus3Y6VJ5sEpysEdvrXeVwlV+uVB6tVZ/uEhwrlV/u tkZol5yy0092q0dqmVV+t053tElxr0VmlEVnlU92qlR8tFN7sk12s ... </current> </image> Can use as a decoration on the input side, but thereare better ways to do that now.
Temperature gauge Zoom in/out Validation of inputs Units conversion Adjust knob to compare simulations Better User Interfaces
More Information • http://rappture.org • What is Rappture? • Getting Started • Documentation • Downloads Examples: /apps/rappture/current/examples In your workspace, type:/apps/rappture/copy_rappture_examplescd rappture_examplesls Mailing list: Post: rappture@lists.nanohub.org Subscribe: rappture-request@lists.nanohub.org with subject subscribe
Exercise #2: Create a Rappture Interface Write the tool.xml file to create this tool: See https://rappture.org/wiki/rappture_xml_elements