Electric Circuits
Electric Circuits. Activity 6. Part 1: Changing Motor Direction. How Does it Work?. The direction of a motor can easily be changed by switching the direction of the electricity current passing through the motor. REMEMBER: Electrons flow from the negative terminal to the positive terminal.

Electric Circuits
E N D
Presentation Transcript
Electric Circuits Activity 6
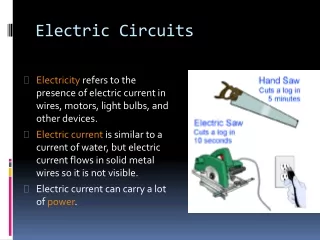
How Does it Work? • The direction of a motor can easily be changed by switching the direction of the electricity current passing through the motor. • REMEMBER: Electrons flow from the negative terminal to the positive terminal
For example, flip the battery + Positive - Negative The motor will spin clockwise The motor will spin counter-clockwise - Negative + Positive
Another example: The DPDT switch DPDT Double Pole, Double Throw A DPDT switch contains 6 teeth ON: to the left ON: to the right OFF Turning the switch ON to the left makes the 4 teeth to the left turn ON. In other words, let the current flow. OFF nothing occurs Turning the switch ON to the right makes the 4 teeth to the right turn ON. In other words let the current flow.
Connecting the DPDT switch(Double Pole, Double Throw) There are a number of different circuit designs that will make the motor change direction. This is just one of them. Green: These wires distribute the electricity flow to both sides of the switch. This way current will flow through the switch whether the switch is turned on to the right or to the left side. Crossing the wires will cause it to change the direction of the flow. + Positive - Negative
Finished! Scenario 1 demonstrates the switch ON to the right. This makes the motor spin counter-clockwise. Scenario 2 demonstrates the switch ON to the left. This makes the motor spin clockwise.
How Does it Work? • The motor speed is related to the current being applied to the motor. • As current increases so does the force induced in the motor, which leads to faster spin. • There are a number of ways to vary the current flowing into a motor: • Change the voltage (size of the battery) • Change the resistance • i.e. Change the wire (length or thickness) • i.e. Add resistors, such as light bulbs
Ohm’s Law • The relationship between current, voltage and resistance was discovered by Georg Ohm. He made his own wires and was able to show that the size of an electric current depended upon their length and thickness. The current was reduced by increasing the length of the wire, or by making it thinner. Current was increased if a shorter thicker wire was used. In addition, larger currents were observed when the voltage across the wire was increased.
Ohm’s Law cont. From experiments like these, Ohm found that, at constant temperature, the ratio voltage/current was constant for any particular wire, that is: R = VV = IR I = V I R R = Resistance (Ohms)(a property that slows the flow of electrons) V = Voltage (Volts)(is a measure of the pressure applied to electrons to make them move) I = Current (Amps) (A flow of electric charge)
Some good reading • http://www.physicsclassroom.com/class/circuits/u9l3b.cfm • http://www.doctronics.co.uk/circuits.htm • http://www.need.org/needpdf/infobook_activities/SecInfo/Elec3S.pdf