Helmet Light User Instructions
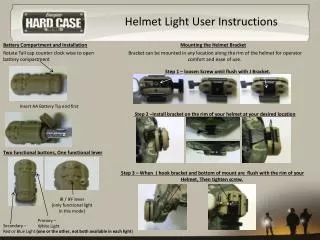
Battery Compartment and Installation. Mounting the Helmet Bracket . Rotate Tail cap counter clock wise to open battery compartment. Bracket can be mounted in any location along the rim of the helmet for operator comfort and ease of use. Step 1 – loosen Screw until flush with J Bracket.


Helmet Light User Instructions
E N D
Presentation Transcript
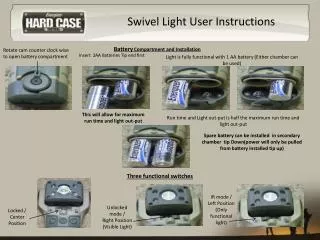
Battery Compartment and Installation Mounting the Helmet Bracket Rotate Tail cap counter clock wise to open battery compartment Bracket can be mounted in any location along the rim of the helmet for operator comfort and ease of use. Step 1 – loosen Screw until flush with J Bracket. Helmet Light User Instructions Insert AA Battery Tip end first Step 2 –Install bracket on the rim of your helmet at your desired location Two functional buttons, One functional lever Step 3 – When J hook bracket and bottom of mount are flush with the rim of your Helmet, Then tighten screw. IR / IFF lever (only functional light In this mode) Primary – White Light Secondary – Red or Blue Light (one or the other, not both available in each light)
Light location Right side Mounted Helmet Light User Instructions White Light – Bottom Button (right side mounted) Red or Blue Light– Top Light White Light -- Center Light IR Light – Lower Light Red or Blue Light – Top button (right side mounted) Light location Left side Mounted White Light – Top Button (left side mounted) IR Light– Top Light White Light -- Center Light Red Or Blue Light – Lower Light Three modes of operations Primary and Secondary Light Press 1X – low Press 2X -- Medium Press 3X -- High Red or Blue Light – Bottom Button (left side mounted) (if light has been on for more than three seconds, next press will extinguish the light)
To Engage IR/IFF Right side mounted To Engage IR/IFF Left side mounted IR Light— Move lever down to engage IR light (all other lights are disabled in this mode) IR Light— Move lever up to engage IR light (all other lights are disabled in this mode) Helmet Light User Instructions IFF Mode— Move lever up to engage IFF Mode (all other lights are disabled in this mode) IFF Mode— Move lever down to engage the IFF mode (all other lights are disabled in this mode) IFF Light IFF Light IR Light Constant On One level of brightness IFF Light Need Flash input To Engage the lock out feature Turn the tail cap ¼ turn (light is still water proof) Tab should be aligned centered with Hard Case Logo
Rotating your Helmet Light Step 1 — While mounted gently pull light away from helmet Step 2 — Rotate into your desired position Helmet Light User Instructions Mounting bracket has 20 lockable positions within the 360 degree rotation! Removing your Helmet Light from your Helmet Recommended Hand Position To avoid accidental discharge (AD) of colored lights. Finger position should be end to end. Step 2 — Slide light rear wards to remove light. Step 1 — Depress the T-Bar to disengage locking bracket Removing your Helmet Light from your OTV/FLC Step 1 — Depress the T-Bar to disengage locking bracket Step 2— slide light upwards to remove light.