(Impression trays)-(Boxing in the impressions and making the casts) (Post damming)-(Relief Areas) )
(Impression trays)-(Boxing in the impressions and making the casts) (Post damming)-(Relief Areas) ). Dr. Waseem Bahjat Mushtaha Specialized in prosthodontics. Impression trays. Impression tray :

(Impression trays)-(Boxing in the impressions and making the casts) (Post damming)-(Relief Areas) )
E N D
Presentation Transcript
(Impression trays)-(Boxing in the impressions and making the casts) (Post damming)-(Relief Areas) ) Dr. Waseem Bahjat Mushtaha Specialized in prosthodontics
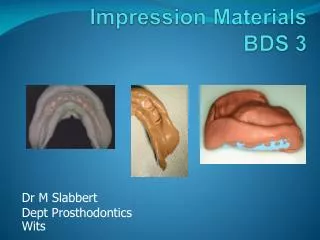
Impression trays Impression tray: is an instrument used for carrying the impression material in to the mouth for maintaining it in position during setting or hardening and supporting it during removal from the mouth and when pouring the model. The impression trays consist of a floor and flanges. The difference between the upper and lower tray is that the upper has a palatal portion while the lower has lingual flanges
Requirement of impression tray 1- They should be strong and rigid, and can be sterilizer and polish 2-They should be clean and smooth. 3-They should allow for equal thickness of impression material over the entire fitting surface. 4- The flanges of the tray must reach the functional position of the sulci and frena and yet not displace them. 5-The tray should hold the impression material in correct position in the mouth and consequently must cover the whole areas of the jaw, which are required for the impression .They must prevent distortion of the material during setting and removal from the mouth
Stock tray 1- Stock trays are ready made trays. 2- Supplied in various shapes and sizes. 3- Trays are usually made from nickel silver, tin, stainless steel, aluminum or plastics 4- in edentulous cases: A- Stock trays having round floor. B- Short flange C- The handles staggered (inclined) as to clear the lip and avoid its distortion
5-in dentulous cases: A-stock trays having flat floor B-vertical high flanges C-the handles can be made straight by extending it straight across the floor of the trays 6- in partially edentulous cases: Tray with combined round and flat floor. 7- If it is too large it will distort the tissue around the borders of the impression and will pull the soft tissues under the impression away from the bone 8- If it is small, the border tissue will collapse inward on to the residual ridge (this will reduce the support for the denture and prevent the proper support of the lips by the denture flange.
Special (individual) tray"Custom tray" To produce accurate impression and avoid variation in transmitted pressure there must be an equal thickness of impression material over the entire surface; also the flanges of the tray must reach the functional position of the sulci and frena and yet not displace them. It is unusual for a stock tray to full these requirements, and therefore, special tray should be construction for each patient. Before making a special tray, the best impression possible with a stock tray is made, and model (cast) is made for this impression.
The special tray materials vary according to the type of impression technique selected, the more common being: A-non metallic (plastic) individual tray: 1-shellac base plate 2-compound impression 3-acrylic resin (most commonly used) 4-old dentures. B- Metallic special tray
A- Non metallic (plastic) individual tray 1- Shellac base plate: These materials are normally used when the impression is to be made of plaster of Paris or alginate impression materials. To provide space in the tray for the impression material, the model must be covered with two layers of wax and the tray adapted to this surface. This layer of wax is called shim or spacer. This shim can also be made of shellac. It can also be produced by immersing the model in the water for 10 minutes then dipping it in molten wax .
Three dips are usually enough to produce the shim. The tray should be perforated if alginate impression is used. A special tray with stops may be preferred for mucostatic impression. These stops can be made by perforating the shim. Four stops, two in the lateral incisor areas and two in the molar regions are usually made. These stops should touch the oral mucosa during impression making and should be lightly scraped lateral before pouring the cast. When the shim is used it should be dusted over with talcum powder to prevent the tray material from sticking to it. The shellac base plate material is softened uniformly by passing it to and for over a flam and then adapted to the shim. If necessary, resoft to complete the process. Trim the edges with a sharp knife or scissors and smoothen with a file and sandpaper, leaving a rounded periphery to the tray. If alginate impression material is to be used, the tray should be perforated over its entire surface by drilling holes of approximately one sixteenth of an inch diameter space about one quarter to three eight of an inch apart. A handle of any desired shape can be made of shellac base plate or iron wire.
2- Compound impression Sometimes compound impression are used as special tray after scraping 2-3 mm. from the fitting surface of the impression to provide space for the plaster impression( plaster wash impression) . Perforation are required if alginate is used for making the impression.
3- Acrylic resin Certain impression techniques call for the use of a close fitting tray (when zinc oxide and eugenol past is used, the shim is not required and the tray is directly adapted to the model) in particular zinc oxide eugenol pastes for edentulous cases. This type of tray can be made in either heat curing or autocuring acrylic resin. If undercuts are present on the cast, they should be blocked out with plaster and separating medium is then applied to the cast.
A wax base of the required thickness is made on the cast and the edges are seated down. The wax base is flasked in the same manner as recommended for a complete denture. After separation of the flask, the wax is boiled out, the flask is cooled, the cast is coated with a suitable separating medium and packing is carried out in the usual manner. Deflasking, finishing and polishing is carried out as described for complete denture process. A quicker method of making an acrylic resin tray is by the use of autopolymerizing acrylic resin material. Undercuts are blocked out with plaster or wax. After covering the model with a separating medium, the powder and liquid of the acrylic resin should be mixed together according to the manufacture's instruction. When the material is dough stage in consistency it is rolled flat to an even thickness and spread rapidly over the cast, using the fingers to adapt. Polymerization will take place in a few minutes at room temperature and if required can be accelerated further by placing the cast in warm water. When the heat or cold curing acrylic resin is hard, the periphery is trimmed with a stone or bur and the tray is ready for use in final impression making.
Advantages of the acrylic impression trays 1- easier to make 2-rigid 3-light in weight 4-can be easily cut down, if over sized.
Constructing the auto polymerizing acrylic resin impression tray having a spacer On the cast obtained from the preliminary impression the periphery can be outlined with a disposable indelible marker wax spacer is placed with in the outlined border to provide space in the individual impression tray for the final impression material.
The posterior palatal seal area on the cast is not covered with the wax spacer. Thus the completed final impression tray will contact the upper residual ridge across the posterior palatal seal. Base plate wax approximately 1mm thick is placed on the cast as designated by the previously drawn outline. A self curing acrylic resin tray material mixed and uniformly adapted over the cast so the tray will be 2-3mm thick. A resin handle is attached in the anterior of the tray to facilitate removable of the final impression. The handle is placed in the position of the upper anterior teeth so it will not distort the upper lip when the tray is in the mouth. The acrylic resin tray is removed from the preliminary cast; the labial and buccal flanges of the impression tray are marked and reduced until they are about 2mm shorter than the reflections.
Spacer constructing the lower final impression tray having The cast is outlined for a wax spacer, which will provide space in the individual tray for the final impression material. a wax spacer about 1mm thick is placed over the crest and slopes of the residual ridge. The buccal shelf on each side and the retromylohyoid spaces on the cast are left uncovered.
. Thus the completed final impression tray will contact the mucosa in the region of the buccal shelves to place additional pressure in this primary-stress bearing area when the final impression is made. Extra wax can be placed over the lingual slopes of the cast to provide additional space for the action mylohyoid muscles when the final impression is made self-curing (cold curing or auto polymerizing) acrylic resin tray material is mixed and uniformly distributed over the cast so the final impression tray will be approximately 2-3mm. thick. An anterior resin handle is centered over the labial flange. The flange of the tray should be contoured. The buccal, labial and lingual flanges of tray are reduced until the borders are short of the limiting anatomic structures.
4- Old dentures as a final impression tray The existing denture may be used as a special tray as in case of making zinc oxide eugenol impression for relining of the dentures.
B – Metallic special trays This type can be used for any impression materials, but it is required only when compound is to be used. Although swaging nickel silver between dies and counter die can make metal trays, casting is the method generally used. The material for casting tray is alloy of tin two parts, lead one part, or tin alone. The production of metallic special tray is time consuming and expensive for this reason it is not normally used.
Relief Areas Relief: elimination of the pressure.
1- Hard areas A-owing to the varying thickness of the mucosa membrane on which the denture rests it is frequently necessary to relieve the denture over areas of thin mucosa in order to avoid pain \or rocking of the denture and the commonest position requiring such relief is the midline raphe of the hard palate.
B- All areas to be relieved should be determined by careful palpation and their outlined shown on the model used for constructing the special tray. The depth of relief's dependent on the compressibility of the areas of thick mucosa membrane and should be sufficient to prevent the denture from pressing on the areas of thin mucosal coverage when full masticatory loads are imposed.
C- Relief areas on dentures should always merge in to the surrounding fitting surface and should never have aclearly defined outline. The median palatine raphe and the torus palatinus and torus mandibularis are examples of the hard areas that need relief.
Methods of relief 1- Automatic relief: This type of relief can be obtained by using muco-compressing (mucofunctional) impression technique. 2- Direct relief: a- a plaster impression may be scraped to added of 1mm or less depending on the effect desired, over area corresponding to the hard parts in the mouth. This method is not applicable to hydrocolloids or zinc oxide and eugenol, or rubber base past impression materials.
b- Another method, witch can produce the same effect but more conveniently and accurately, is by attaching one ore more layers of tin foil to the cast. An outline of the area to be covered should be marked by pencil on the cast. Foil of 0.05-inch thickness is then cut into shape and burnished by a blunt instrument into close contact and cemented to the cast before the trial denture is made.
2- Sensitive area Relief of pressure over certain structures is required because they are sensitive to pressure. a- incisive papilla in the anterior part of the hard palate. b- The rugae are usually rough, resistant to friction and insensitive, yet they sometimes become flattened and deformed by pressure of an unrelieved.
c- Over prominent tuberosities or bony nodules in any location especially if they are covered with a thin tightly stretched mucosa membrane. d- Mental foramen in the premolar region of the mandible. e-over the crest of thin lower ridge f- Sharp mylohyoid ridge.
Shape of the relief 1- Upper cast: the relief area will normally be pear-shaped with the broadest part anteriorly; it should not encroach on the crest of the ridge except the incisive papilla. 2- Lower cast: rarely requires relief; but foil may be necessary over the areas that need relief.