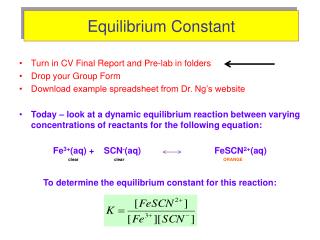
Constant Hall
Constant Hall. A Mediated Classroom Guide. Overview. In Constant Hall classrooms, media and computer equipment is stored in a Media Desk. You will also find this desk configuration in some classrooms in Kaufman, Oceanography, Education, and BAL.

Constant Hall
E N D
Presentation Transcript
Constant Hall A Mediated Classroom Guide
Overview In Constant Hall classrooms, media and computer equipment is stored in a Media Desk. You will also find this desk configuration in some classrooms in Kaufman, Oceanography, Education, and BAL The computer is on one side, the VCR is on the other. The doors can be slid back into the desk after opening.
This is a view of the typical setup in Constant Hall classrooms. The Touch Panel (bottom right) is used to control the media equipment. The HOTLINE telephone provides an immediate connection to the Customer Service Desk. Hot Line Touch Panel
Start Menu • This is the TOUCH PANEL welcome screen. • Only use the tip of your finger to touch the panel, it is made of glass and can be easily broken. (Please, do not use your nails, pencils, pens, paper clips, etc. to activate the touch screen icons.) • Touch Start to begin Just a note: The buttons on the side panels of the touch screen are inoperative.
Main Menu • Touch PC to view/project the desktop computer. • Touch VCR to view/project a video tape. • Touch Laptop/Doc Cam to view/project an external laptop computer or a document camera. • Touch Volume to change Audio Level. • Touch System Tools to access the screen and data projector controls. • Touch EXIT to proceed to the EXIT MENU.
System Tools Menu This is the panel for the projector and screen. • System Tools accesses the controls for the Screen and Data Projector. • Touch DOWN to lower the screen for use, UP to raise it when you are finished. • Touch ON to power on the Data Projector, please allow one minute for the projector to warm up and display. • Note: When the projector is powered off, it will cool down for 2 minutes before it can be restarted. • Touch Back to return to MAIN MENU.
Login Menu Log into the classroom computer as “staff” • “ctrl/alt/delete” and answer usage notice “OK”. • Click “workstation only”. • Type “staff” in “username” field. • Type “staff” in “password” field • Click “OK” or “Enter” on keyboard The “staff” logon provides access to the following: • The computer itself: a. Floppy Drive (a:\) b. Hard Drive (c:\) c. DVD/CD-ROM Drive (e:\) d. Iomega Zip Drive (“Removable” d:\) • The Internet To access your network drive (h:\) • Logon as “staff” • Click “Start”, then “Programs”, then “Novell”, then “Novell Common” • Logon with your LAN network Username and Password Note: The LCD Computer monitors are computer displays. They are not set up as touch panels.
VCR Control Menu • This is the VCR control panel. • Control buttons work the same as those on the front of the VCR, which may also be used if you have problems with the panel controls. • Touch BACK to return to the MAIN MENU.
Close-up of VCR A typical VCR. Front panel controls may be used if you have problems with the touch panel.
Volume Control Menu • Set up your volume for the PC and Laptop before adjusting the system volume control. • Directly controlling the volume on the PC is separate from this control. For more information, see next slide. • Touch UP or DOWN to raise and lower the volume from all sources. • Touch MUTE to silence the sound without changing the volume setting. Touch MUTE again to restore the sound. • Touch “Back” to return to the main menu
PC Volume Control Menu • To control the volume on the PC, locate the “volume” icon (image of a loudspeaker) on the tool bar at the lower right hand corner of the “desktop” and double click it. A dialogue window will pop up to allow for adjustments.
Laptop/Document Camera MenuLaptop Usage Touch this To use this Constant Hall systems are configured to allow the use of a personal laptop or a portable document camera (doc cam). The laptop connection cable should be near the VCR in the Media side of the desk. The cable connects to the monitor output of a PC type laptop. Those using a Macintosh laptop will need to provide their own cable/converters. The other end of the cable should be connected to the computer input jack as pictured above. You may need to activate the laptop’s external port, usually by holding the FUNCTION key and pressing F3 or F7. (Consult your laptop’s users’ manual for specific instructions.) The data projector will support up to 1024x768 resolution. Important Note: You cannot access the Internet through your laptop. You must use the classroom PC for internet or network access.
Laptop/Document Camera MenuDocument Camera Usage Touch this To use this • Constant Hall systems are also configured to allow the use of a document camera. This device will electronically capture an image and send it to the system for projection. You can use transparencies or opaque images such as book pages or photos. • Document cameras are part of Classroom Central’s delivery inventory. You will need to request the device in order to use it. Please visit the Classroom Central website at http://www.odu.edu/classroomcentral to request an available document camera. On the day of your class, the camera will be delivered and set up prior to the start time and will be picked up at the conclusion of the class. • If the camera is not picked up before you leave the classroom, please call the Customer Service Center on the hotline phone.
Checklist for System Shutdown and Exit Disengage source(s) that you used. • Retrieve any media you brought with you (floppies, Zips, or CD’s) and press ctrl/alt/delete and logout. • Switch off the black presenter mouse to preserve the battery life. • If you used the VCR, eject your tape. • If you used the laptop, remove the VGA cable from the back of your laptop, and store it neatly in the cabinet for the next user. • If you used the document camera, disconnect and power down the camera so it is ready for Classroom Central staff to pick up. • Use the touch panel to power off LCD projector. • Raise the screen. • Exit the touch panel. Exit is located on the MAIN MENU of the touch panel. • Touch System off, and the Welcome Screen will display on the touch panel. • Lock the media desk. • Turn off all room lights before leaving, start with the switches nearest the desk. • Lock and close the classroom door. Don’t forget any tapes or disks!
EXIT menu • Use this to EXIT the system when you are done. Please raise the screen before exiting the system, and turn off any wireless devices. • Remember: The projector will take 2 minutes to cool before it can be turned back on.
In Summary All equipment is located in the media desk and is selected and controlled from the touch control panel. Start Up • Start the control panel • Use the System Tools to power on the projector and lower the screen. The projector takes 30 seconds to warm up. • Use the Main Menu to select the source you plan to use. (PC, VCR, Laptop, or Doc Cam.) • Shut down/Exit system • Logout of the computer. • Use the System Tools to raise the screen and power off the projector. • Use the Main Menu to exit. • Use System Off to end. • Clean off the whiteboard for the next user.
Customer Service, how may I help you? If you have any problems please pick up the HOTLINE phone and you will be immediately connected to Customer Service! You may also call 683-3192. You can also reach Classroom Central via email at classroomcentral@odu.edu. Classroom Central Office of Computing and Communications Services http://www.odu.edu/classroomcentral