Understanding Silver Coverage: Key Alignments and Responsibilities in Defensive Schemes
This guide provides an in-depth analysis of the Silver coverage scheme in defensive football, particularly focusing on the positioning, alignment, and reading responsibilities from different player roles. It discusses key concepts such as Red, Copper, Island, and various player alerts to effectively counter opposing formations like trips and tight end alignments. The text outlines important strategies for dealing with removed players, tight ends, and adjusting to offensive patterns while ensuring the defense maintains optimal coverage integrity.

Understanding Silver Coverage: Key Alignments and Responsibilities in Defensive Schemes
E N D
Presentation Transcript
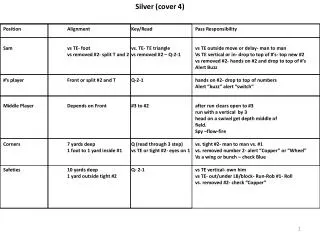
Silver (cover 4) Position Alignment Key/Read Pass Responsibility Sam vs TE- foot vs. TE- TE triangle vs TE outside move or delay- man to man vs removed #2- split T and 2 vs removed #2 – Q-2-1 Vs TE vertical or in- drop to top of #’s- top new #2 vs removed #2- hands on #2 and drop to top of #’s Alert Buzz #’s player Front or split #2 and T Q-2-1 hands on #2- drop to top of numbers Alert “buzz” alert “switch” Middle Player Depends on Front #3 to #2 after run clears open to #3 run with a vertical by 3 head on a swivel get depth middle of field. Spy –flow-fire Corners 7 yards deep Q (read through 3 step) vs. tight #2- man to man vs. #1 1 foot to 1 yard inside #1 vs TE or tight #2- eyes on 1 vs. removed number 2- alert “Copper” or “Wheel” Vs a wing or bunch – check Blue Safeties 10 yards deep Q- 2-1 vs TE vertical- own him 1 yard outside tight #2 vs TE- out/under LB/block- Run-Rob #1- Roll vs. removed #2- check “Copper”
Copper (read 2) (check vs removed #2) We can just run Copper as a scheme regardless of how wide #2 is aligned Position Alignment Key/Read Pass Responsibility #’s player vs. removed split #2 and T Q-2-1 top of numbers vs. Tight #2- foot vs. trips- “danger” #3- gfvs trips- danger- man “danger”- man to man on 3 banjo or zone- split #2 and T “banjo”- combo #3 with Safety #3- out- own, #3 in/vertical- top #’s Middle Player Depends on Front guard- 3-2 high middle- spy flow fire and formation vs 2 x 2 alert for Back up the middle Corners 7 yards deep outside foot Q-2-1 read 2 of #1 # 2 blocks/vertical/in – man to man on 1 # 2 out- man to man on #2 and funnel 1 to safety Island- green cover Pre-snap- Alert “island” “blue” Post-snap- alert- Squat Safeties 10 yard inside foot of wide #2 Q-2-1 read 2 always ask I’m I wide #2 vertical or deep in- Own #2 enough to cover a vertical #2 under LB- “Cross” Rob #1 #1. #2 blocks- rob #1- #2 out- adopt #1 Vs trips away- split #1 BS and #3 trips side backside Safety- Banjo call – read #3 #3 blocks/out/under LB- Free away from banjo- over center, away from danger split #1 and #2/3 # 3 vertical or deep in- own 3
Coverage: Silver Cover 4 with Robber concepts Used with 4 man fronts (Miami, over, under and 3 man fronts with weak side and inside pressure. Notes: Whenever possible we want the Sam attached to the front and not removed due to coverage responsibilities. Silver vs. tight #2 Copper vs. removed #2 Blue vs TE/Wing or Bunch vs 2 x1 or 3 x1 with bs 1 tight- over vs 3 x 1- bs 1 open- copper and banjo vs 3 x 1 and the bs 1 is a TE- over/danger vs empty copper and danger Calls “Silver”- vs tight #2 “Copper-” read 2 scheme vs removed #2 “Blue”- true cover 2 to blue side “Danger”- man to man vs #3 “Banjo”- combo # 3 between S and bs $ “Over” “white” – vs any closed set- ¼, ¼, ½ “Switch”- Call from S to W vs any open set where the #2 is tight but not in I. “Island”- Corner has #1 by himself “green” “China” or “zone it” – zone ¼’s vs wheel threat “#’s player” alert for “Buzz” call We can always go Green to the boundary “Silver” “Over” “White” “Copper” Or “zone it” “Silver” “Copper” “Silver” Note: We can check “over Red” 3 deep $ in b gap Good vs. inside run Backside C outside S S E E E E E E E E E N N N N N N N N N E E E E E E E E E H H H H H H H H H S S S S S S C S M M $ C M M M W W W W $ C S M M M Flat W W W W W M C C C C C C C C C C C C C $ $ C C $ $ $ $ $ $ $ $ $ $ $ $ $ $ ½ “Blue” “Silver” “Copper” “Copper” “Copper” “Copper” Flat ½ “Silver” “Banjo” “Silver” “Copper” “Green” “Over” “Danger” “Copper” Flat ½
“Silver” “Switch” “Blue” “Blue” “Blue” “Blue” Flat Flat Flat Flat ½ ½ ½ ½ “Blue” “Blue” “Blue” “Blue” “Copper” “Copper” “Danger” Flat Flat Flat Flat ½ ½ ½ ½ S S S $ S S S S S S E E E E E E E E E E E N N N N N N N N N N N E E E E E E E E E N E E E H H H H H H H H H H H E S “Copper” Note: We can check “over Red” 3 deep $ in b gap Good vs. inside run Backside C outside S “Danger” “Copper” “Switch” C “Silver” “Copper” $ C C C C C S C C C C C C “Over” White C C H W C C S M M M M M M M M M M M C C C C W W W W W W W W W W W Note: Ram shade checks to Ram Slant M C C $ $ $ $ $ $ $ $ $ $ $ $ C $ $ $ $ $ $ $ $ $ $ C Flat ½ “Blue” Or Copper- C/$ read #3 S- m/m point “Switch” “Island” “Silver” “Over” White “Blue” Or Copper- C/$ read #3 $- m/m point Flat Flat ½ ½ ½ Variations “bump” linebackers bump instead of Safeties over” Maggie- play #3 in trips man to man with S- leaves bs c/s- to play lock-on vs #1 “Zone it”- backend plays a true ¼’s zone Danger- play #3 in trips man to man with- leaves bs safety free or to spy or to double
Silver coverage vs. 3 x1 options- (Banjo vs. Te trips, Danger vs trips) “Banjo”, “Danger”, “Zone it”, “Load”, “Over”, “Fire”, “Monster” Danger- Free/maggie/spy “Island” “Banjo” “Danger” “Zone it” “Copper” #3 runs a 10 yard out- “buzz” “Over” “Load it” “Fire” E E E E E E E N N N N N N N E E E E E E E H H H H H H H S $ S S S $ $ W W W W W W W S S S $ C M M M M M M M C C C C C C C C C C C C C $ $ $ $ $ $ $ $ $ $ “Monster” Island “Danger”- maggie Red Spy- $ man to man on designated receiver
Coverage: Auto Ram fronts, 40 fronts (Miami, over, under) I would avoid running this coverage double tight Vs 2 back 2 tight- check 44 red ( 3 weak) Vs1 back check silver – switch call backside Vs 2 backs- 3 deep zone with $$ rocking down to rec. strength Vs 1 back- check Silver/Copper- calls apply #- drop to top of the numbers, h- drop to inside edge of hash, m- drop to middle goal post, ld- “lone dove” you own back out or crosser E E E N N N E E E H H H # $ $ W S S S M W M M $ ld W C C C # h C m ld # # h m h h C C $ $ $
# # # # m h h h ld h m ld # # h h E E E E E N N N N N E E E E E H H H H H S S $ $ $ $ S S S M M M M M $ W W C C C W W W C C C C C C C $ $ $ $ $ h # m ld Variations “bump” linebackers bump instead of Safeties over” Meg- play #3 in trips man to man with S- leaves bs c/s- to play lock-on vs #1 “Z”- backend plays a true ¼’s zone Danger- play #3 in trips man to man with- leaves bs safety free or to spy or to double