Posterior Palatal Seal
Posterior Palatal Seal.
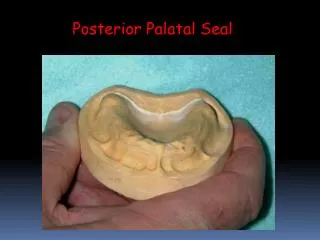

Posterior Palatal Seal
E N D
Presentation Transcript
The posterior palatal seal is placed in the maxillary complete denture because the acrylic will distort slightly and pull away from the posterior palatal area of the maxillary cast. The acrylic will shrink toward the areas of greatest bulk, which are the areas over the ridge where the teeth are placed. The posterior palatal seal provides a vacuum seal between the denture and the soft palate that holds the maxillary complete denture securely in place.
The amount of area in which the palatal seal can be placed varies with the shape of the posterior palate. In House’s classification of the posterior palate, a class 1 palate will allow 5-10 mm of surface area to place the seal, a class II posterior palate will allow 3-5 mm and a Class III posterior palate will allow only 1-3 mm.
House’s Classifications House classified the soft palate according to how it drapes. Class I Vibrating line Vibrating line 5-10 mm 3-5mm 1-3 mm Vibrating line Class II Class III Class I – easiest to tolerate, broadest range, hardest to locate. Class II – most common Class III – easiest to locate, hardest to tolerate.
Posterior Palatal Seal Posterior Nasal Spine Velum Glandular tissue
Orally, the area of the vibrating line is recorded by making marks with an indelible transfer stick in the fovea palatina area and the hamular notch areas on both sides of the palate and then connecting them with a solid line.
In the lab exercise, mark points on the maxillary cast in the fovea palatina area and the hamular notch areas.
Connect these points with a solid line which will appear as a gentle curve toward the anterior. This line will extend into the buccal vestibular areas of the hamular notch.
Place points in the glandular area 5-8 mm forward of this first line and about two mm anterior to this line in the mid palatal area.
Draw a second line anterior to the first line that connects these dots and forms a butterfly pattern. It looks like two mountains with a valley in between.
Make a depth cut on the posterior line with a cleoid/disoid or the point of a green-handled knife. It should be .5 mm deep in the middle of the posterior palate, 1 mm deep in the hamular notch area, and 1.5 mm deep in the glandular area between the hamular notch and the middle of the posterior palate.
Use the back of the green-handled knife to form the palatal seal. It should feather out to zero at the anterior line. It should not extend onto the maxillary tuberosities or onto a torus.
It should feather out to zero at the anterior line. It should not extend onto the tuberosities or onto a torus as these areas are not depressable and would prevent the denture from seating entirely.