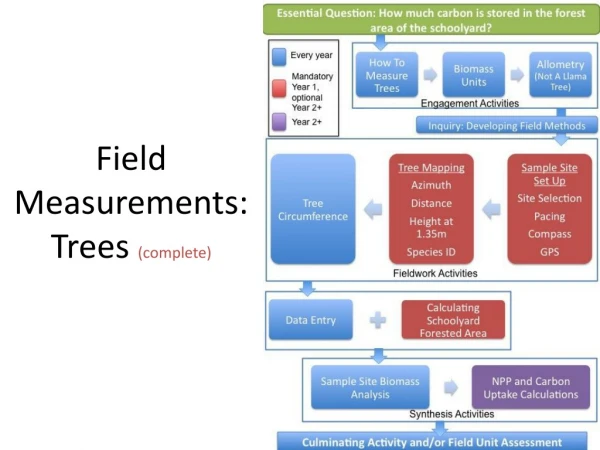
4 Steps to Complete Field Training
4 Steps to Conducting a Complete MarcoPolo Field Training A Field Trainer’s Guide to Processing Training Registrations, Materials, Rosters, Surveys and Follow-up Forms. 4 Steps to Complete Field Training. Register & Purchase or Download Materials Roster Survey Follow-up Report.

4 Steps to Complete Field Training
E N D
Presentation Transcript
4 Steps to Conducting a Complete MarcoPolo Field TrainingA Field Trainer’s Guide to Processing Training Registrations, Materials, Rosters, Surveys and Follow-up Forms
4 Steps to Complete Field Training • Register & Purchase or Download Materials • Roster • Survey • Follow-up Report
Step 1 - Register Your Session To register a training from the MarcoPolo homepage (http://www.marcopolo-education.org), click on the Trainer Resource Center link in the red Professional Development area.
Step 1 - Register Your Session To access the resources in the Trainer Resource Center, you will first need to sign in using your MarcoPolo or Rusticello Login ID (usually your e-mail address) and Password. These should have been e-mailed to you after attending your initial MarcoPolo training session.
Step 1 - Register Your Session Once at the Trainer Resource Center (www.marcopolo-education.org/pd/ftrc.aspx) click the link in the Field Trainers box at the bottom of the page that reads “Register Your Training” to begin the registration process.
Step 1 - Register Your Session When this page opens, select your state and then enter either your first or last name.
Step 1 - Register Your Session Click on the down arrow next to the drop-down menu and select your name and from the list. Then click on the “GO” button to continue to the next page. If your name is not listed, we suggest using the back button on your browser to go to the previous page and enter in only a portion of your name. If your name still is not listed, click on “Other.” You will then be prompted to complete the missing information on the next page.
Step 1 - Register Your Session To add a field training session, fill out all required fields, including selecting the school or district to be trained, and click the “Submit” at the bottom of the screen. Be sure to click here to select the school or district to be trained.
Step 1 - Purchase or Download Materials After successfully adding a training session, you can purchase or download training materials through this page. Use this link to access the training materials page.
Step 1 - Purchase or Download Materials Please be sure to purchase or download the proper materials for your session type. We have provided suggested materials for each session type below: • Awareness Session– 1 Elementary and/or 1 Secondary Teacher’s Guide for use as a sample • Training of End Users/Teachers Session – 1 Elementary and/or 1 Secondary Teacher’s Guide per attendee (middle school educators may benefit from having both Guides) • Training of Trainers Session – 1 Training Kit, 1 CD-ROM, and 1 Elementary and/or 1 Secondary Teacher’s Guide per attendee
Step 1 - Purchase or Download Materials If you clicked on the “order materials” link from the previous page, you will be taken to the MarcoPolo Materials page where you can place an order online. You can also download the materials free from the links provided.
Step 2 - Roster On the day of your training, have all attendees fill out the roster. Beginning at the MarcoPolo Homepage (http://www.marcopolo-education.org), have attendees click on the red tab entitled “Professional Development.” Once the page refreshes, they should select the link for “Training Logistics Forms”in the left navigation bar. Then, in the Attendees section, have them select the “Sign in on the Roster” link to begin the roster process.
Step 2 – Roster A new browser window will appear listing the trainings for the current date. Have attendees locate your training in the list and click on the underlined date and time next to your name and location. Note: To access previous days/weeks, use the “Previous Day” and “Next Day” buttons or use the drop down lists and click “Go.” All columns can be sorted by clicking the column header.
Step 2 - Roster Once the attendee has selected a training, they must log in to MarcoPolo. If they have already logged in, they will be taken directly to the form on the following slide. If an attendee has never registered for MarcoPolo before, they can click on the “Register for free” link on this page and complete all of the Fields. Attendees should be sure to select their Organization when registering as it is a necessary Field for Rostering into a Training Session.
Step 2 - Roster Once logged in, the attendee will be asked to verify the selected training and their personal information. If they have not yet chosen an organization, they will also be asked to do this at this time – see the following slide for more information. If the attendee wishes to edit any of their information, they can do so on this page. Use these links to edit personal information
Step 2 - Roster If the attendee has not already selected an Organization, they should click on the “Select Organization“ link. They will then be asked to locate their organization by performing a search by ZIP code. If they do not know their organization’s ZIP code, they can click on the “Don’t know your ZIP code?” link to search by city and state. Click here if you don’t know your ZIP code.
Step 2 - Roster Once you have completed all of the necessary fields, click on the Confirm button at the bottom of the page and you are done!
Step 3 - Survey At the end of your training session, attendees should complete the Survey. Beginning at the MarcoPolo Homepage (http://www.marcopolo-education.org), have attendees click on the red tab entitled “Professional Development.” Once the page refreshes, they should select the link for “Training Logistics Forms”in the left navigation bar. Then, in the “Attendees” section, they should select the “Take the Training Survey” link to begin the survey process.
Step 3 - Survey A new browser window will appear listing the trainings for the current date. Have attendees locate your training in the list and click on the underlined date and time next to your name and location. Note: To access previous days/weeks, scroll to the bottom of the training list and click on "Show Weekly Calendar." One can then use the black arrows at the top of the list to access previous or future weeks' trainings. Trainer names removed for privacy. Click on date to select training
Step 3 - Survey Have attendees complete the survey.
Step 3 - Survey Once you have answered all of the questions, click the “Submit” button at the bottom of the page and the following page appears. Click “Done” to close this window.
Step 4 - Follow-Up Report All Field Trainers are asked to complete a Follow-up Form at the completion of any session they conduct. To complete this form, return to the Trainer Resource Center (www.marcopolo-education.org/pd/ftrc.aspx) and click on the link in the Field Trainers box that reads “Report on Your Training.”
Step 4 - Follow-Up Report Search for yourself by entering your state and part of your name.
Step 4 - Follow-Up Report Select your name from the drop down list. If your name is not listed, we suggest using the back button on your browser to go to the previous page and enter in only a portion of your first or last name. If your name still is not listed, please contact mpfieldtraining@lists.mci.com.
Step 4 - Follow-Up Report Once you have selected your name and clicked Go, the page will refresh to list your training sessions that have taken place within the last three days. If you need to complete a Follow-Up form for a date more than three days in the past, click on the “Other” link at the bottom of the page. Click on This link to access trainings more than three days in the past.
Step 4 - Follow-Up Report Complete the Follow-up form by providing the necessary information about your training.
You have now completed the 4 Steps to Conducting a Complete MarcoPolo Field Training Thank you for your support!